WordPress.com provides you with a great experience out-of-the-box, from superb SEO to social media sharing, custom web fonts, and so much more.
At WordPress.com, we also cover very advanced needs, such as connecting GitHub to sites on a Business or eCommerce plan. This allows you to automate deployment using GitHub Actions, which can become a huge productivity boost for developers. You’ll be happy to know that GitHub and WordPress.com work beautifully together.
Prerequisite: Start your WordPress.com site now
Tutorial Overview, GitHub Deployment Automation
This is a tutorial that explains how to achieve deep customization of your WordPress.com site using SFTP access, including how to deploy custom themes and plugins. Moreover, we’ll explain how you can automate the deployment of those changes by simply connecting your GitHub repository to WordPress.com. Whenever you push changes to a specific branch of your GitHub repository, those changes will automatically be deployed to your site at WordPress.com as well.
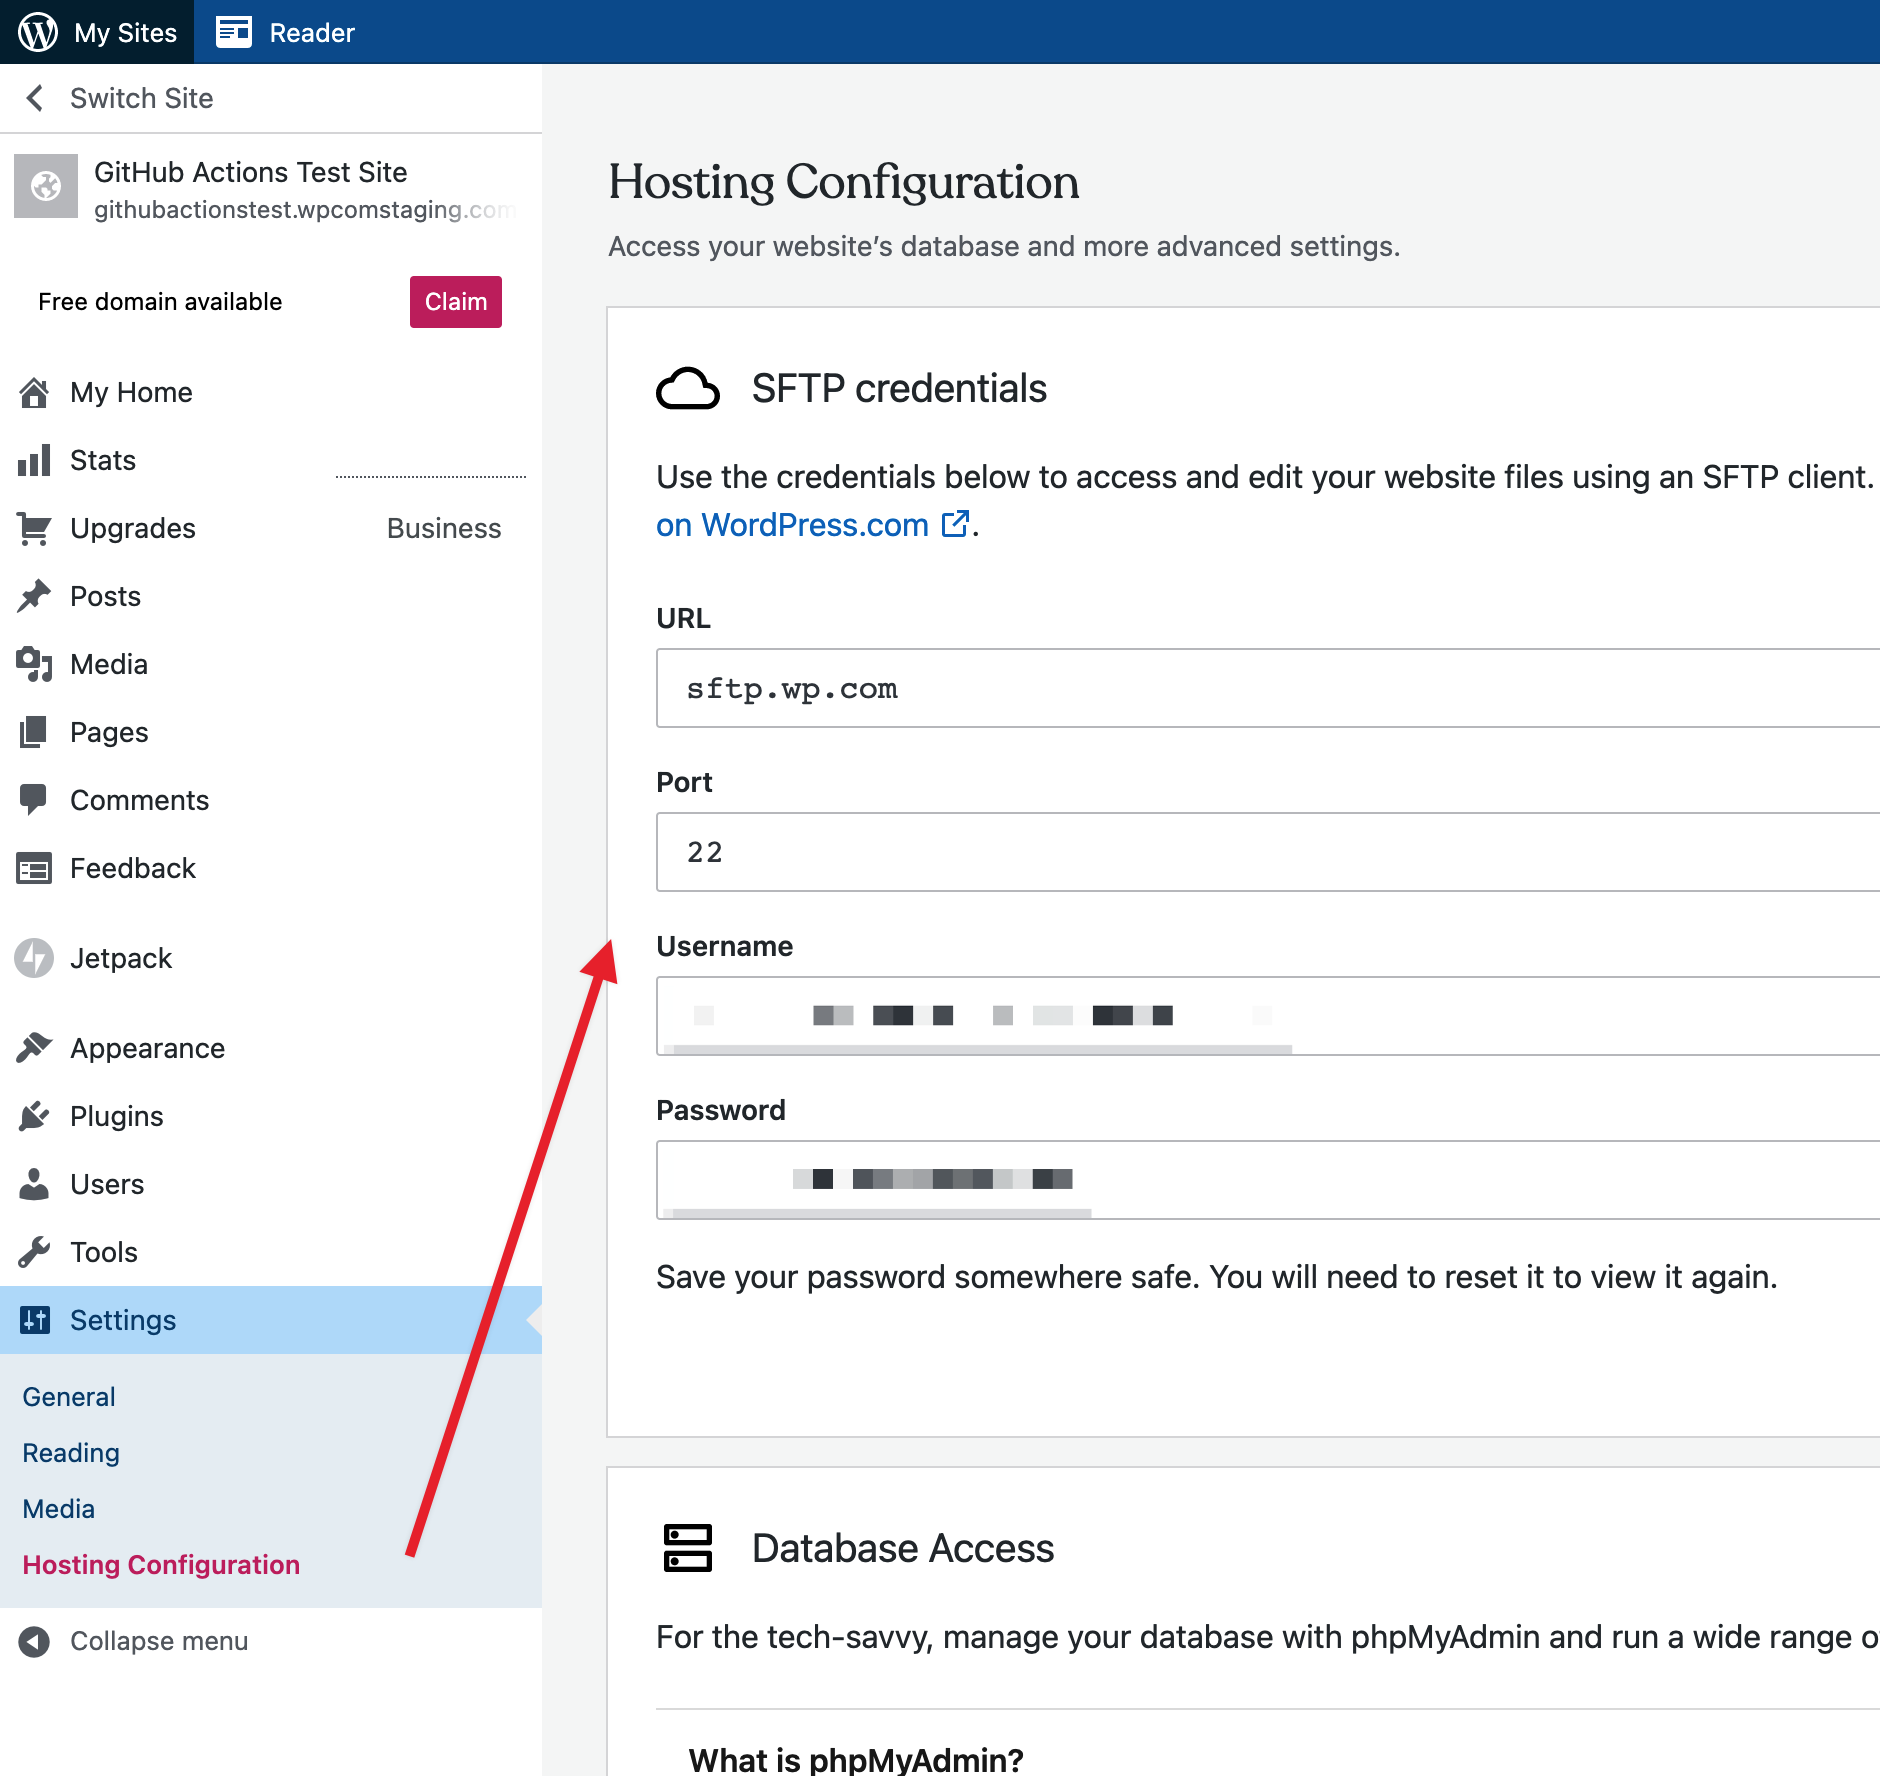
Create SFTP Credentials at WordPress.com
At WordPress.com, create SFTP Credentials for your site. SFTP access is available to administrators on the WordPress.com Business plan.
Log In Over SFTP, Manually Review Directory Structure
In the screenshot below, which was taken from Filezilla (a popular SFTP client), you can see the primary extensibility features in WordPress, i.e., themes and plugins. Themes are in /wp-content/themes; plugins are in /wp-content/plugins.
If you recreate this structure in a Git repository starting from the /wp-content directory, then whenever you push changes to the GitHub repository, they will be deployed automatically to your site at WordPress.com.
Some core directories and files have a question mark (?) icon next to them. This denotes they are part of your site’s core installation. We do not allow modifying core files as they are required for your site to function properly.

Create GitHub Repository
I’ve created an example GitHub repository named: wp-github-actions-test-site. Inside this repository, I’ve added a custom theme and a custom plugin that I’ll deploy automatically as part of this tutorial. I have already pushed these changes to the main branch of my example repository. Using my example (screenshot below), please create a GitHub repository for your site at WordPress.com.

Create New Branch: wordpress.com
Create a new branch with the name wordpress.com, such that you have two branches: main and wordpress.com. Whenever you push changes to the wordpress.com branch, you want those changes to be deployed automatically to WordPress.com. You can create the new branch using GitHub’s interface, as seen below, or from the command line. The choice is yours.

Create GitHub Action
On the main branch, create a workflow by copying and pasting the code snippet (provided below). Please copy & paste the snippet with no modifications into .github/workflows/wordpress.com.yml
Note: It is easiest to use GitHub’s interface for this, as shown here.


WordPress.com Workflow Code Snippet
Copy & paste into .github/workflows/wordpress.com.yml
name: Deploy to WordPress.com
on:
  push:
    branches: [ wordpress.com ]
jobs:
  FTP-Deploy-Action:
    name: FTP-Deploy-Action
    runs-on: ubuntu-latest
    steps:
      - uses: actions/checkout@master
        with:
          fetch-depth: 2
      - name: FTP-Deploy-Action
        uses: Automattic/FTP-Deploy-Action@3.1.2
        with:
          ftp-server: sftp://sftp.wp.com/htdocs/
          ftp-username: ${{ secrets.FTP_USER }}
          ftp-password: ${{ secrets.FTP_PASSWORD }}
          known-hosts: "
            sftp.wp.com ssh-rsa AAAAB3NzaC1yc2EAAAADAQAB
            AAABAQDwfT/YEhOKO2Z0+XrjRqUS5Q2Ali6AlhOhZtzlIfMOvm03Sype
            DJH70tlUHasS+nm0SnZ01fOiEeAXa91ZhMihIYUT3nTGuiA2J3uVYsyS
            CJefvhWc0kg1FbEus3V3cVmx4e3XctdkzLbOgPNngypZocbP+8yCpbx6
            Kb9lihmgTjgGn2QzbK1enRSzsN/CbjVhej9jwukbrWqdCrQsKAsoZ2p6
            YCtcKbHS+Yy4RwcO9PxZUBkeMXUrejms027bRcdVfwf55hWSD9xYEHpE
            HupkSL4ofWs3UKeRGz+jCCzl7Nu0S6VSwK4Zzll0auHI0Hwh8WKTJbSn
            1gxCdF93/rmP
          "
Create GitHub Secrets
The workflow code snippet references two secrets:
- ${{ secrets.FTP_USER }}
- ${{ secrets.FTP_PASSWORD }}
Create these two secrets in your GitHub repository using the SFTP credentials that you obtained at WordPress.com in an earlier part of this tutorial. Please define both the FTP_USER and FTP_PASSWORD secrets.


Push Changes, Test Deployment Automation
Now that you have everything configured properly, update your local copy of the GitHub repository using Git from the command line. Start by fetching all updates, then pull changes into the main branch, merge them into the wordpress.com branch, and finally push those changes to the wordpress.com branch. In doing so, you will test the GitHub Action workflow to make sure things are working properly.
$ git fetch --all
$ git checkout main && git pull
$ git checkout wordpress.com && git merge main
$ git push --set-upstream origin wordpress.com
At this point, you can visit the Actions tab at GitHub to review and observe status. Since you pushed to the wordpress.com branch, the workflow you created should already be running. When it’s finished, the status icon will turn green with a checkmark indicating your changes were deployed successfully to WordPress.com.

In this case, the workflow is deploying your last change, which was to “Create the wordpress.com.yml” file itself — from a previous step in this tutorial.
In the future, when you merge and then push any changes, such as theme or plugin updates, from the main branch into the wordpress.com branch, they’ll be deployed to WordPress.com automatically. Yay! 🎉
The Business Plan at WordPress.com
At WordPress.com, you’ll be well-equipped without installing custom themes or plugins. However, if you want to take your site to the next level, our Business plan supports several additional features. This plan includes staging sites, increased storage, custom themes, custom plugins, performance and monitoring tools, and SSH access, making the GitHub integration described in this tutorial possible.


