
If you’re running WordPress for your own site or client projects, a managed WordPress hosting solution can save you time and stress. Managed hosting takes care of server maintenance, security updates, and technical issues for you. If your site is on a non-managed or slow host, now may be the right time to switch. Pressable is a solid option.
In this guide, I’ll explain why Pressable is a solid choice for hosting your WordPress site. I’ll also walk you through a step-by-step migration process based on my own experience. Even if you’ve never migrated a website before, the process is easy!
In this article
- Why Choose Pressable for Your WordPress Site?
- Choosing the Right Pressable Plan
- How to Move Your Site to Pressable
- Step 1: Update Your Live Site
- Step 2: Backup Your WordPress Site
- Step 3: Start Your WordPress Site Migration in Pressable
- Step 4: Continue the Migration Process
- Step 5: Install, Set Up & Run the Pressable Automated Migration Plugin
- Step 6: Check the list of Files Not Migrated
- Step 7: Delete Old Hosting “Stuff”
- Step 8: Reset your SFTP Migration User Password
- Move Custom Redirects, Web Rules & HTTP Headers
- Check Your Migrated Site
- Point Your Domain to Pressable
- Clear Cache, Chill & Watch Your Site Go Live
- Bonus: Setup & Optimize or Disable Jetpack
- Conclusion: Is Pressable Right for Your WordPress Site?
Why Choose Pressable for Your WordPress Site?
Pressable is a managed WordPress hosting solution, which means they specialize exclusively in WordPress sites. You can only run self-hosted WordPress sites on Pressable.
Keep in mind that it’s possible to run your own server for equal or better performance at a lower cost. However, this requires technical knowledge and ongoing maintenance. Pressable provides hosting for users who want reliable performance and dedicated support without the hassle of managing a server themselves.
According to Pressable, they offer a range of features including:
- Fully Managed WordPress Hosting: Automatic updates, daily backups, and robust security keep your site safe and running smoothly.
- High Performance: A global content delivery network with 28+ datacenters ensures fast page loads. Advanced auto-scaling and optimized infrastructure keep your site responsive even during traffic spikes.
- High Availability & Uptime: Geo-redundant architecture replicates your site to a second data center in real time, supporting Pressable’s 100% uptime guarantee.
- Security & Peace of Mind: Free Jetpack Security, malware scanning, DDOS protection, two-factor authentication and real-time activity logs protect your site from threats.
- Simple Website Management: Intuitive dashboard, staging environments, plugin update automation and real-time backups make managing one or multiple sites easy.
- Developer-Friendly Tools: SSH access, WP-CLI, REST API automation and Git-based version control give developers full flexibility.
- Free WordPress Migrations: Move your sites yourself with their migration plugin or let Pressable’s expert team handle it for you.
- Unlimited Bandwidth: One of Pressable’s standout features is that every plan includes unlimited bandwidth. Unlike many managed WordPress hosts, Pressable does not charge overages or limit bandwidth. This makes it an ideal choice if your current host restricts traffic or penalizes high usage.
Sounds like a dream, right? Fast, secure and reliable hosting at a reasonable price. Now, let’s jump into the process of actually moving your site.
Who Is Pressable For?
I believe Pressable is best for small to medium-sized websites, including business sites and blogs. Its managed infrastructure takes care of updates, backups, security and performance optimization, allowing site owners and developers to focus on content, design and growth instead of server maintenance. This makes it especially appealing for non-technical bloggers, as well as agencies and freelancers managing multiple client sites.
That said, Pressable isn’t the right fit for every WordPress project. It only hosts WordPress sites and does not include email hosting, custom server configurations, or dedicated servers, which larger or resource-intensive sites may need. Plans have visitor and storage limits, so you may need to upgrade as your site grows. Pressable also does not support low-level server customizations such as ionCube, custom firewall rules, or editing NGINX configs.
Personally, we don’t use Pressable because our grandfathered dedicated server on another host provides the flexibility and resources we need at a very affordable price, although Pressable is an excellent solution for most WordPress sites.
Choosing the Right Pressable Plan
If you haven’t signed up for Pressable and are considering moving your site(s), there are several plans available, so be sure to pick the one that fits your needs. The main factors to consider are:
- # of WordPress installs
- Monthly visits
- Storage space
Pressable’s plans start with Signature 1 for a single site and up to 30,000 visitors and go up to Signature 8 for 100 sites and 2 million visitors! All Signature plans include the same features, you choose based on the 3 factors listed above (number of installs, monthly visitors and requires storage space).
For “mission-critical sites” that need extra resources, Pressable also offers Premium Site Plans. These are pricier but include higher CPU allocations, vertical scaling and custom storage options for sites with millions of visitors. From what I understand you sign up for the premium site plans on a per-site basis, but don’t quote me on that (their site isn’t clear on this).
If you’re unsure which plan to choose, their support team can help guide you. You can also start with a smaller plan and scale up later if needed.
Pressable Offers Free Site Migration: If you don’t want to move your site yourself, there’s no need to read further. Simply sign up for Pressable and contact their support team. They will manage the migration with their Seamless White Glove Migrations service, free of charge.
How to Move Your Site to Pressable
Moving your WordPress site to Pressable is easier than you might think. If you’d rather not handle the migration yourself, just sign up and their support team will take care of everything.
For those who want to do it themselves, I’ll walk you through each step, so you can move your site confidently and safely.
Step 1: Update Your Live Site
Before doing anything, make sure your live site is fully updated.
This includes WordPress, your theme and any plugins. We’ll be making a backup next. It doesn’t make sense to back up and migrate an outdated site. Plus, outdated themes or plugins could potentially cause conflicts with the PHP version on Pressable and may lead to a broken site after migration.
Make sure you’ve updated:
- WordPress
- Themes
- Plugins
Step 2: Backup Your WordPress Site
Backing up your WordPress site is the most important first step before any migration. Even though the process is usually smooth, having a complete backup gives you peace of mind in case anything goes wrong. I recommend creating a full backup of all your site files and your database and storing it either on your computer or securely in the cloud, like Dropbox.
To backup your site you will use one of the following solutions:
- Built-in Hosting Solution: Most hosts allow you to create a full site backup and download it as a ZIP file. This is usually the simplest and most reliable option. Since I was moving from WPEngine this is the solution I used.
- WordPress Backup Plugin: If your current host doesn’t offer backups, you can use a WordPress backup plugin. Be sure to choose one that allows you to download the backup locally.
Once you create your backup, download it and store it safely on your computer or a private cloud. This way, you can restore your site whenever needed.
Having a complete backup gives you peace of mind, as you can always restore your website if something goes wrong.
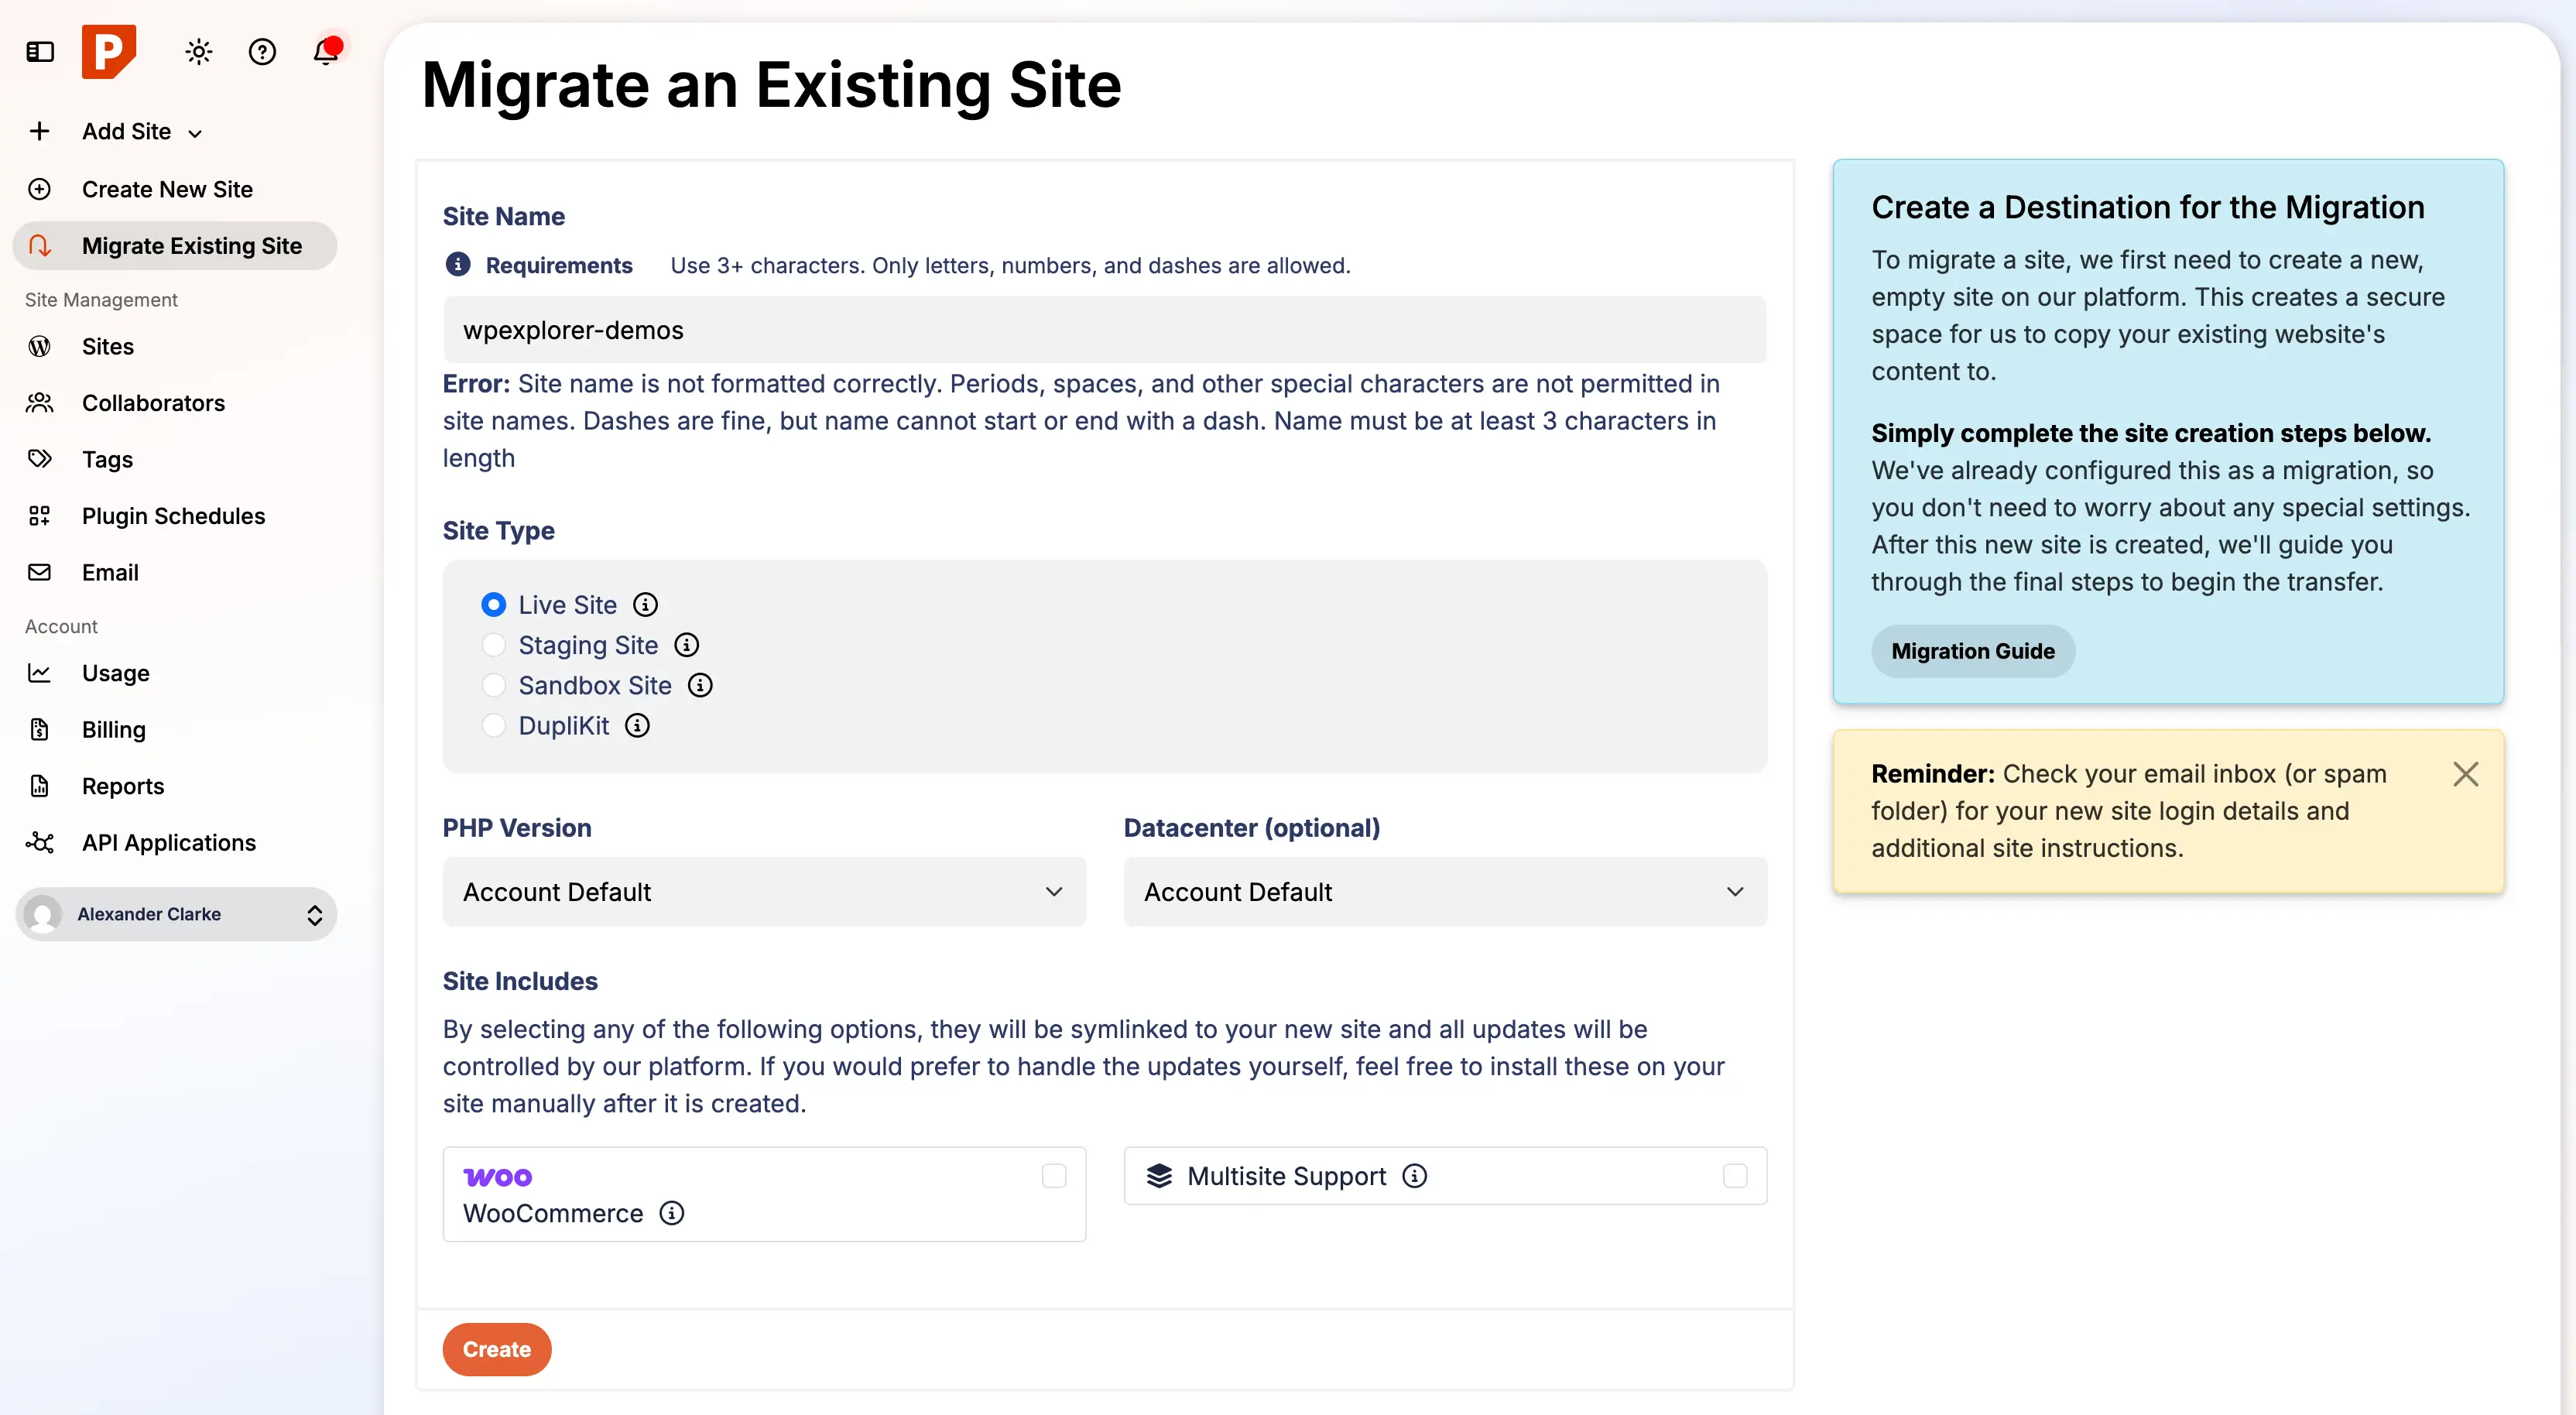
Step 3: Start Your WordPress Site Migration in Pressable
Once you’ve backed up your site, log in to your Pressable account. On the main dashboard, you’ll see a “Migrate Automatic” button which you can click it to start the migration process.

After clicking the button, you’ll go to a page to set up the site you want to migrate. The page will prompt you to configure a few options:
- Site Name: Enter the name of the site you are migrating (this is more like an ID so spaces aren’t allowed)
- Site Type: Choose from Live, Staging, Sandbox, or Duplikit.
- PHP Version: Select the PHP version for your site. (Recommended: “Account Default”)
- Data Center: Pick the data center location closest to your audience for optimal speed. (Recommended: “Account Default”)
- Site Includes: This section displays two checkboxes: WooCommerce and Multisite.
- WooCommerce Note: If your site already has WooCommerce, you do not need to check this box. These settings are intended for new sites and selecting it will simply install the plugin unnecessarily.
- Multisite Warning: The dashboard doesn’t make this obvious. You only need to enable the Multisite checkbox if you are creating a domain-based multisite network. I confirmed this using their AI chat support.
Here’s a screenshot showing the settings I used to migrate one of my sites to Pressable:
Step 4: Continue the Migration Process
After you complete the form, Pressable takes you to your dashboard, which now displays your newly created site along with a notice saying, “Migration Instructions Ready – Click here to start.” Click the link to begin the site migration.
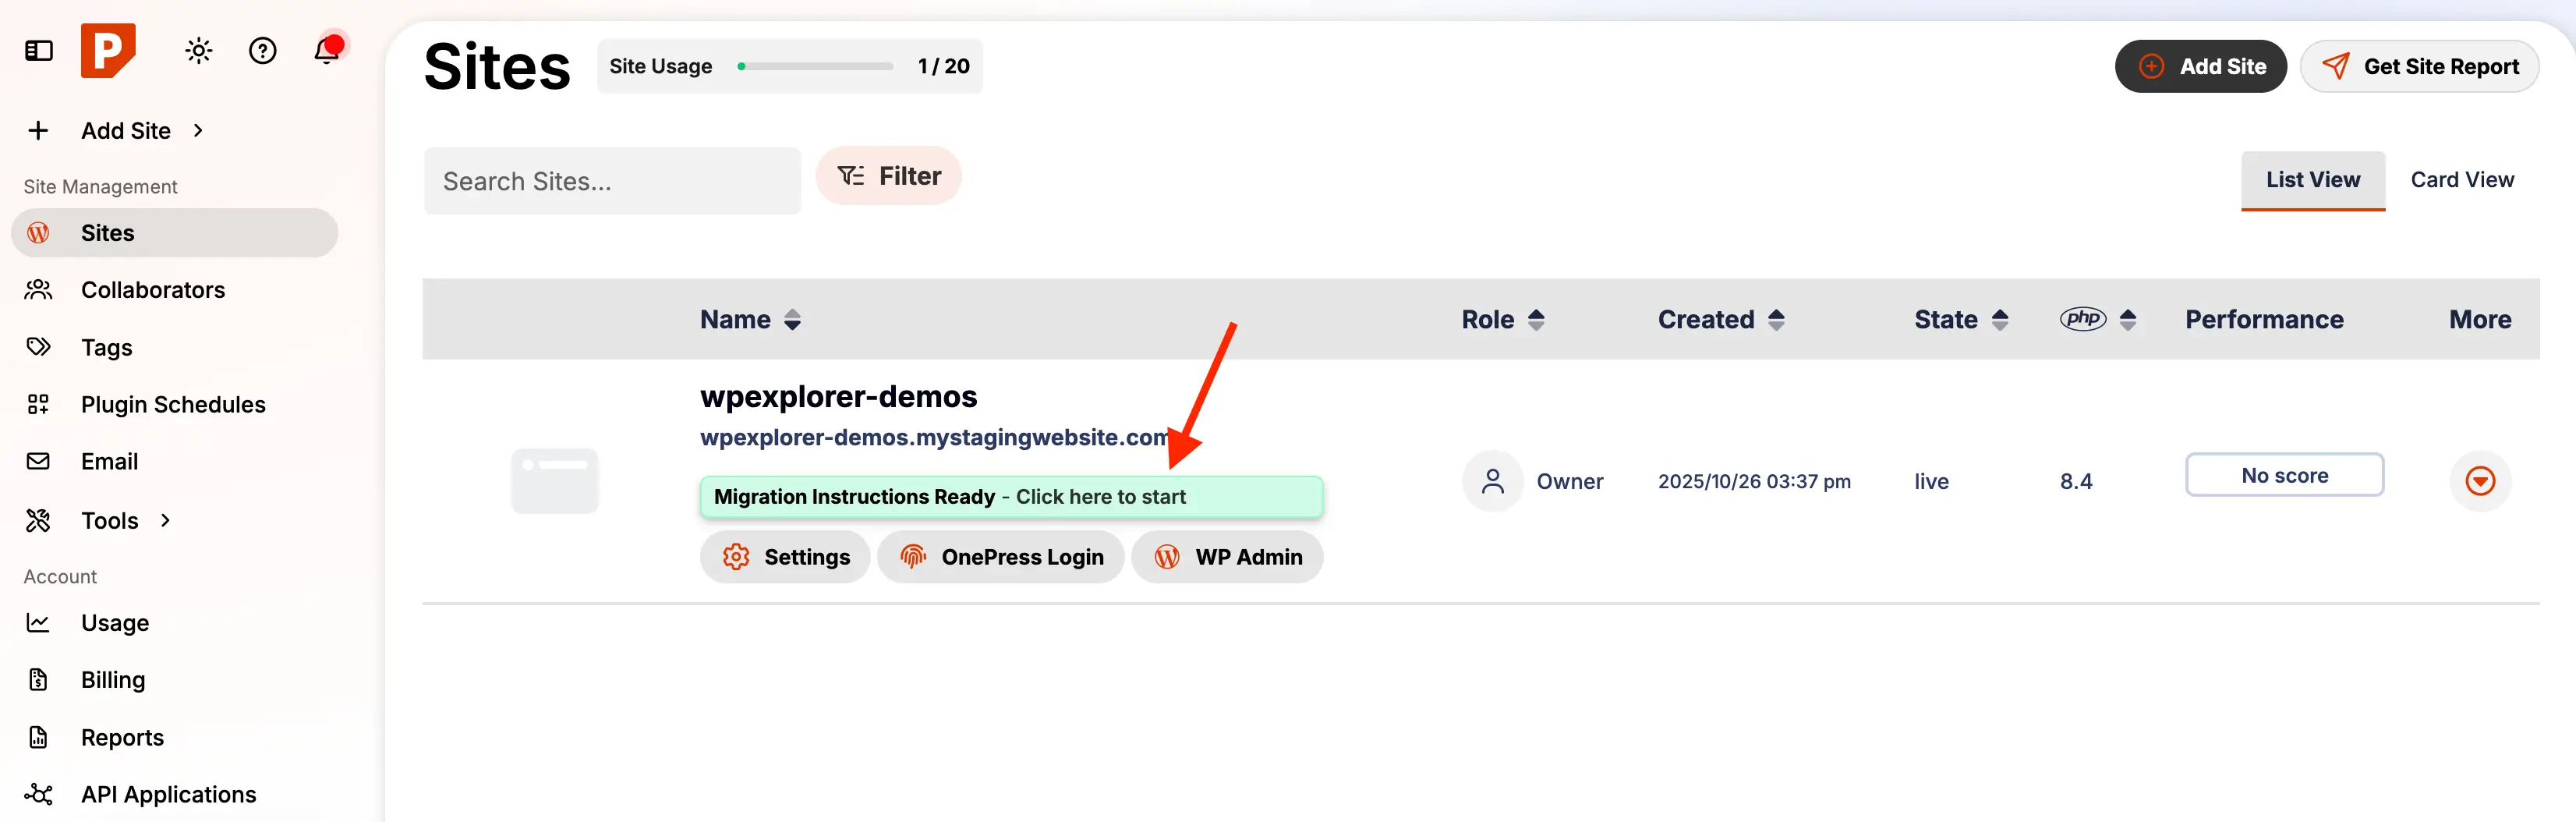
Clicking the link will take you to the site’s dashboard and scroll down to the migration details section which looks like this:
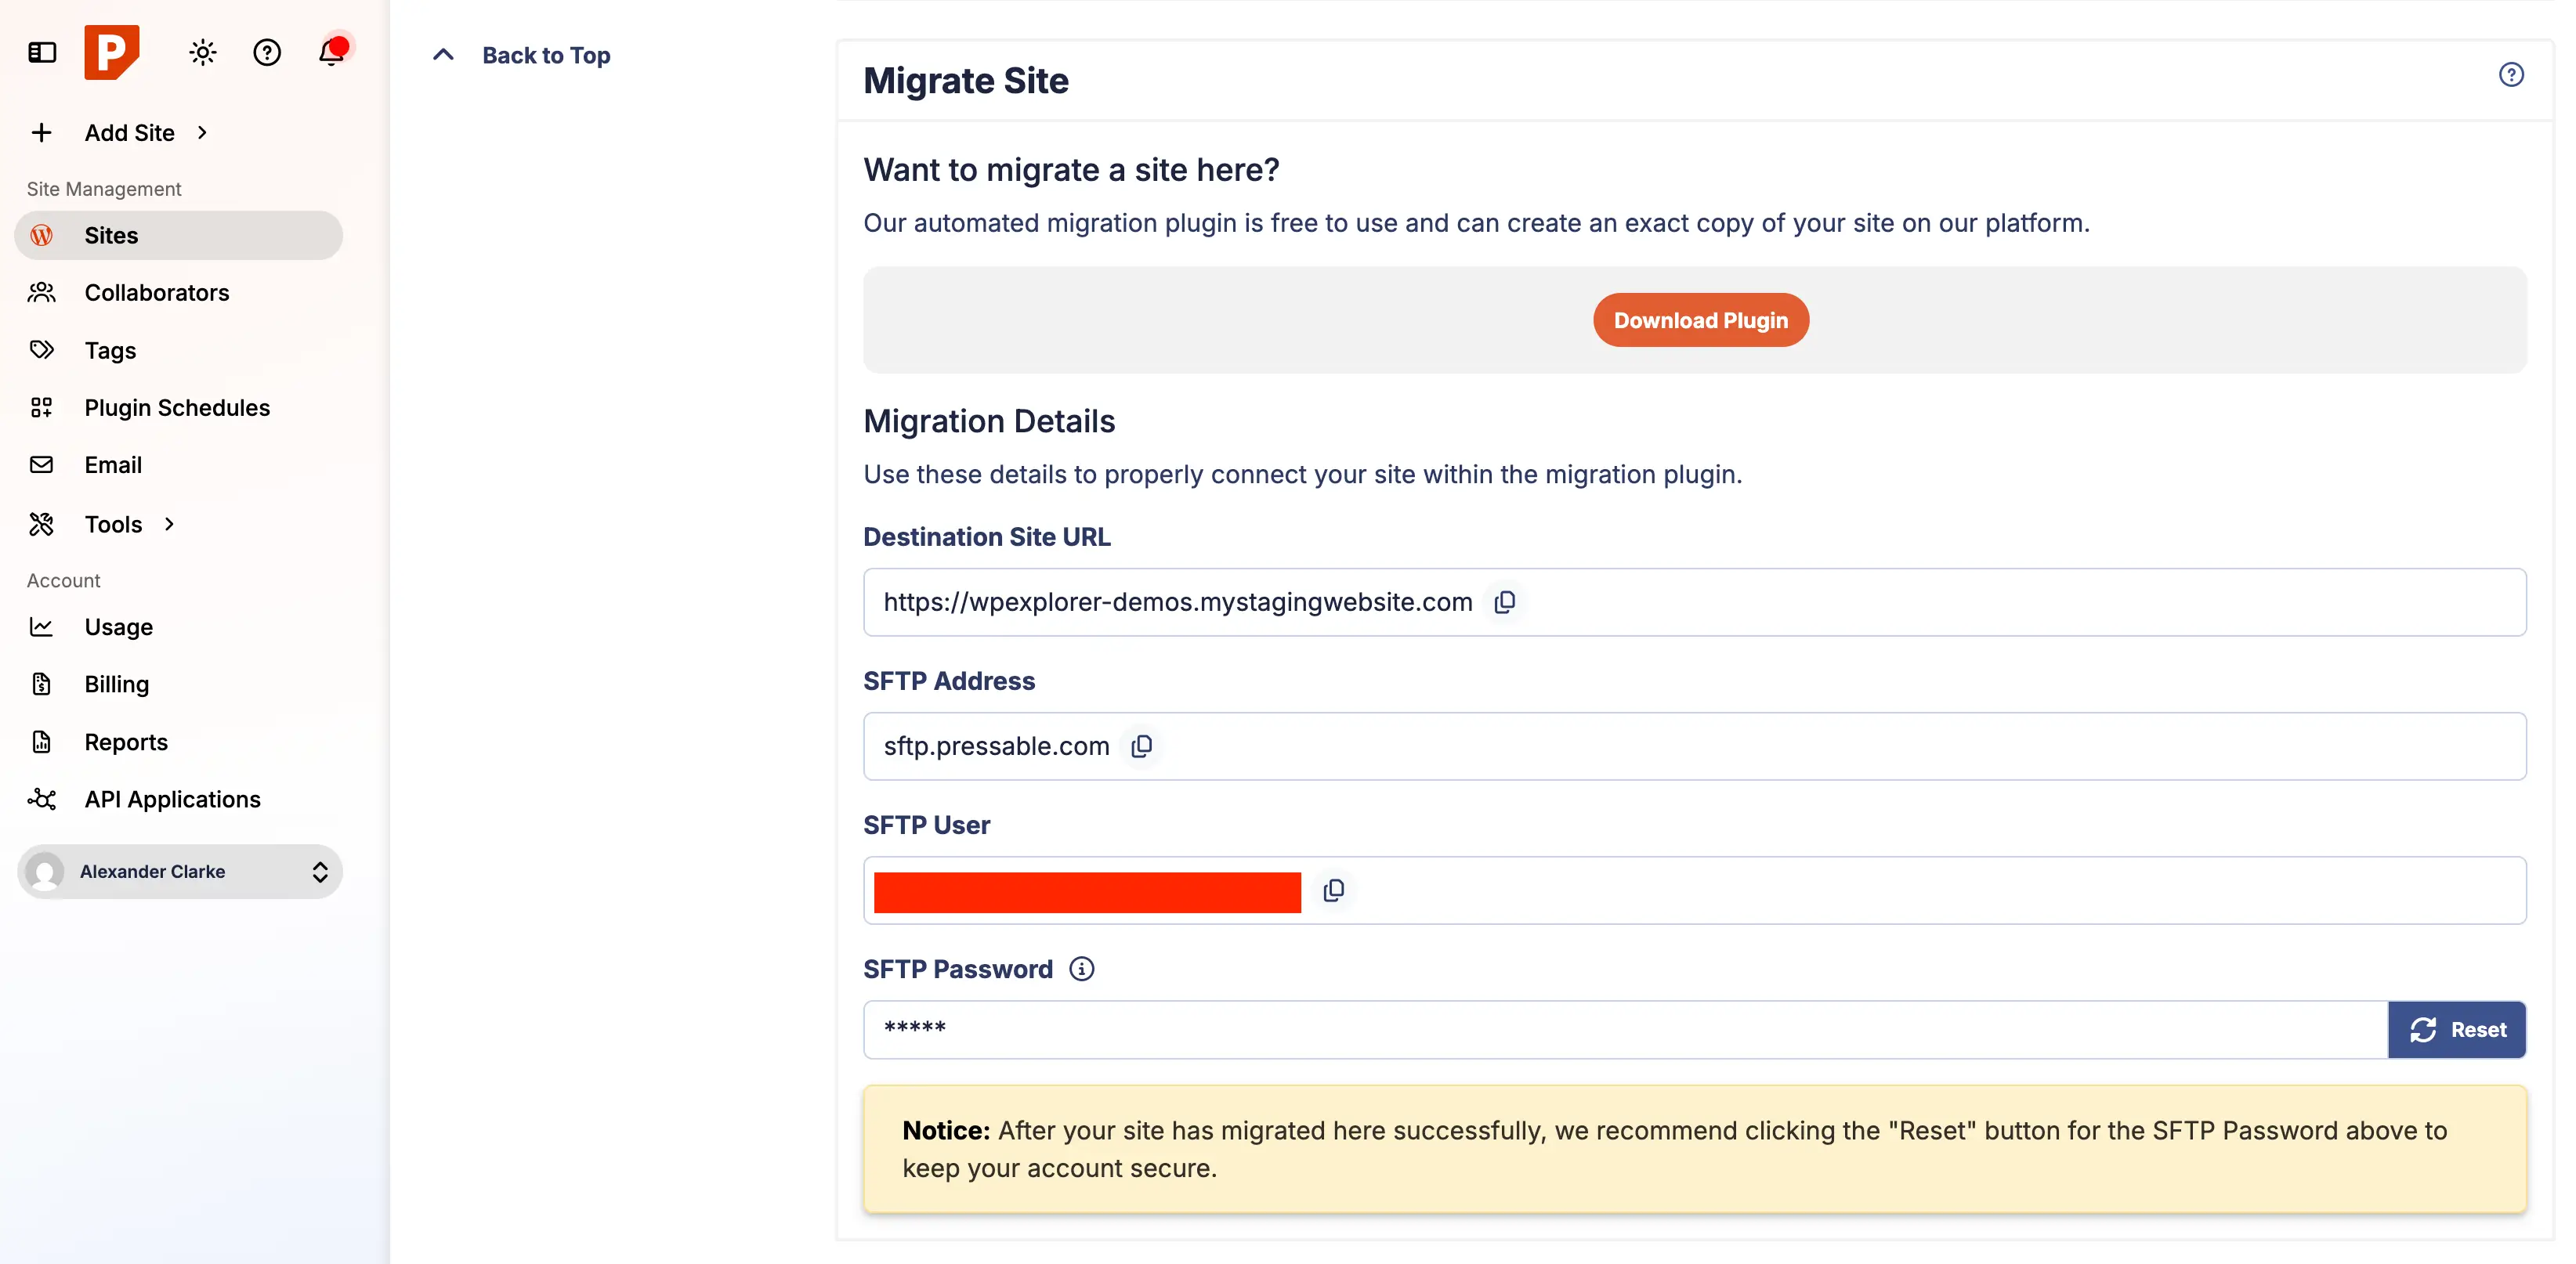
Step 5: Install, Set Up & Run the Pressable Automated Migration Plugin
At this point, you should be looking at the Migrate Site section on your Pressable dashboard (like in the previous screenshot). There’s an option to download the migration plugin, but that just redirects you to WordPress.org which is not very useful.
Instead, open a new tab, log into the WordPress site you’re moving, go to Plugins → Add New, search for “Pressable Automated Migration” and install and activate the plugin. Once you activate the plugin, it redirects you to the migration setup page and shows you this first screen:
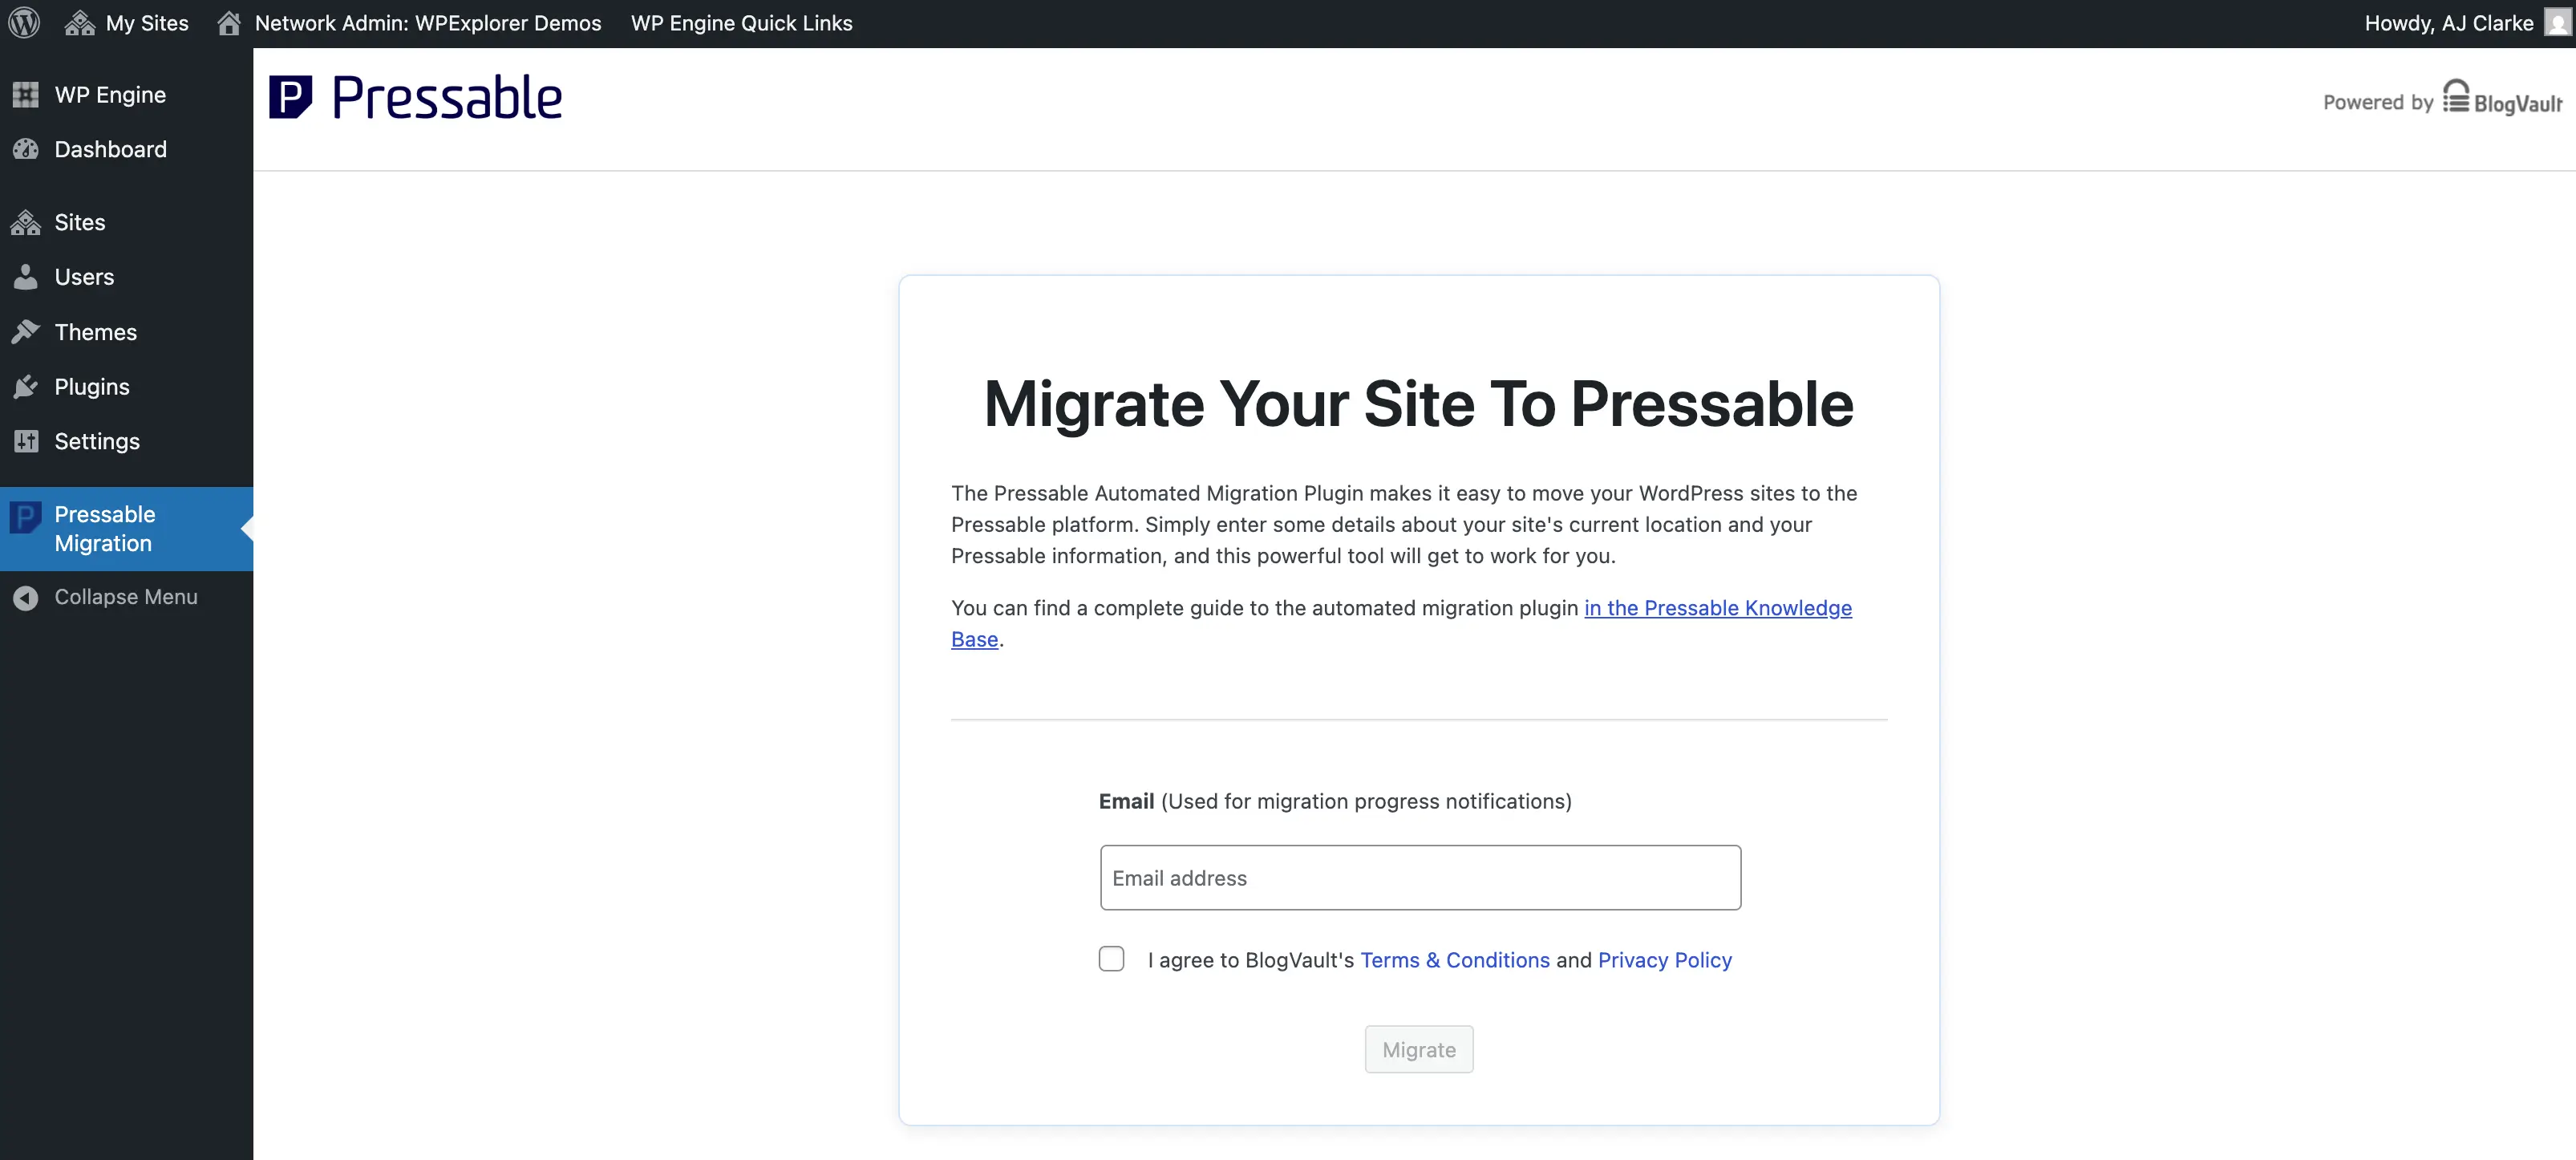
Simply enter your email to receive update notifications about the migration, then click the Migrate button.
On the next screen, you’ll enter the migration details, which you can copy directly from your Pressable dashboard, which should already be open in a separate tab. The form will look like this:
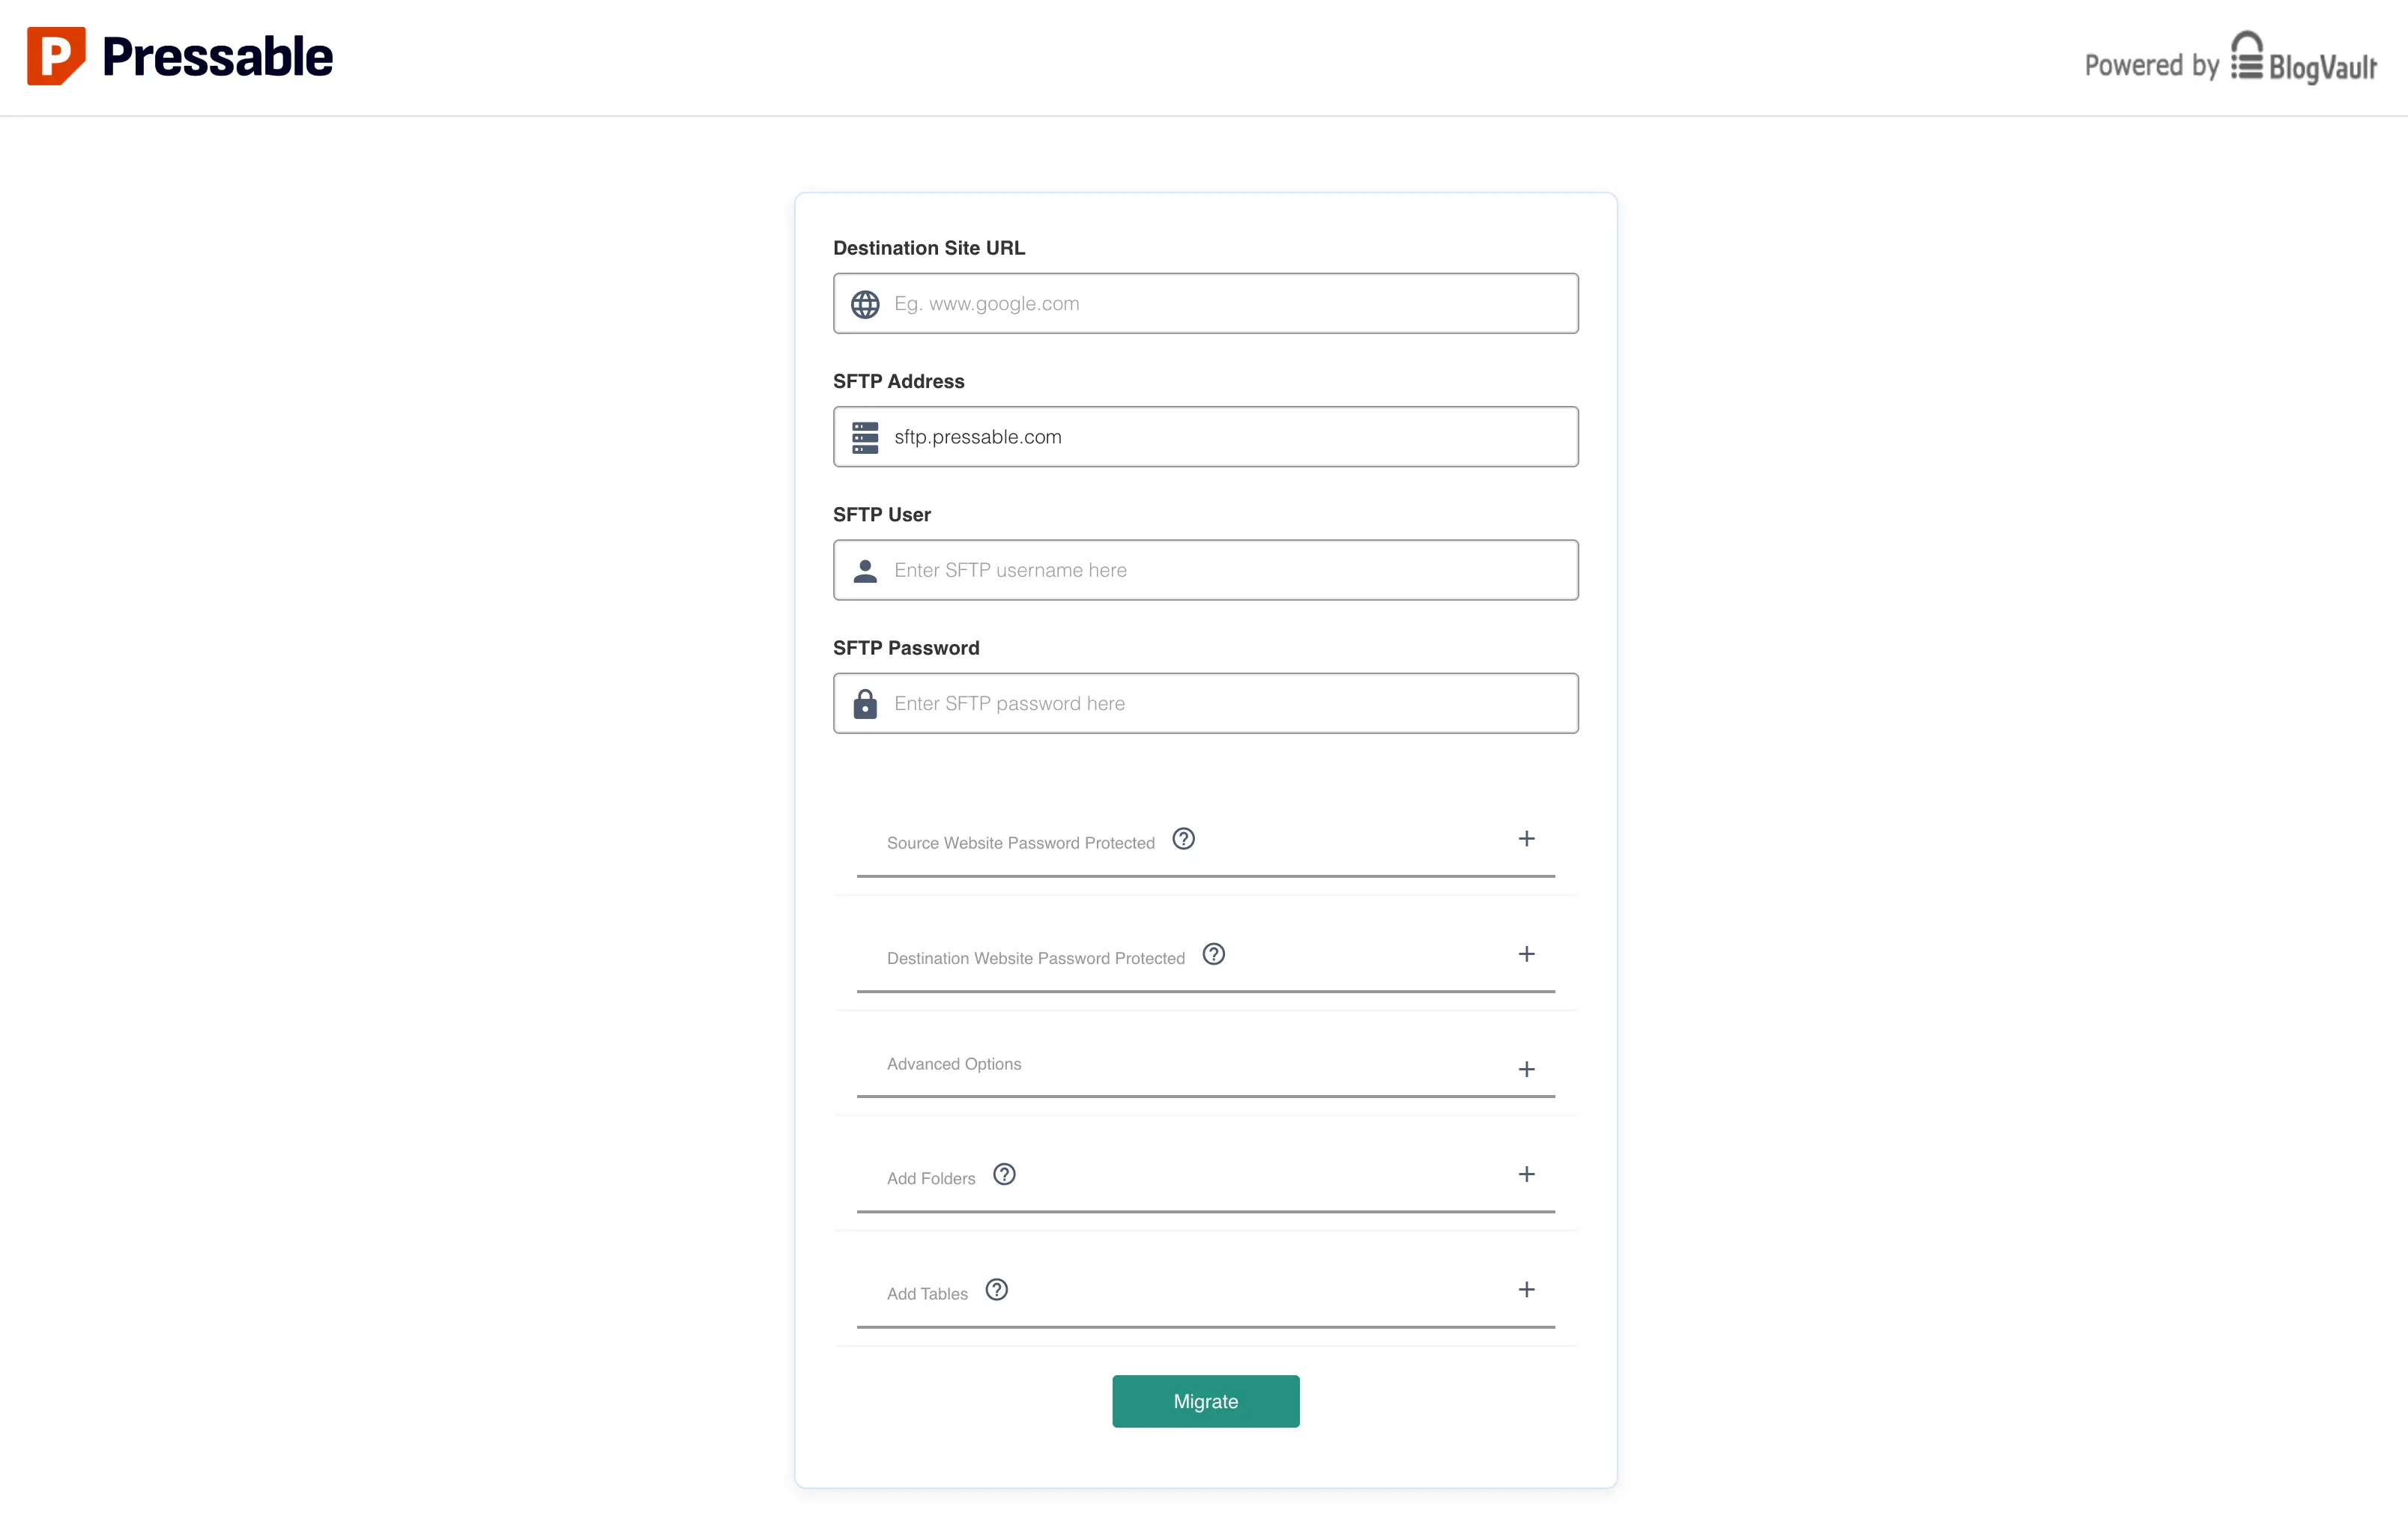
Important: For the SFTP password, you’ll need to click the “Reset” button in your Pressable dashboard to generate a new password. Once created, copy and paste it into the form.
Now you can click the Migrate button to start moving your site. You’ll be redirected to a page on migrate.blogvault.net (the migration happens there, not in your Pressable dashboard) where you can watch the progress. You should also receive an email with the subject: “Awesome! The migration of {URL} has begun!”
Here’s a screenshot of the migration process in action:
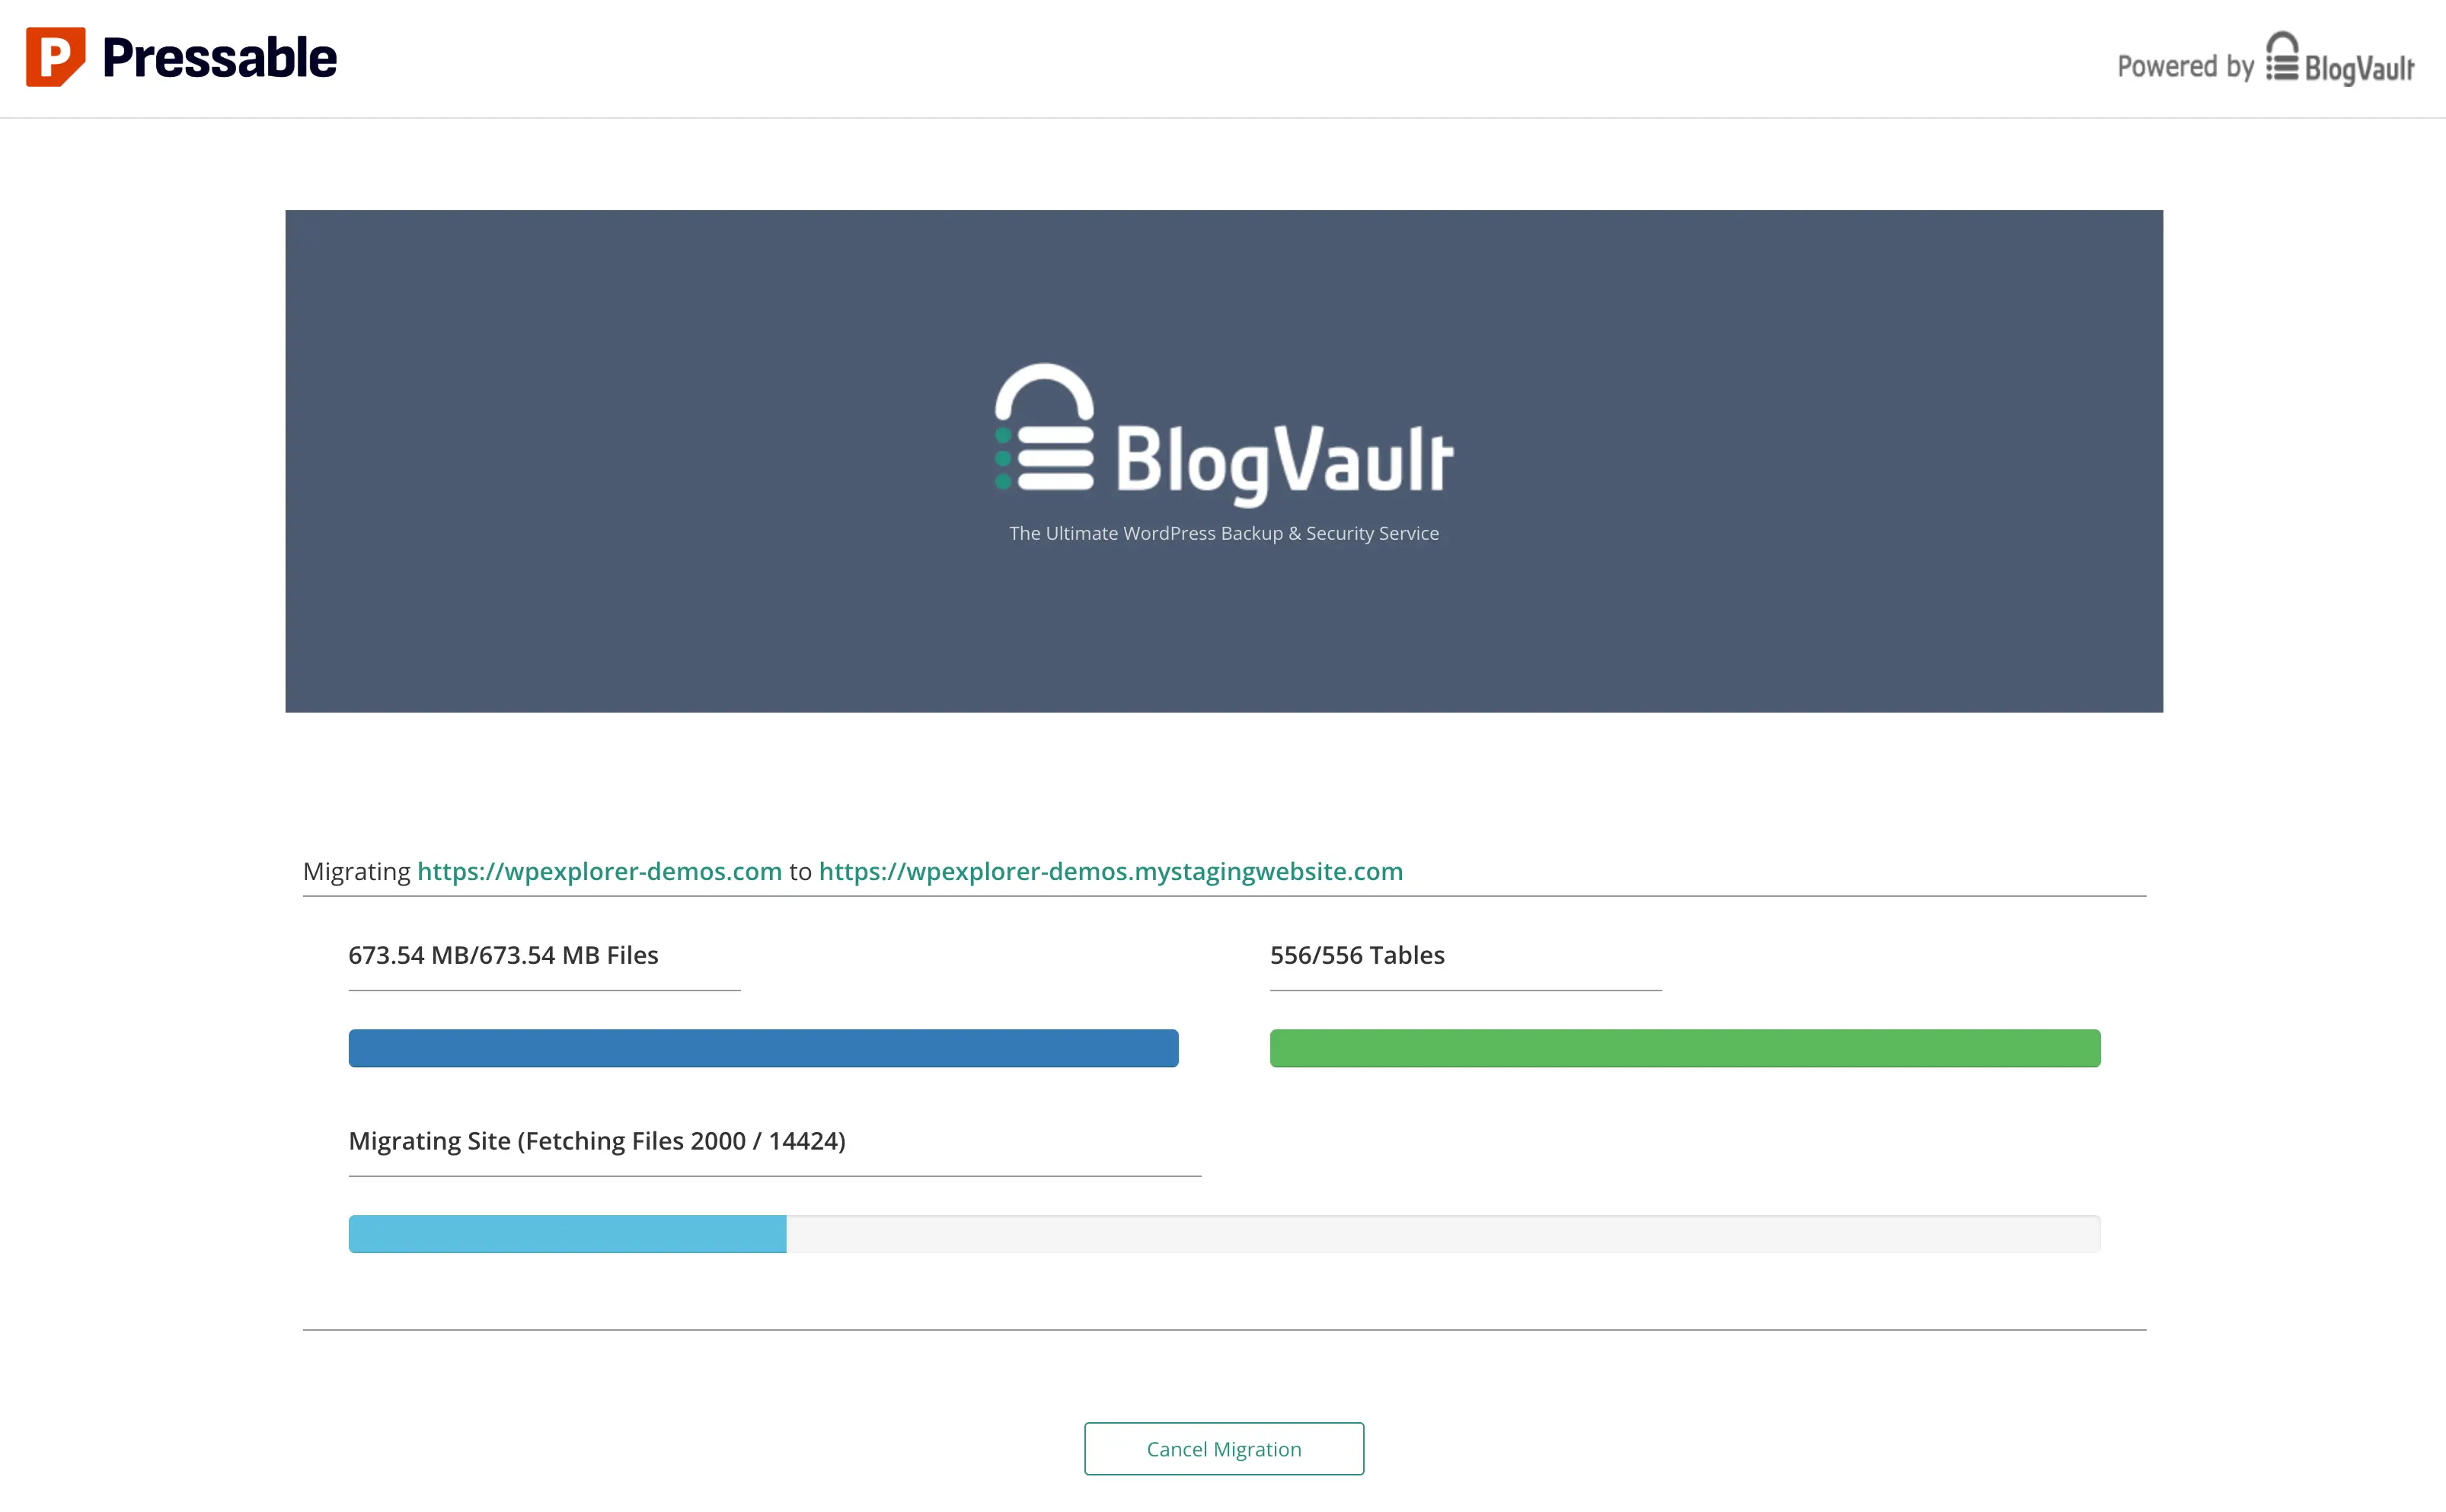
It probably doesn’t matter, but I personally recommend keeping the window open and not doing anything else while the migration runs. Make sure your computer isn’t set to sleep, so the process can continue uninterrupted. This way, you can leave it running and check back later, or monitor the progress via the completion email on your phone.
If a Pressable staff member is reading this…I’m not a big fan of all the BlogVault advertisements and the fact that the migration happens on migrate.blogvault.net rather than a Pressable domain doesn’t feel very secure, although I’m sure it is. I recommend that Pressable use their own domain for the migration process, even if BlogVault still handles the requests behind the scenes.
Important: During the update, the progress bars froze, and I worried the process had stopped working. If this happens to you, just give it some time. Large sites can take a while and progress bars sometimes appear frozen even when the migration is still processing. One of my multisite installations took nearly an hour to move!
Step 6: Check the list of Files Not Migrated
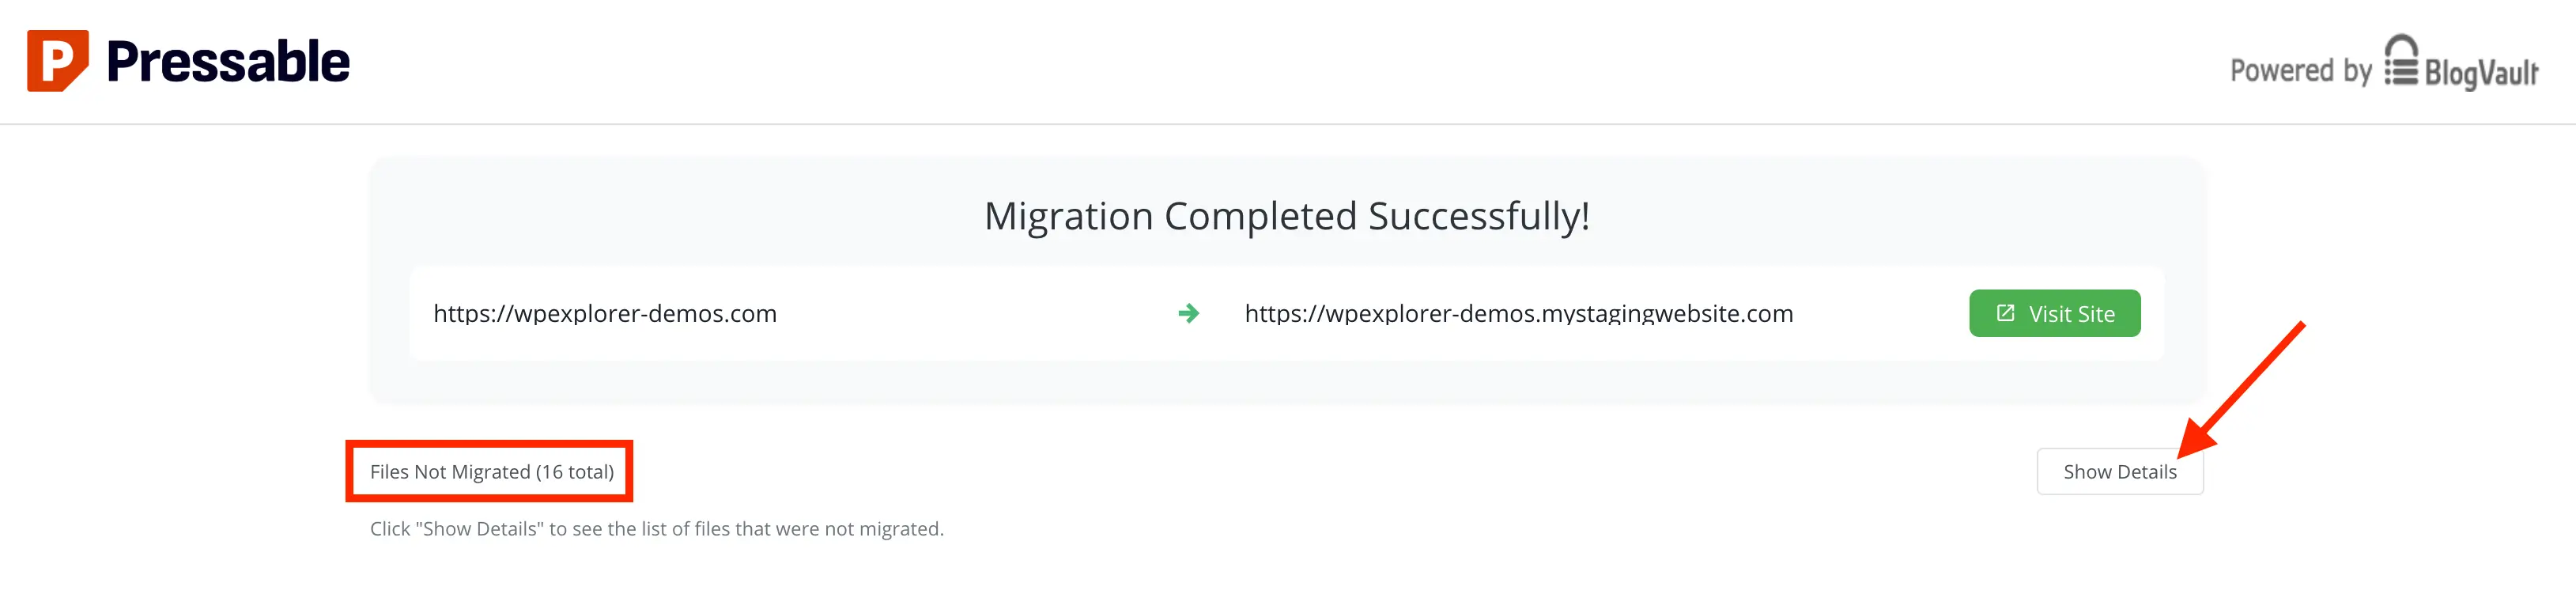
Once the migration is complete, you’ll see the success screen. It may include a section labeled “Files Not Migrated” with a “Show Details” button. Be sure to click this and review any files listed as some may need to be manually moved via SFTP.
From my experience, most of the skipped files weren’t necessary and were primarily WPEngine specific files that won’t be used on Pressable.
Step 7: Delete Old Hosting “Stuff”
After your site is successfully migrated you’ll want to clean up leftover stuff from your previous host. Depending on your old server setup, you might have unnecessary files, custom cron jobs, or admin accounts that you no longer need. Removing them keeps your site secure, organized, and easier to manage on your new host.
Remove Unnecessary Files
This step may not apply to everyone, but if you are moving from another managed hosting server, there may be files from the original host that are no longer required. It’s a good idea to check the root and wp-content folders for any host-specific or leftover files and remove them. This helps clean up your site and is also a security best practice.
For example when migrating from WPEngine to Pressable, there were files that weren’t needed on moved over to Pressable. Specifically, the mu-plugins folder contained a file and folder named wpe-update-source-selector, which is only used on WPEngine. These can be safely removed.
Move or Delete No Longer Needed Cron Jobs
Some hosting environments create custom cron jobs for tasks like automated backups, caching or other server-specific processes. After migrating, these cron jobs may no longer be necessary and could cause conflicts or redundant tasks.
- Review any cron jobs from your old host.
- Delete the ones you no longer need, or replicate essential jobs in your new hosting environment if required.
Note: Managing cron jobs can be technical and covering it in depth is beyond the scope of this guide. If you need to review or remove scheduled tasks after migrating, a plugin like Cron Jobs provides a simple interface to view and manage WordPress cron jobs safely.
Delete Old Hosting Admin Users
Many hosting setups create admin or system accounts with elevated privileges. Once your site is fully migrated, review all users on the old hosting account and:
- Delete or deactivate accounts that are no longer needed.
- Ensure that only the accounts you actively use have access to maintain security.
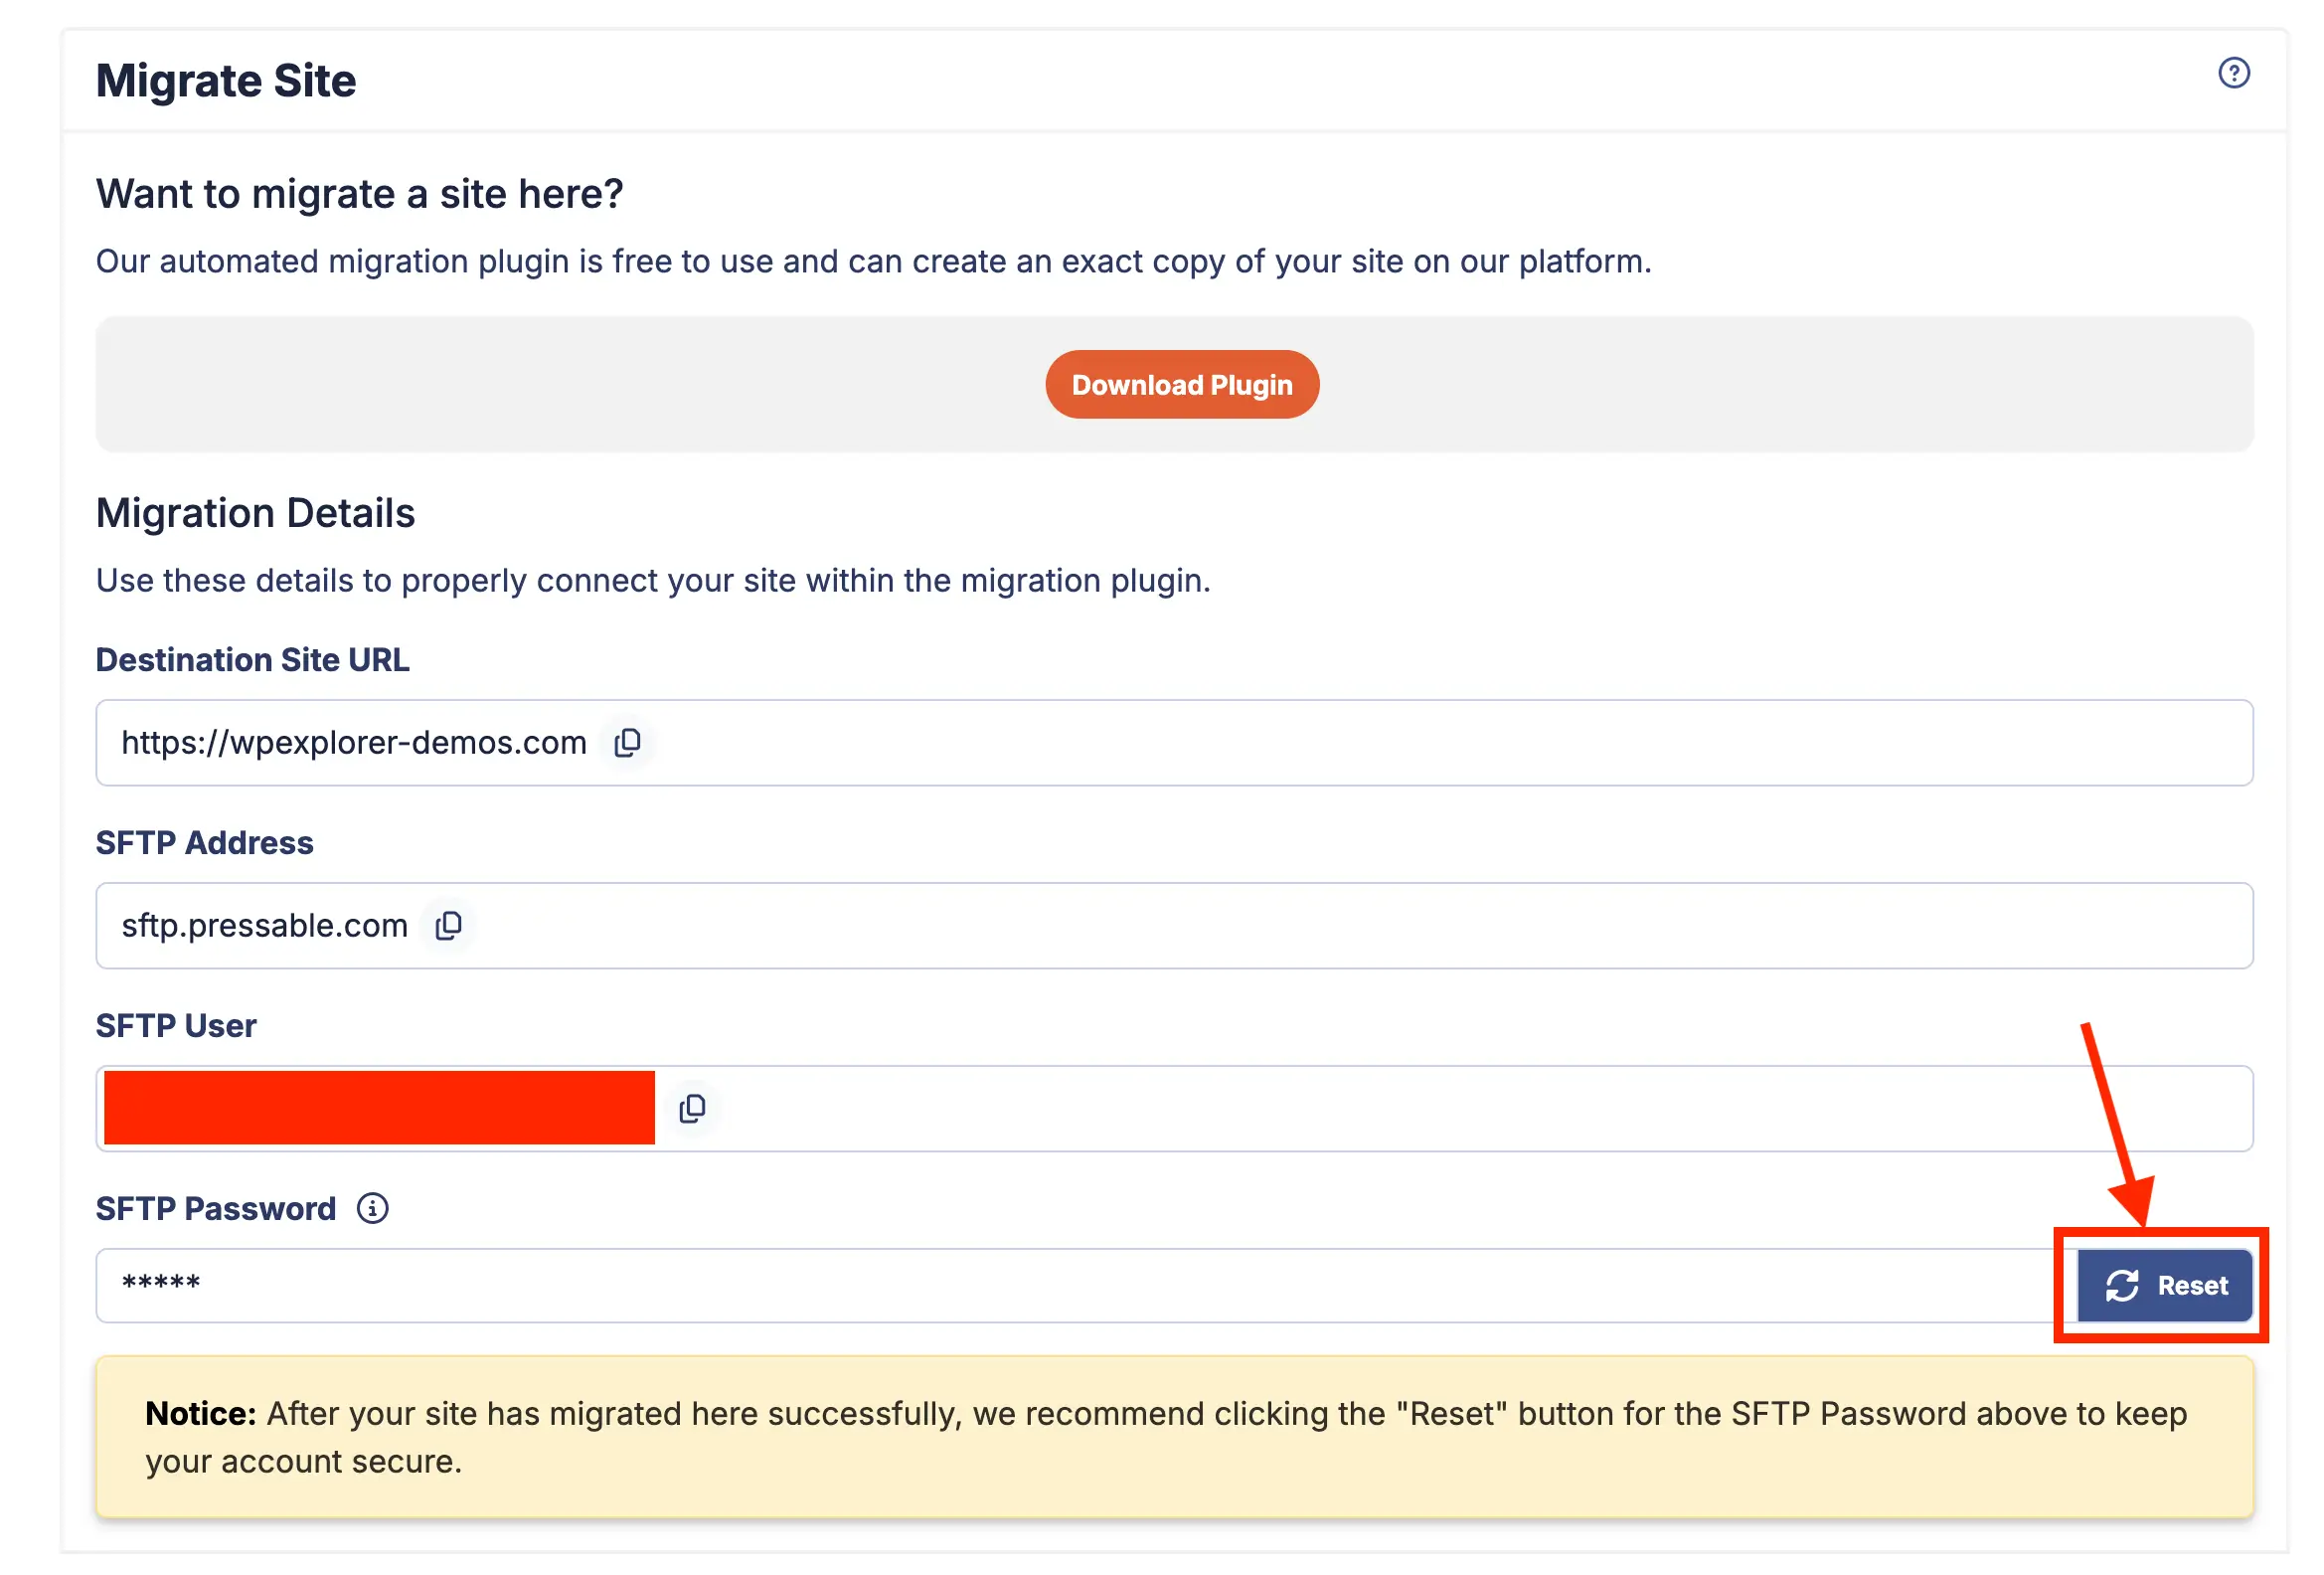
Step 8: Reset your SFTP Migration User Password
Now is a good time to reset the SFTP migration user password. Pressable recommends this and I also think it’s a good idea. In the same screen where you copied the details for the migration (Site > Site Actions > Migrate Site) click on the reset button next to the SFTP password field.
Now that you’ve migrated your site you’ll want to move any custom redirects or server-side web rules. For example, on WPEngine, you can create custom web rules via the admin dashboard. Because these rules are outside the scope of WordPress, you must move them manually as they won’t transfer automatically.
This process may vary depending on your current hosting setup. You might need to contact your web host if you’re unsure whether any web rules require transferring. To add them on Pressable, these resources can help:
Important: Pressable uses NGINX and PHP-FPM to handle requests and render page content for each site. Without Apache, an .htaccess file has no effect on your site or its settings, so you can’t simply move your custom rules to .htaccess. Make sure you check your live site for any .htaccess rules so you can properly move them!
Be sure to click one of the first links above, which explain how to create and manage your custom-redirects.php file in Pressable. This is an important file to add to all your sites, as it lets you include the recommended security headers.
The Pressable currently recommends the following security headers:
header( 'X-XSS-Protection: 1; mode=block' );
header( 'X-Content-Type-Options: nosniff' );
header( 'X-Frame-Options: SAMEORIGIN' );
header( 'Referrer-Policy: no-referrer-when-downgrade' );
These headers help improve your site’s security by:
- X-XSS-Protection: Enables basic cross-site scripting protection in browsers.
- X-Content-Type-Options: Prevents browsers from MIME-sniffing files.
- X-Frame-Options: Stops your site from being embedded in frames on other sites.
- Referrer-Policy: Controls how much referrer information is sent with requests.
These headers are recommended but are not added by default. Because they provide an extra layer of protection, it’s an important step to add them manually (to your custom-redirects.php file) to help improve your site’s security.
Check Your Migrated Site
Assuming your migration went smoothly, you should now be able to view your site on the Pressable staging domain. Before pointing your domain over, I recommend checking everything carefully to make sure all content and functionality migrated correctly. You definitely don’t want to point your domain to a broken site!
Here is a list of checks you can follow:
- Errors: Make sure there are no new errors either visible on the live site or in the server error logs.
- Plugins & Themes: Check that all plugins are active and the theme is functioning properly.
- Homepage & Key Pages: Make sure your homepage and main landing pages display correctly (you can check all pages but that could take a very long time depending on the size of your site).
- Posts & Content: Verify that posts, pages and any custom post types are all present, formatted correctly and accessible.
- Menus & Navigation: Test all menus, dropdowns and internal links.
- Widgets: Check to make sure your site widgets are still showing up correctly.
- Forms & Interactive Elements: Test contact forms, search bars, sliders and other interactive features.
- WooCommerce (if applicable): Check products, carts, checkout, 3rd party add-ons and payment functionality.
- Images & Media: Confirm that images, galleries and videos display correctly.
- Permalinks & Links: Test internal links and make sure permalinks work as expected.
- User Accounts & Logins: Verify that all user accounts work and permissions are intact.
- Site Speed & Performance: Run a quick check to ensure the site loads quickly on the staging domain.
Once you confirm that everything works correctly on Pressable and your site looks and functions as expected, move on to the next step.
Point Your Domain to Pressable
Now that you have a working staging site on Pressable, your domain still points to your old host. The next step is to point it over to Pressable so visitors see the migrated site on your brand new awesome server.
Pressable offers two options for this, but first, go back to your Dashboard and click on your site (if you aren’t already there). Then, in the left-hand navigation, click on “Domains”. From here, you can choose your preferred method to point your domain to Pressable.
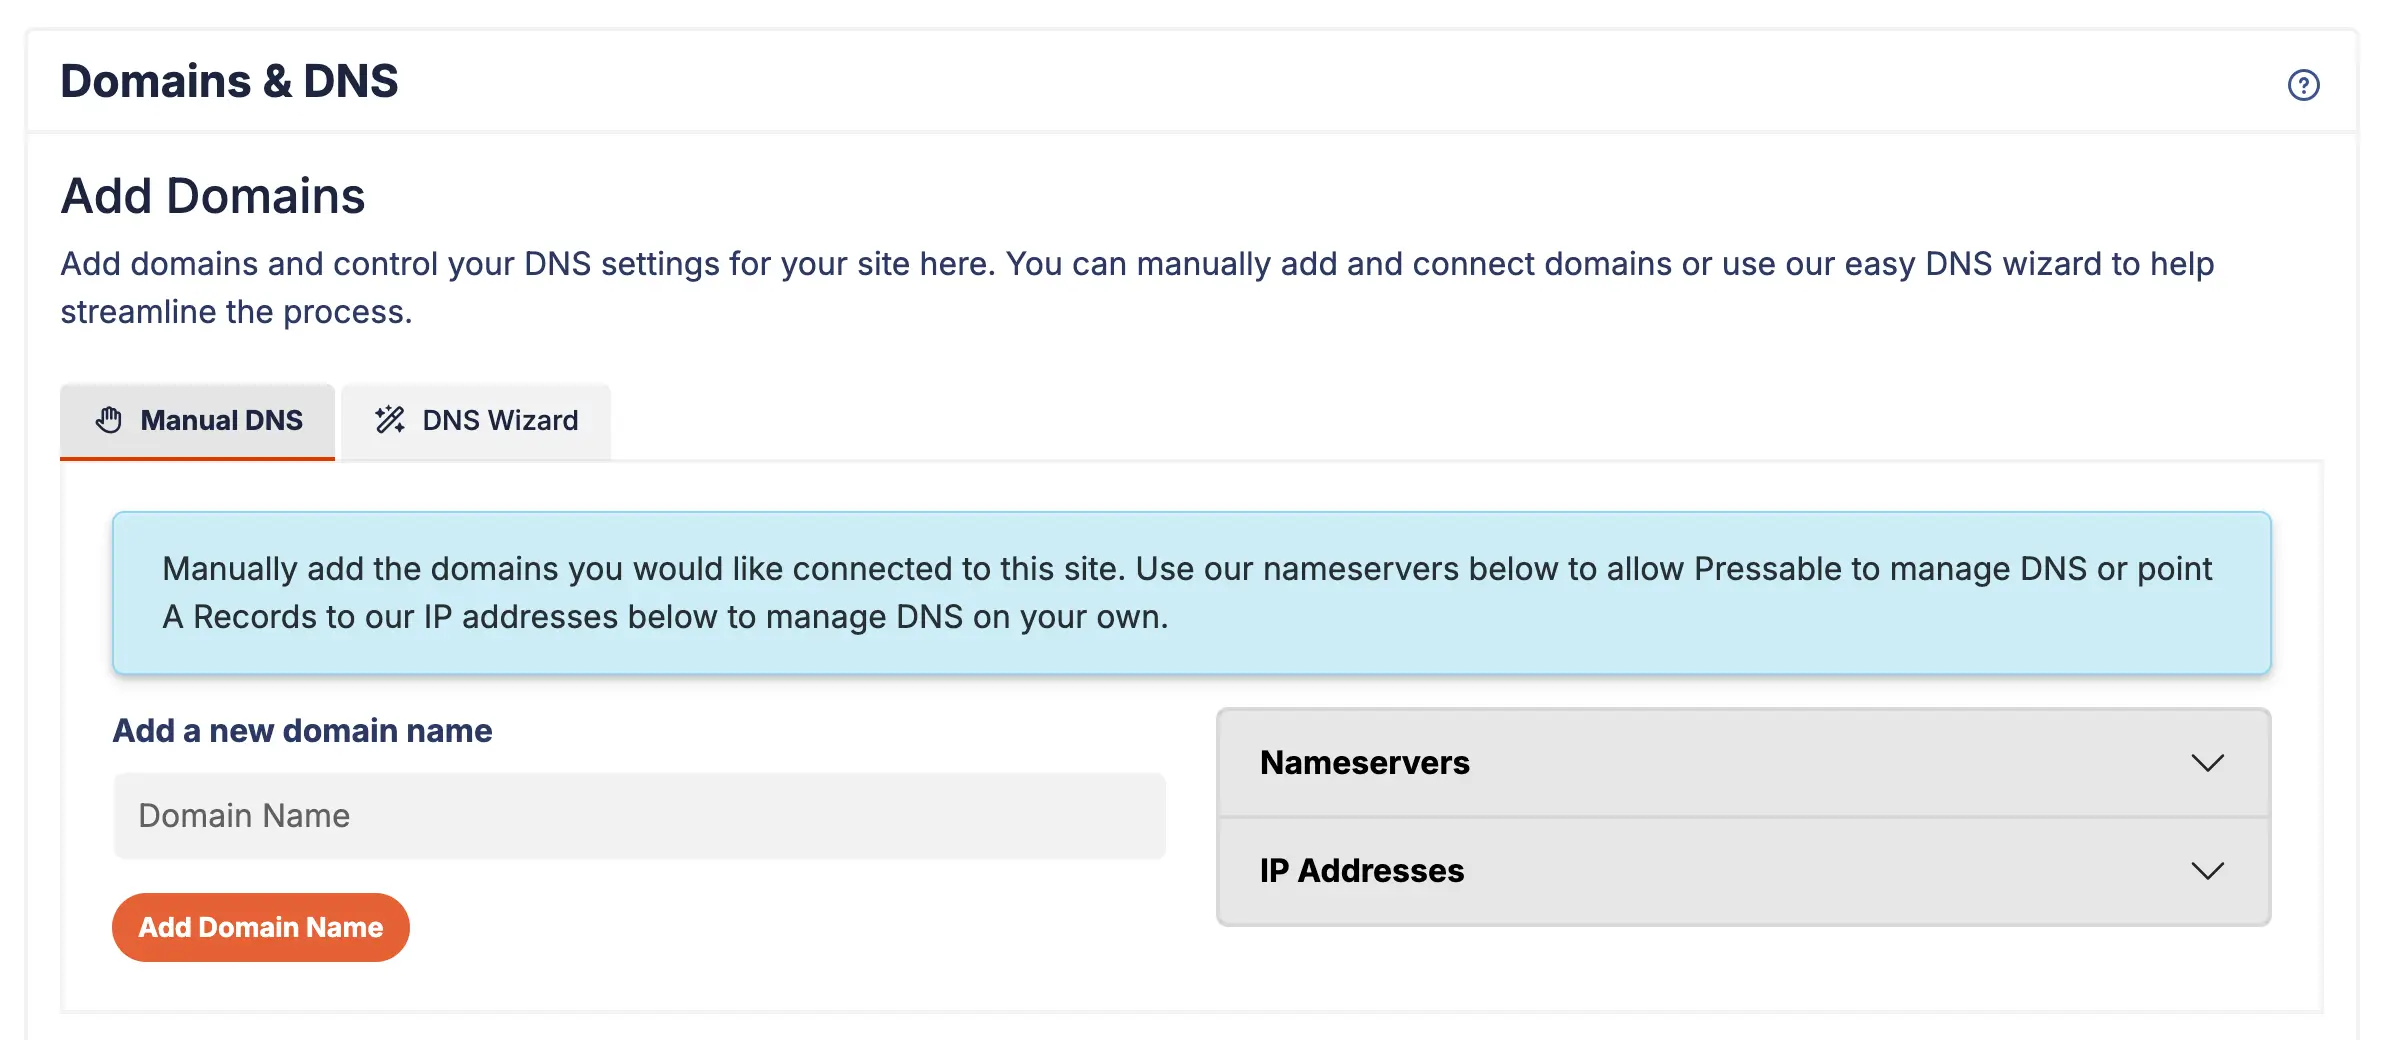
You can refer to the official Pressable documentation for assigning your domain, or follow my shortened guide below covering both options.
1. Manual DNS Update
- Log in to your domain registrar (e.g., GoDaddy, Namecheap, or Cloudflare).
- Add either the nameservers from your Pressable dashboard or the IP addresses (A records). You should not add both!
- If you use nameservers, Pressable will fully manage your DNS. You’ll need to re-add any other records (A, CNAME, MX, TXT, DKIM, SPF, etc.) directly in Pressable after assigning the nameservers.
- I personally recommend using the IP addresses (A records) so you don’t have to worry about moving any existing records.
- Delete any records that point to your current hosting server.
- Wait for DNS propagation, which can take anywhere from a few minutes to 24–48 hours.
2. DNS Wizard
Pressable’s DNS Wizard simplifies the process by guiding you step-by-step. It will automatically configure the necessary DNS records for you (A records). This is especially useful if you’re not comfortable managing DNS manually.
You will still need to log in to your domain registrar and remove any existing records that point to your current hosting provider. According to Pressable’s AI chat bot, this is necessary, I personally used the manual method so I don’t know for sure.
Clear Cache, Chill & Watch Your Site Go Live
After you point your domain to Pressable, let DNS propagation run. Clear your browser cache completely, then wait for it to finish.
Propagation can take anywhere from a few minutes up to 24-48 hours. During this period, you can relax, but it’s a good idea to periodically check your site to make sure everything is loading correctly and there are no unexpected issues.
The simplest way to verify your domain is pointing to Pressable is by checking the dashboard. In the Domains section, a green Health indicator shows everything is connected correctly, while yellow signals remaining issues. If the status stays yellow for a while, review your DNS settings to ensure they match the records provided by Pressable.
Bonus: Setup & Optimize or Disable Jetpack
Pressable includes Jetpack with all plans, along with a Jetpack Security subscription at no additional cost. This adds extra protection such as malware scanning, brute-force attack protection, and downtime monitoring, which can be especially valuable if you’re managing multiple sites.
While Jetpack isn’t required, I strongly recommend using it on Pressable to access the included Jetpack Security features and protect your site. I recommend installing and activating Jetpack, then reviewing the settings and disabling all the non-essential modules.
To manage Jetpack modules, go to the main Jetpack dashboard in your WordPress admin and scroll down to find the Modules link. This page lets you easily toggle individual features on or off based on your needs.
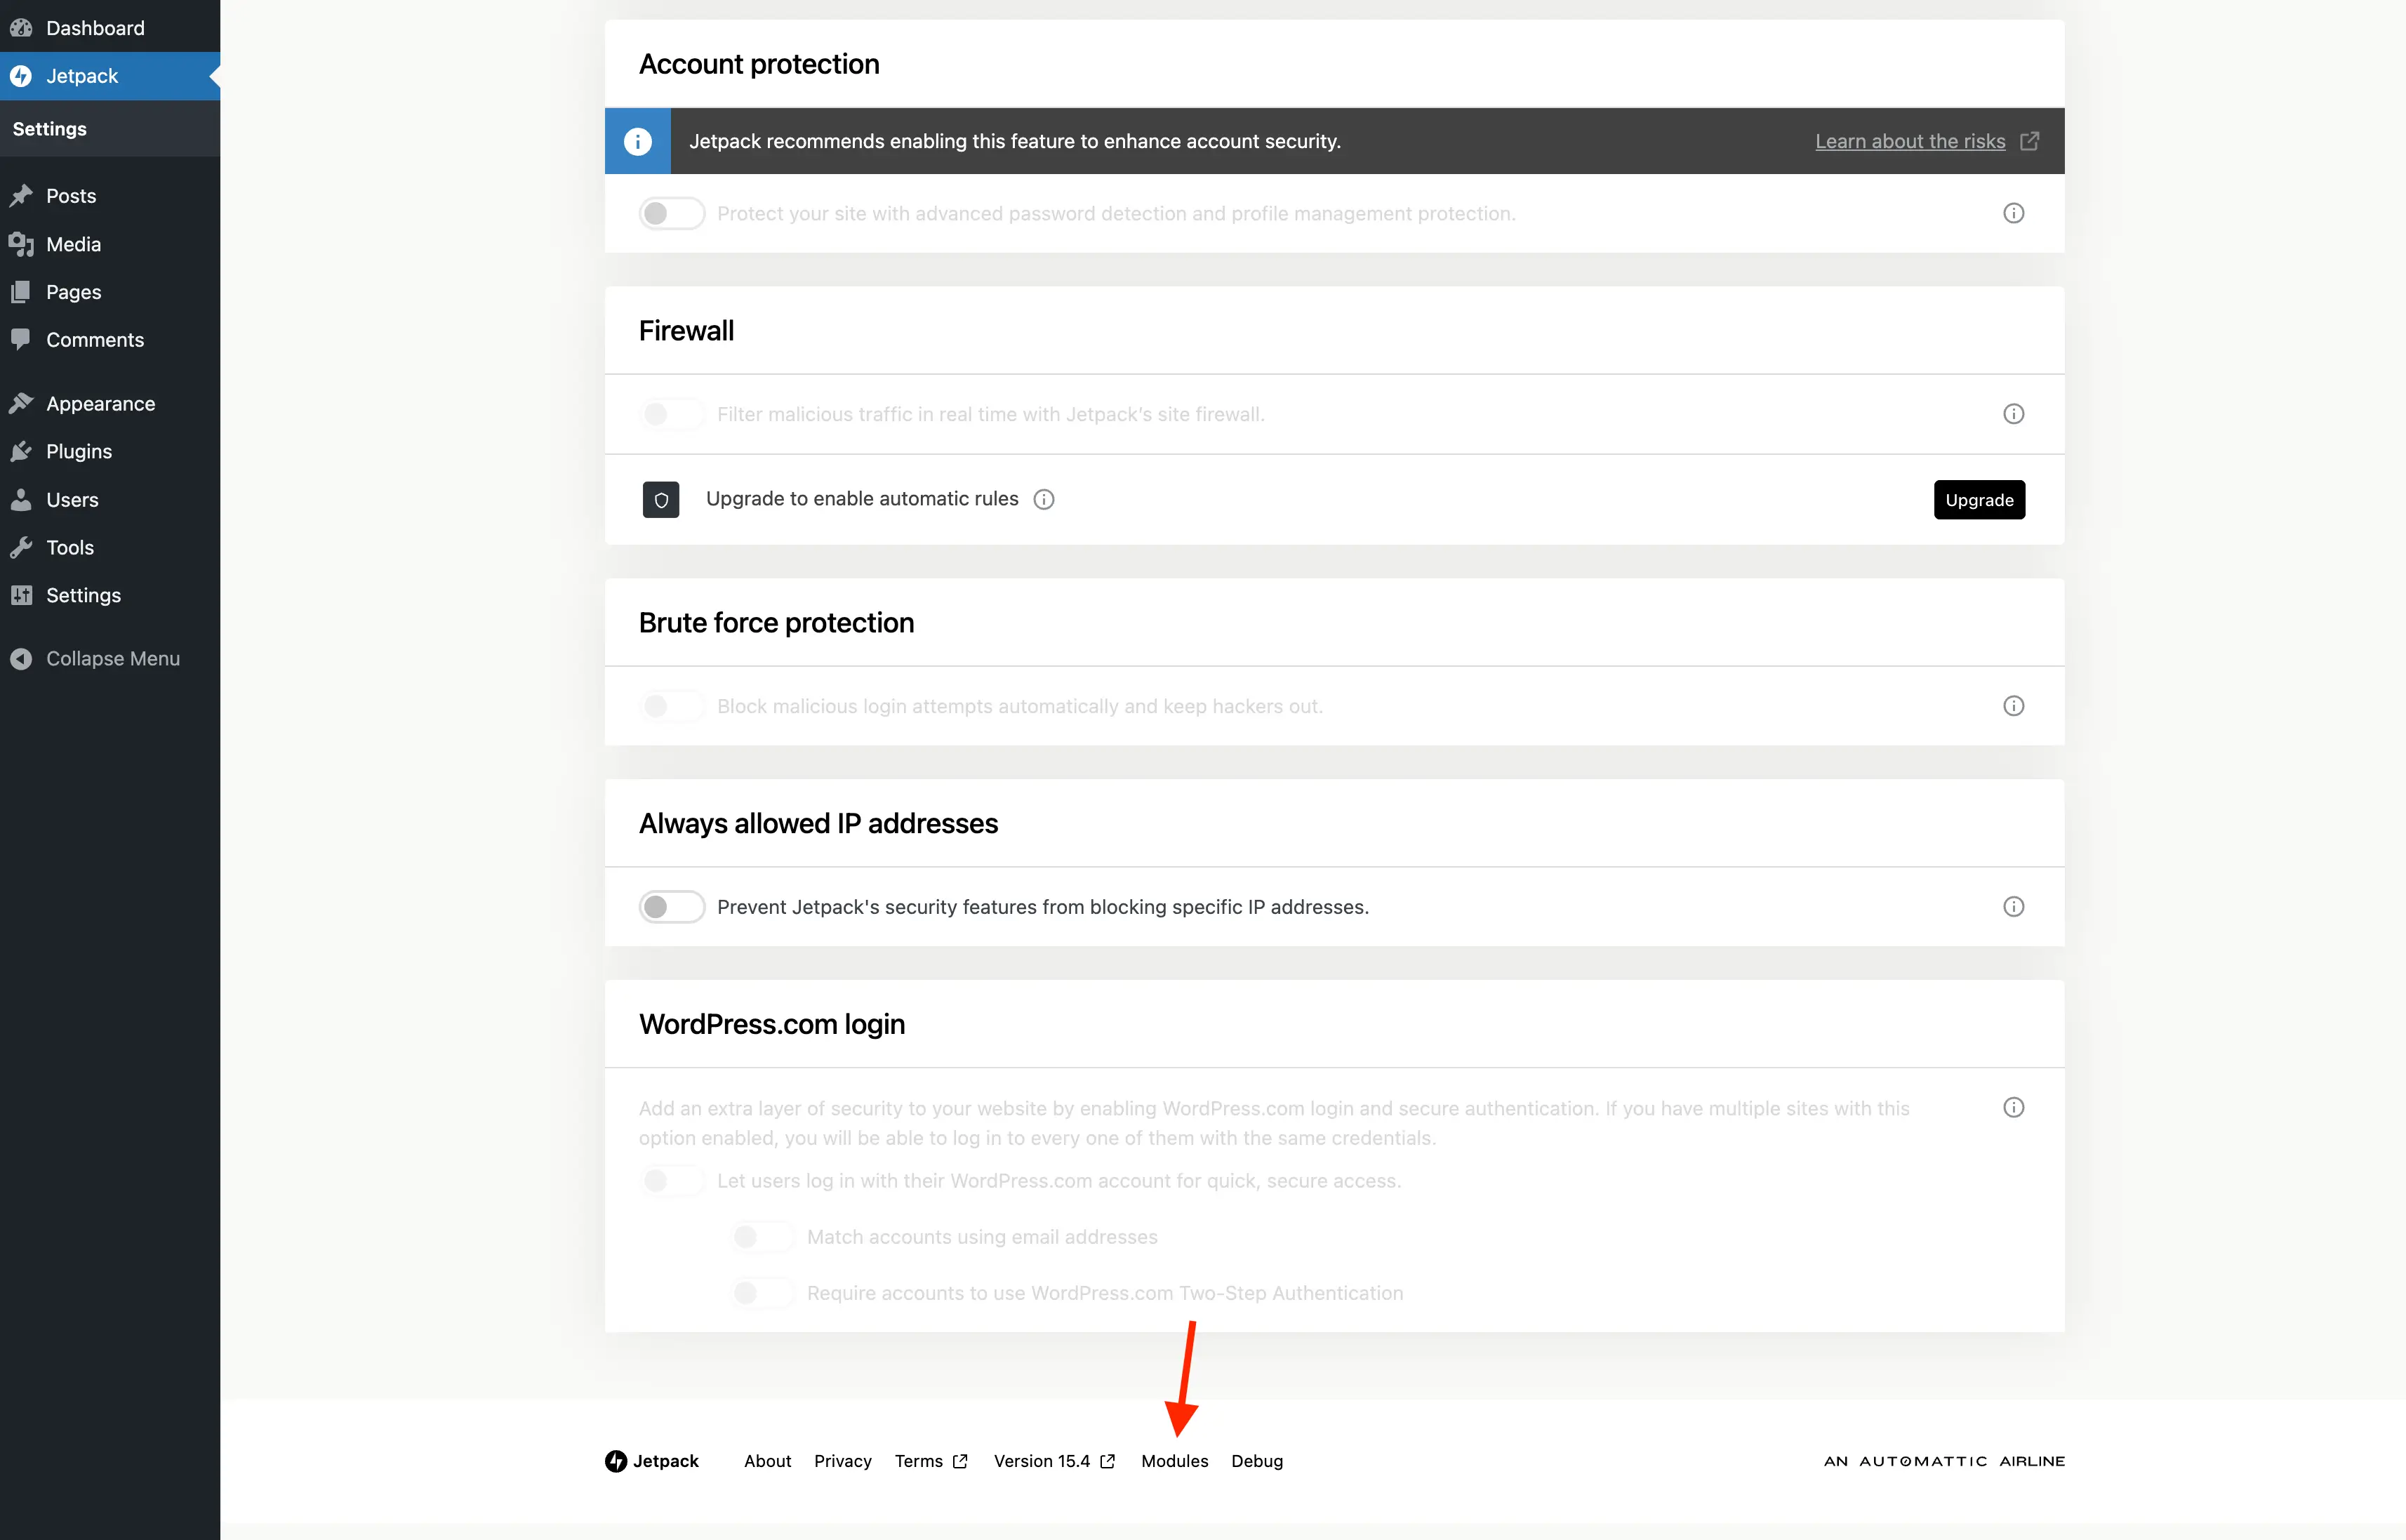
Jetpack can feel bloated, and many of its features aren’t necessary for most sites or can be replaced with better standalone plugins. For that reason, I would disable everything except VaultPress backups and the core security-related modules, such as brute-force protection and malware scanning.
Finally, be sure to follow Pressable’s official documentation for activating your free Jetpack license. For newly created sites, this is usually enabled automatically. If you migrated an existing site, however, you’ll need to manually activate the included Jetpack Security subscription.
Conclusion: Is Pressable Right for Your WordPress Site?
Migrating a WordPress site doesn’t have to be complicated. Pressable makes the process easy, even for non-technical users. With fully managed infrastructure, strong performance, built-in security, and expert WordPress-focused support, it’s an excellent option for most small to medium-sized sites, blogs, and client projects.
If you’re currently on a non-managed or underperforming host, moving to a managed WordPress platform like Pressable can save you time, reduce maintenance headaches and improve overall site reliability and performance.
Ready to try it yourself? Sign up for Pressable here and take advantage of their managed WordPress hosting and free migration service!
Disclaimer: WPExplorer may be an affiliate for one or more products listed in the article. If you click a link and complete a purchase we could make a commission.


