I remember when one of my friends told me they were spending more on ads than they were making in sales from their WooCommerce store. That’s when I suggested we try adding a rewards program.
We launched a simple refer-a-friend system, and within three months, their word-of-mouth sales had nearly doubled.
I know that WooCommerce rewards programs can feel intimidating to set up. Many of the plugins I tested in the past were overly complicated and required too much configuration.
That’s why I was so impressed when I tried two plugins that make this simple: RewardsWP for easy refer-a-friend programs and Loyalty Program by Advanced Coupons for a more powerful, all-in-one system with points, rewards, and referrals.
In this guide, I’ll teach you how to set up a WooCommerce rewards program to boost sales and keep customers coming back—without relying on expensive ads.
TL;DR: You can easily create a WooCommerce rewards program using RewardsWP for a simple refer-a-friend system. For an all-in-one solution that includes points, rewards, and referrals, use Loyalty Program by Advanced Coupons. Both plugins work seamlessly with WooCommerce and help you turn one-time shoppers into repeat customers.
You can use the quick links below to navigate through the tutorial:
What Is a WooCommerce Rewards Program? (And Why You Need One)
A WooCommerce rewards program is a system that gives your customers bonuses or incentives in exchange for their loyalty.
These programs are designed to encourage repeat purchases, increase engagement, and turn satisfied customers into long-term advocates for your store.
There are two popular types of rewards systems you can create in WooCommerce:
- Referral (Refer-a-Friend) Program: Rewards existing customers for referring new shoppers. This method turns happy buyers into brand promoters and helps you attract new customers without spending on ads.
- Points-Based Loyalty Program: Gives customers points every time they make a purchase, leave a product review, or perform another action on your website. Those points can later be redeemed for discounts, coupons, or even free products.
Here’s a quick comparison of both approaches to help you decide which one fits your store best:
| Refer-a-Friend Program | Points Loyalty Program | |
|---|---|---|
| Main Goal | Bring in new customers through referrals. | Reward existing customers for repeat purchases. |
| How It Works | Customers share a referral link and earn a reward when their friend buys. | Customers earn points for purchases and actions, then redeem them for rewards. |
| Best For | Stores focused on growth and word-of-mouth marketing. | Stores focused on customer retention and loyalty. |
| Pros | Simple setup, fast results, low marketing cost. | Flexible, encourages repeat sales, builds long-term engagement. |
| Cons | Needs active sharing; slower growth with small audiences. | Requires more setup and tracking. |
| Example Reward | $10 discount for both customers. | 1 point per $1 spent, redeemable for coupons. |
| Best Plugin | RewardsWP | Loyalty Program by Advanced Coupons |
Here are some of the biggest benefits of adding a rewards program to your WooCommerce store:
- Reduce Marketing Costs: Happy customers are your best marketers. A referral program helps you reach new audiences through word-of-mouth, while a loyalty program rewards your regular buyers and keeps them coming back—no expensive ads required.
- Improve Customer Retention: When people earn points or referral bonuses, they have a reason to shop again. These small rewards help turn first-time buyers into long-term customers.
- Increase Repeat Purchases: Whether it’s redeeming points for a coupon or using a discount they earned by referring a friend, customers are more likely to make another purchase when there’s a reward waiting for them.
- Boost Average Order Value: You can set minimum spending limits for discounts or redemption. This simple rule often nudges customers to spend a little more to claim their reward.
- Build a Competitive Advantage: When two stores offer similar products, shoppers tend to choose the one that values their loyalty. A well-designed rewards program gives you that edge and helps create a real sense of community around your brand.
At the end of the day, rewards programs are about showing appreciation. They remind your customers that their support matters, and that’s what keeps them coming back.
Method 1: How to Create a Refer-a-Friend Rewards Program in WooCommerce (Using RewardsWP)
In this method, I’ll focus on creating one of the simplest and most powerful rewards programs: a refer-a-friend program. This will allow you to reward your current customers for bringing new customers to your store.
I’ll walk you through how to set up a rewards program using the RewardsWP plugin.
While there are many great WooCommerce loyalty plugins available, I recommend RewardsWP if your main goal is to launch a refer-a-friend program quickly. I’ve found it to be the easiest and fastest tool for beginners because it focuses only on referrals and does it exceptionally well, without overwhelming you with extra settings.
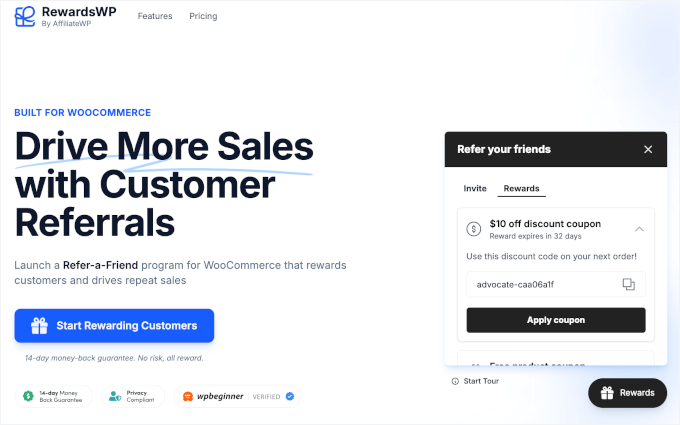

You can learn more about the plugin in our detailed RewardsWP review.
Step 1: Install and Activate RewardsWP
First, you need to sign up for an account on the RewardsWP website. Just follow the onscreen instructions to create your account and make a payment.
Next, you need to install and activate the RewardsWP plugin in your WordPress dashboard. For detailed instructions, you can see our beginner’s guide on how to install a WordPress plugin.
Once the plugin is activated, a new ‘RewardsWP’ menu item will appear in your WordPress dashboard.
The first thing you will need to do is enter your license key. You can find this in your account area on the RewardsWP website or in the email they sent you when you purchased the license.
Simply paste your license key into the RewardsWP » Settings page and click the ‘Connect’ button.
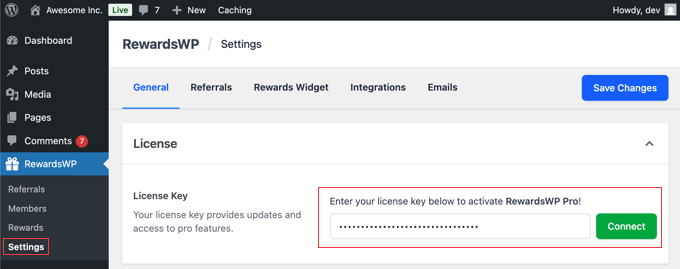
When I tested the plugin, it connected with my WooCommerce store automatically without any extra setup. Everything worked right away, which makes the process very simple for beginners.
While this guide focuses on WooCommerce, it’s worth noting that RewardsWP also integrates with Easy Digital Downloads and MemberPress, making it a flexible choice for digital download stores and membership websites.
Step 2: Set Up Your Referral Rewards
The next step is to set up rewards for your customers and the people they refer to your online store.
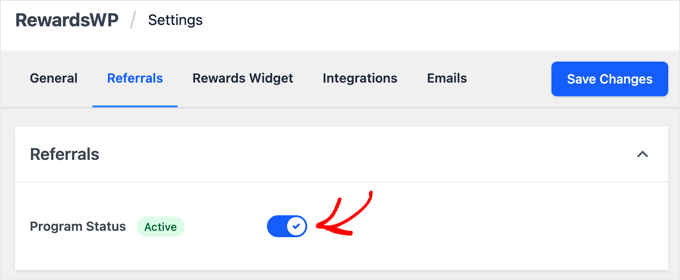
To get started, navigate to RewardsWP » Settings in your WordPress dashboard and click on the ‘Referrals’ tab.
The first thing you’ll need to do is activate the program by using the toggle to switch the Program Status from ‘Inactive’ to ‘Active’. Don’t worry, none of these settings will go live on your site until you click the ‘Save Changes’ button later.
Once activated, it’s time to set up your rewards. You’ll see two main sections: ‘Advocate Reward’ (for your existing customer) and ‘Friend Award’ (for the new customer).
In my experience, a program that only rewards your existing customers isn’t nearly as effective as one that rewards both people. After all, the friend is much more likely to use a referral link when they get something out of it, too.
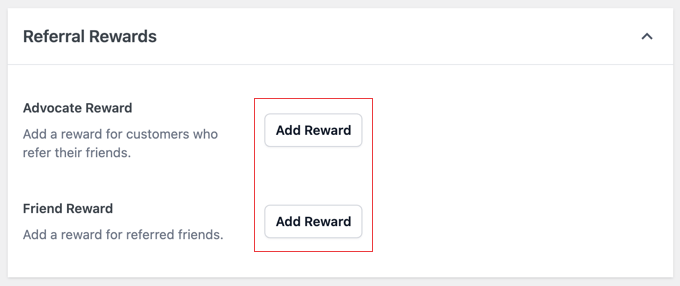
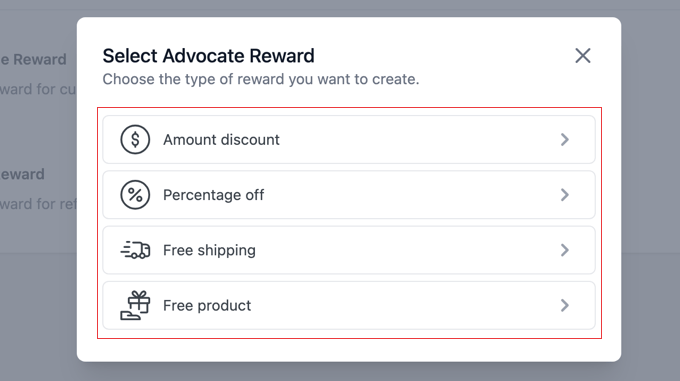
When you click the ‘Add Reward’ button, a popup titled ‘Select Advocate Reward’ (or Friend Award) will appear.
Here, you can choose the type of incentive you want to offer:
- Amount discount: A fixed dollar amount off their purchase (such as $10 off).
- Percentage off: A percentage discount on their order (such as 15% off).
- Free shipping: Waives the shipping costs for the order.
- Free product: A specific product from your store at no cost.
Let’s walk through an example. If you select ‘Amount discount,’ you will be taken to a new page to set the specific rules for that reward. You’ll see fields for:
- Reward Value: The exact dollar amount of the discount.
- Minimum Order Amount: The amount a customer must spend to be able to use the reward.
- Reward Expiration: How long the reward is valid, with options like 7 days, 3 months, 6 months, or 1 year.
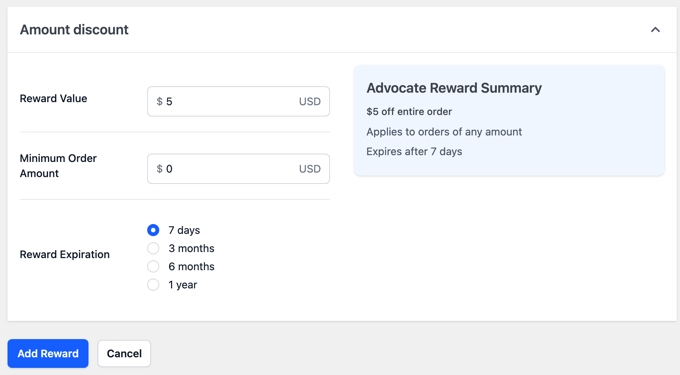
Make sure you click the ‘Add Reward’ button at the bottom to save your settings.
You’ll find that the other reward types, like ‘Percentage off’ or ‘Free shipping,’ have very similar and straightforward settings.
Once you configure and save the reward for the Advocate, simply follow the same steps for the Friend.
Once you have set up your Advocate and Friend rewards, don’t forget to click the ‘Save Changes’ button at the top of the screen to activate your rewards program.
Tips for a Simple and Effective Reward Strategy
I’ve found that keeping the rewards simple and easy to understand is the key to a successful program. A clear, valuable offer for both people is what turns your happy customers into your best marketers.
For example, you could give the Advocate a $10 discount for a successful referral and welcome the new Friend with 15% off their purchases for 7 days. This provides an immediate, clear benefit and is very easy to set up.
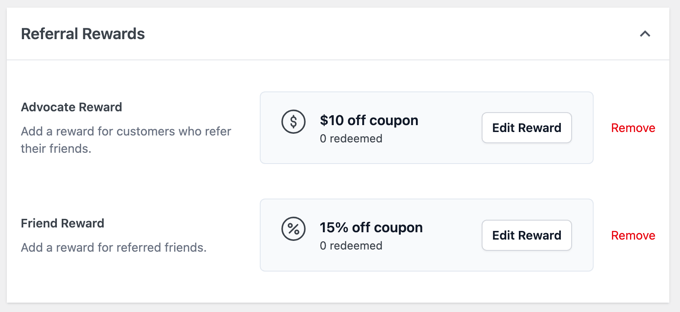
While simple discounts are very effective, don’t overlook the ‘Free Product’ reward. This can be a powerful incentive because a tangible product often feels more valuable to customers than a small discount.
Best of all, once you’ve set this up, the program runs on its own. RewardsWP handles all the tracking and reward delivery automatically, so you don’t have to manage it day-to-day.
Step 3: Customize the Customer-Facing Rewards Widget
Now, let’s customize how the rewards program looks to your customers. I recommend paying close attention to the customer’s side of things, because if the program is confusing or hard to use, then no one will use it.
In your WordPress dashboard, navigate to RewardsWP » Settings and click on the ‘Rewards Widget’ tab.
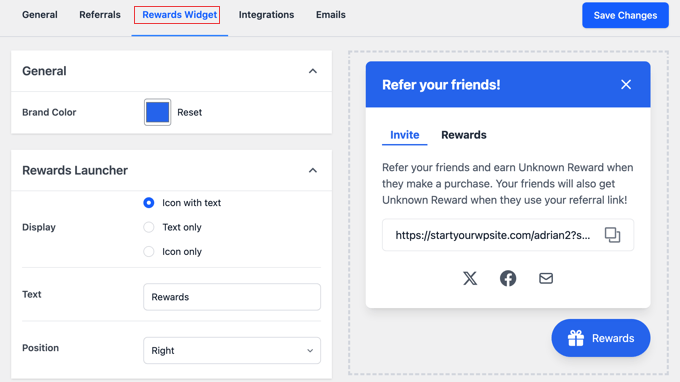
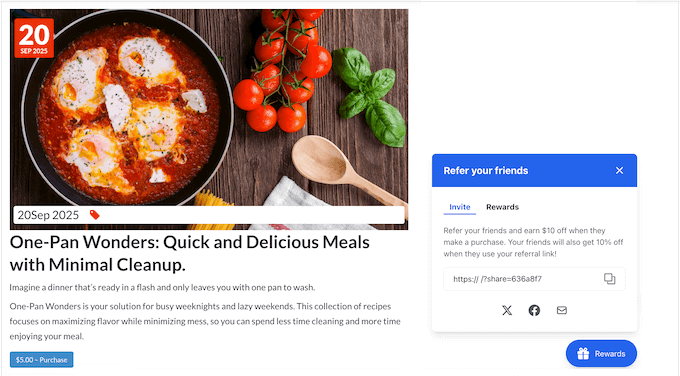
This page controls the floating widget that your logged-in customers will use to find and share their referral link.
Let’s walk through the settings:
- Brand Color: Use this to select a color for the widget’s title bar and button, so it matches your website’s design.
- Display: Choose how the widget button appears on your site. You can select ‘Icon with text,’ ‘Text only,’ or ‘Icon only.’
- Button Text & Position: Here you can change the text that appears on the button (the default is ‘Rewards’) and choose whether it’s positioned on the ‘Right’ or ‘Left’ side of the screen.
As you make these adjustments, you can see your changes in the live preview on the right side of the screen.
Next are the important Sharing Options, which you can enable with a toggle:
- X (formerly Twitter): You can write a default message that populates when a user clicks to share.
- Facebook: This toggle allows sharing to Facebook. Users will be prompted to write their own message.
- Email: You can customize the default email ‘Subject’ and ‘Message’ that gets sent. The plugin uses helpful tags like
{reward_name}and{referral_link}to automatically insert the correct information.
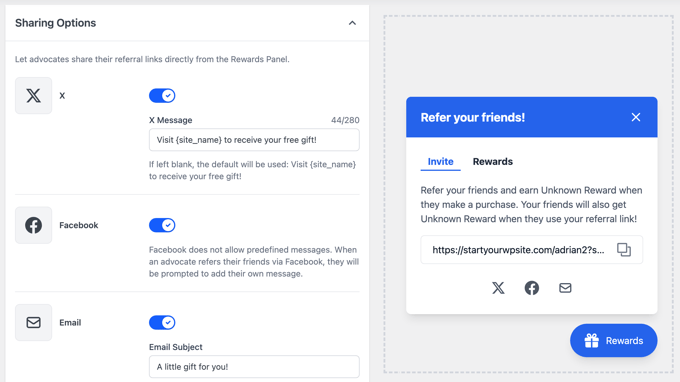
Pro Tip: I highly recommend personalizing the default email text to match your brand’s voice. This makes the entire experience feel more polished and trustworthy for your customers.
Once you’re happy with the setup, make sure to click the ‘Save Changes’ button at the top right to make your widget live.
Step 4: Configure Email Sender Settings
The referral program sends two key types of emails, and you’ll want to make sure they look like they are coming directly from your store.
The first is the invitation email that your customer (the Advocate) sends to their friend, which you customized in the ‘Rewards Widget’ settings.
The second is an automated email that notifies the Advocate when their friend has successfully made a purchase and their reward has been issued.
To configure the sender details for these emails, stay in the RewardsWP » Settings area and click on the ‘Emails’ tab.
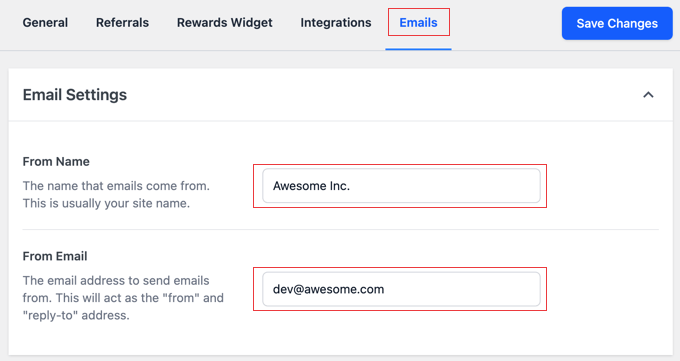
This page is very straightforward and has two important fields:
- From Name: This is the name that will appear as the sender in your customers’ inboxes. You should enter your store’s name here.
- From Email: This is the email address the rewards notifications will be sent from. It’s best to use a professional email address associated with your website, like
support@yourstore.com.
After filling in these details, don’t forget to click the ‘Save Changes’ button.
💌 Ensure Every Email Gets Delivered


WordPress uses PHP mail by default, which can be unreliable and often sends emails to the spam folder.
That’s why we recommend using WP Mail SMTP.
It connects your site to trusted mailers to make sure that all emails end up in your customers’ inboxes.
Step 5: Test Your Refer-a-Friend Program
Before you promote your new program, it’s important to test the entire process from start to finish. This helps you catch any issues and ensures your customers have a smooth experience.
Here is a quick checklist to follow:
- Log in as a test customer and find the Rewards Widget. Copy your unique referral link from the widget.
- Open the link in a different browser or an incognito window to simulate being a new visitor (the ‘Friend’).
- Make a test purchase as the new ‘Friend’ and confirm that their reward (such as 15% off) is applied correctly at checkout.
- Check your original test customer’s email inbox. After the purchase is complete, you should receive an automated email notifying you that your referral was successful and giving you your ‘Advocate’s Reward’.
- Try to use the Advocate’s reward (such as the $10 off coupon) on a new order to make sure it works perfectly.
Once you’ve confirmed that both rewards are delivered and working correctly, you can be confident that your new refer-a-friend program is ready for your customers.
Bonus Step: Track Your Program’s Success and Reward Top Advocates
Once your program is up and running, RewardsWP makes it easy to see how it’s performing.
To see a live log of all the referral activity, just navigate to RewardsWP » Referrals in your WordPress dashboard.

On this page, you’ll find a detailed table of every referral that has occurred, including who sent it, who received it, and the status of the referral. This is the best place to monitor the success of your program.
I suggest checking this page regularly to identify your most enthusiastic customers—your top advocates. You could even reach out to them personally with a thank-you note or an extra bonus coupon to strengthen that relationship and encourage even more referrals.
Method 2: Create a Points-Based Loyalty Program in WooCommerce (Using Loyalty Program by Advanced Coupons)
In this method, I will show you how to create a points-based loyalty program for your WooCommerce store. In this setup, customers will be rewarded for purchasing items, leaving product reviews, spending over a certain amount, and more.
I will show you how to do this using Loyalty Program by Advanced Coupons, which is the best WooCommerce coupon and loyalty program plugin. We have tested it extensively over the years, which you can learn about in our Advanced Coupons review.

Step 1: Install and Activate Loyalty Program by Advanced Coupons
First, you need to sign up for an account on the Advanced Coupons Loyalty Program website. Simply follow the instructions to enter your details and pay for the plugin.
Then, you need to install and activate the free Advanced Coupons plugin and the premium Advanced Coupons Loyalty Program plugin in your WordPress dashboard.
For more information on how to do this, see our guide on how to install a WordPress plugin.
Next, you need to head to Coupons » License and switch to the ‘Loyalty Program’ tab. Here, you need to enter your license key and the email address you used to sign up for the plugin.
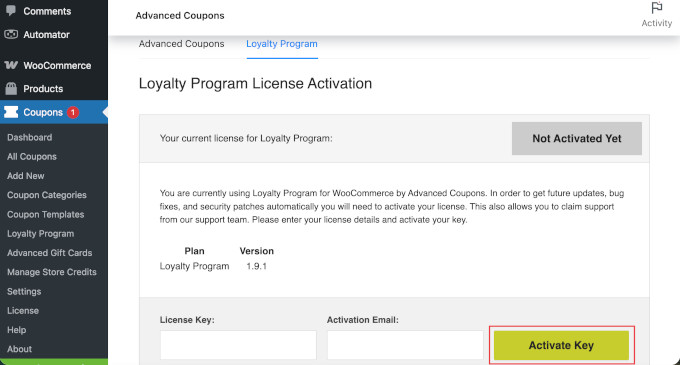
You can find your license key in your Advanced Coupons account dashboard or in the email you received when you signed up.
Then, click on ‘Activate Key’ to complete the process.
Step 2: Setup the General Settings for your Loyalty Program
Next, you need to go to Coupons » Loyalty Program» Settings from your WordPress dashboard. This is where you will build your loyalty program.
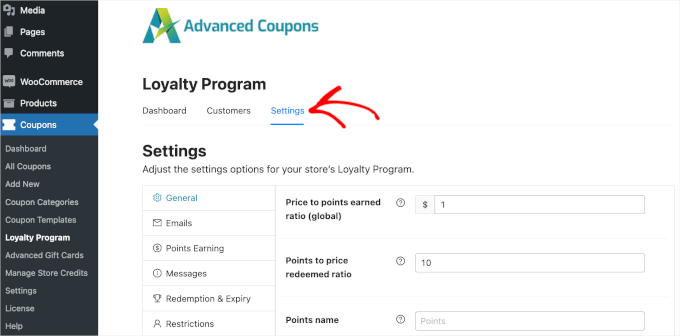
Under the General settings, you can control a few things related to your loyalty program:
- Price to points earned: The number of points that customers earn per dollar spent in your store. The default is 1 point for every $1 spent, but you can increase this to reward your customers more.
- Points to price redeemed ratio: How much each point is worth when a customer redeems it in your online store. A setting of ’10’ means that users must redeem 10 points to get a $1 discount in your store.
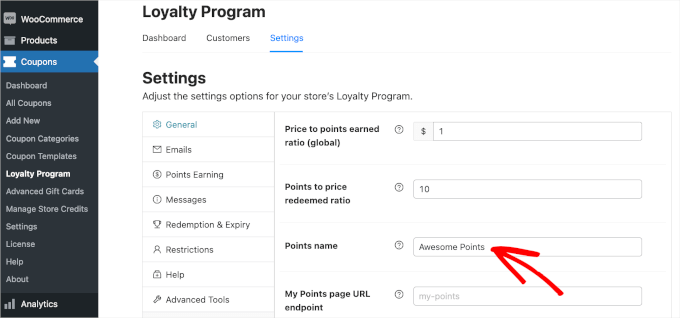
- Points name: You can change this setting if you prefer to call your points something else, like Starbucks does with its ‘Stars’. In my example, I’m using Awesome Points.
Step 3: Set up the Email Settings
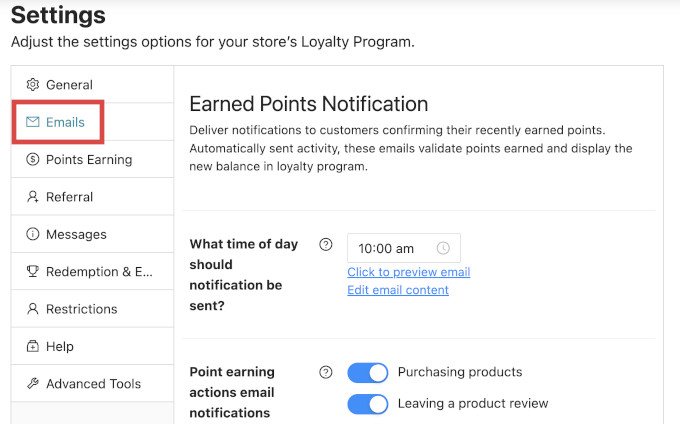
Next, in the ‘Emails’ tab, you can set up email notifications for customers enrolled in your loyalty program. These include notifications about how many points they’ve recently earned and reminders to redeem their points.
Advanced Coupons has default settings for the time of day, and how soon after customer inactivity these emails should be sent. You can leave them as they are or adjust them to fit your needs.
Expert Tip: Emails sent directly from WordPress can end up in the spam folder. That’s why I recommend using an SMTP plugin like WP Mail SMTP. It ensures that emails actually land in your customers’ inboxes!
Step 4: Configure Points Earning Settings
Next, you will configure how points are calculated in your WooCommerce store. Click to open the ‘Points Earning’ tab.
For example, you may wish to give a customer fewer points if they use a coupon code as opposed to a shopper who pays outright.
Under ‘Points Calculation’, you can use the toggles to control whether discounts, tax, shipping, and fees should be included when calculating points.
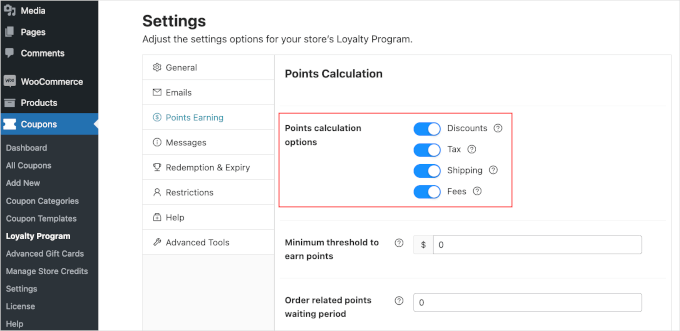
You can also set the minimum amount that customers need to spend to earn points using the ‘Minimum threshold to earn points’ setting.
On the other hand, the ‘Order related points waiting period’ setting controls how long it will take for customers to receive their points after spending.
Moving down, you can control the ‘Actions that earn points’. This means that customers can be rewarded for:
- Purchasing products
- Leaving a product review
- Commenting on a blog post
- Registering as a user / customer
- Completing their first order
- Spending over a certain amount
- Extra points during certain periods (like a sale)
Simply turn on the toggles for any actions you want to reward.
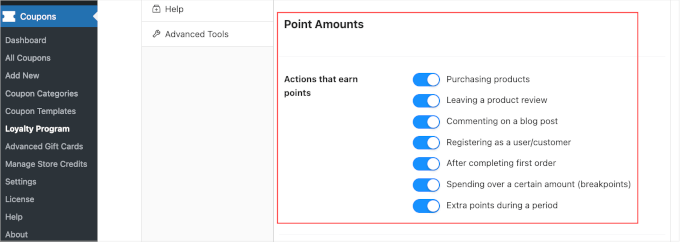
For each action that you switch on, new settings will appear below.
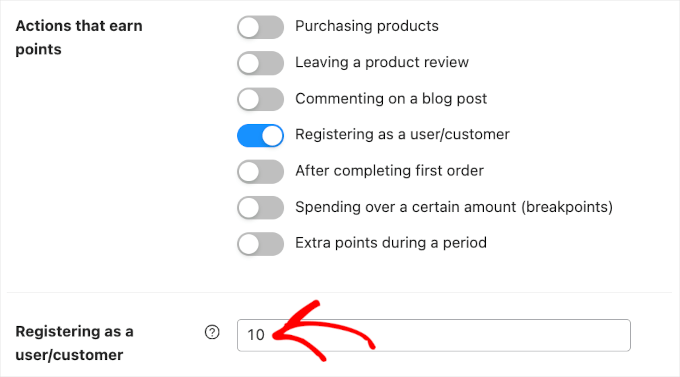
For example, if you reward customers for registering on your site, you can also set the number of points they will earn for that action.
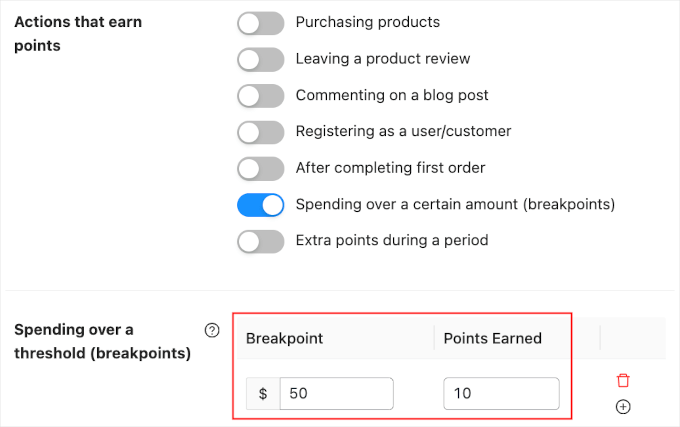
I recommend encouraging shoppers to spend more by awarding extra points for orders over a certain amount. This can increase the average order value, which is similar to cross-selling and upselling products in WooCommerce.
Just switch on the ‘Spending over a certain amount’ settings and then type a value into the ‘Spending over a threshold’ field.
During busy shopping periods, it’s also smart to give customers an extra reason to buy from your store.
For example, you might award extra points during Black Friday so that customers don’t want to shop with a competitor.
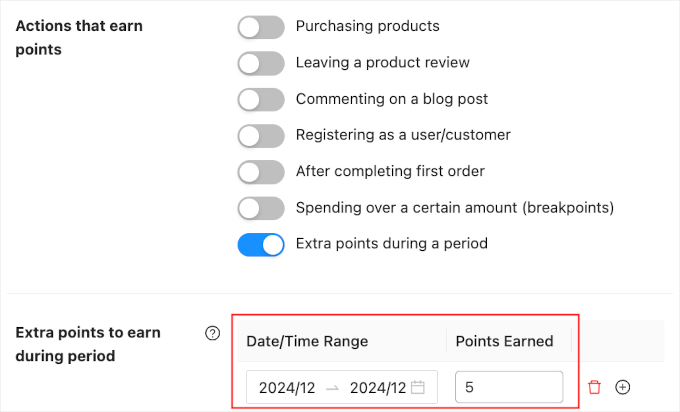
Just switch on the ‘Extra points during a period’ toggle.
Then, simply enter a date and time range into the ‘Extra points to earn during period’ section. You can also type in how many points customers will earn.
Step 5: Set up Referral Program Settings
Next, you can create a referral program for your store. This means that existing customers can refer their friends to your loyalty program and receive more points.
Just open the ‘Referral’ tab.
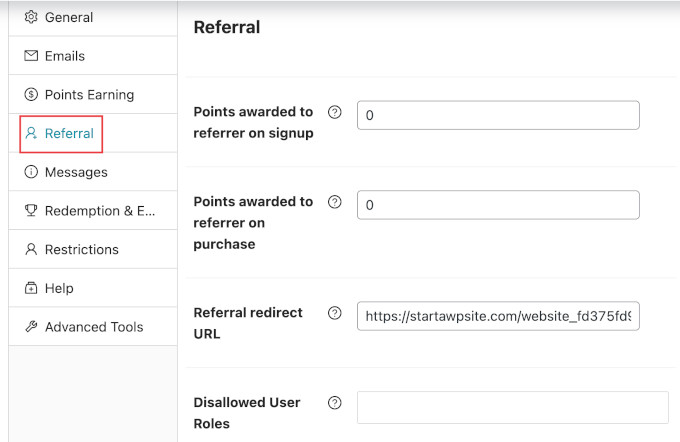
Here’s a quick overview of the settings:
- Points awarded to referrer on signup: How many points the referrer gets if someone uses their link to sign up for your loyalty program.
- Points awarded to referrer on purchase: How many points the referrer gets every time the person they referred buys something in your store.
- Referral redirect URL: Where you want to send people when they click on a referral link. For example, you might want to send them to a specific product page, the signup page for your loyalty program, and more.
You can also choose to exclude certain user roles or users from using the referral program. This could be helpful if you don’t want your team members to be eligible for the program.
Step 6: Allow Customers to Create Accounts
Your customers will need to create an account in your WooCommerce store to collect loyalty points.
You can also automatically create an account for them when they make their first purchase. This can improve the user experience and may attract additional members.
To automatically create an account for a new customer, just go to WooCommerce » Settings and click on the ‘Accounts and Privacy’ tab.
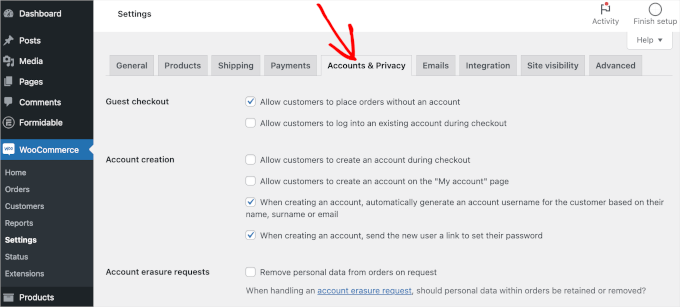
If you uncheck the ‘Allow customers to place orders without an account’ setting, customers will be unable to check out as guests.
This will encourage more people to register on your site, but may also cause more shoppers to abandon their shopping carts and give up on a purchase.
So, it’s a good idea to set up WooCommerce conversion tracking and track visitors to your WordPress website. You can then see whether this change hurts your conversion rates.
Next, you need to check the ‘Allow customers to log into an existing account during checkout’ box.
You’ll also want to make it as easy as possible for customers to create an account. So, I also recommend checking all the boxes in the ‘Account creation’ section, as you can see in the following image:
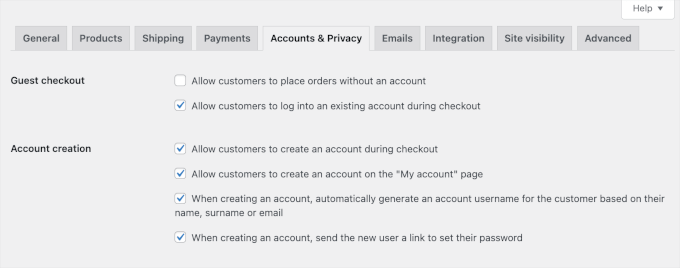
Now, WooCommerce will automatically send emails to first-time customers with information on how to access their new accounts.
Step 7: Preview Your Loyalty Program
Finally, you will want to check that your loyalty program is up and running correctly. You can do this by going to My Account » My Awesome Points.
Here, customers can see how many points they have earned and how much they are worth.
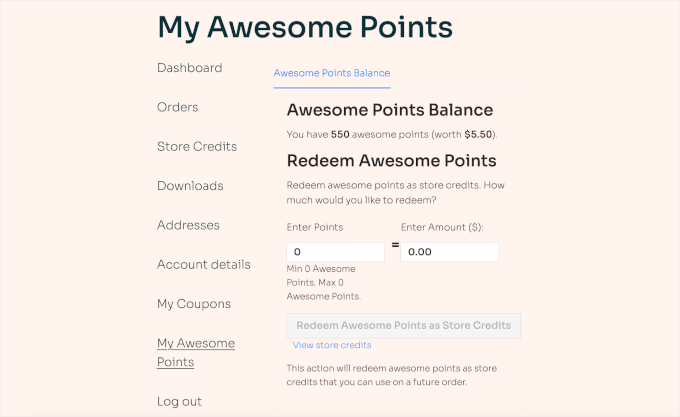
Customers simply need to enter a value in the ‘Enter Points’ field, and they will see instructions on how to redeem their points.
Best Practices for a Successful Rewards Program
Great job on getting your rewards program set up. Now that the technical side is complete, here are a few key strategies to ensure it becomes a powerful tool for growing your business.
Find the Right Balance: You want your rewards to be motivating without hurting your profits. A great way to protect your margins is to set a ‘Minimum Order Amount’ for the rewards. This ensures that the discount is only applied to purchases of a certain size, encouraging customers to spend more.
Keep It Simple: A program that is confusing won’t be used. The best strategy is to offer clear, direct value that is easy to understand in seconds. For example, “Give your friends 15% off, get a $10 coupon for yourself” is a simple and powerful offer for a refer-a-friend program.
Promote Your Program: Don’t just launch your rewards program—make sure to promote it. Mention it in your email newsletters, on your order confirmation pages, and on social media. The more your customers know about it, the more they’ll use it.
Monitor Your Results: Keep an eye on how many people are using the program. If you find that customers aren’t participating, don’t be afraid to test different reward offers to see what motivates them the most.
Frequently Asked Questions About WooCommerce Rewards Programs
Over the years, I’ve helped countless store owners set up their loyalty systems. Here are the answers to some of the most common questions I hear.
What’s the difference between a referral and a loyalty program?
A loyalty program covers the overall category of rewarding customers. This can include earning points for purchases, getting birthday rewards, or unlocking VIP tiers.
A referral program, like the one we built today, is a specific type of loyalty program that rewards customers for one specific action: referring their friends. It’s often the best place to start because it directly drives new sales.
Can I run both a loyalty and referral program at the same time?
You probably don’t need to run both at the same time. If you want the simplest way to launch a refer-a-friend program, RewardsWP is the ideal standalone solution. If you want a complete system with points for purchases, reviews, and referrals, then Loyalty Program by Advanced Coupons is the better all-in-one option.
Do I need coding skills to create a rewards program?
No, you don’t need any coding skills when using a plugin like RewardsWP. The entire setup process involves clicking through settings pages and filling out forms, just like any other WordPress plugin.
Will a rewards program slow down my website?
A well-coded plugin like RewardsWP is designed to be lightweight and won’t hurt your site speed. It only loads its scripts on relevant pages, minimizing any performance impact.
How are referral rewards handled for returned orders?
RewardsWP handles this automatically. If a referred friend’s purchase is refunded, the reward that was issued to the original customer (the Advocate) can be automatically voided to prevent misuse.
Additional Resources for WooCommerce Stores
I hope this article has helped you create a rewards program in WooCommerce. Setting up a loyalty system is one of the smartest investments you can make in your customer relationships and long-term business growth.
With RewardsWP handling the technical details, you can focus on what matters most: delivering great products and service that keep customers coming back.
You might also be interested in reading these related tutorials:
If you liked this article, then please subscribe to our YouTube Channel for WordPress video tutorials. You can also find us on Twitter and Facebook.

