If you don’t have a newsletter set up already, now is the time to get started. A newsletter has limitless uses; you could inform users about your latest articles, thank them for signing up, remind them about abandoned carts, or invite them to upcoming events.
And all of this can be totally automated, sending emails in various time intervals or based on certain triggers. This takes the work off while letting you build loyalty with your subscribers.
Looking for an affordable newsletter plugin that’s filled with features yet can be mastered in minutes? AcyMailing might be worth a try. Unlike other mailing plugins, it puts no limits on contacts or campaigns, and it’s pretty easy to pick up as well.
Let’s take a look at AcyMailing and see its best features in action.
What is AcyMailing?

AcyMailing is a free and premium newsletter plugin that stands out in quite a few ways. For one, it’s both a WordPress and Joomla plugin, which is useful if you work with both CMSes or are planning to switch from one to the other.
It’s also beginner-oriented, with super easy setup and a drag-and-drop template builder system. If other plugins are giving you trouble by requiring HTML to design beautiful email templates, AcyMailing does it all without code.
Finally, while it’s not as complex as top-end newsletter plugins, it offers a lot more features for the price and is easier to wrap your head around. It also imposes no annoying limits on how many emails you can send or how many subscribers you can have. Any limitation falls on your web host or SMTP service alone.
AcyMailing Pricing
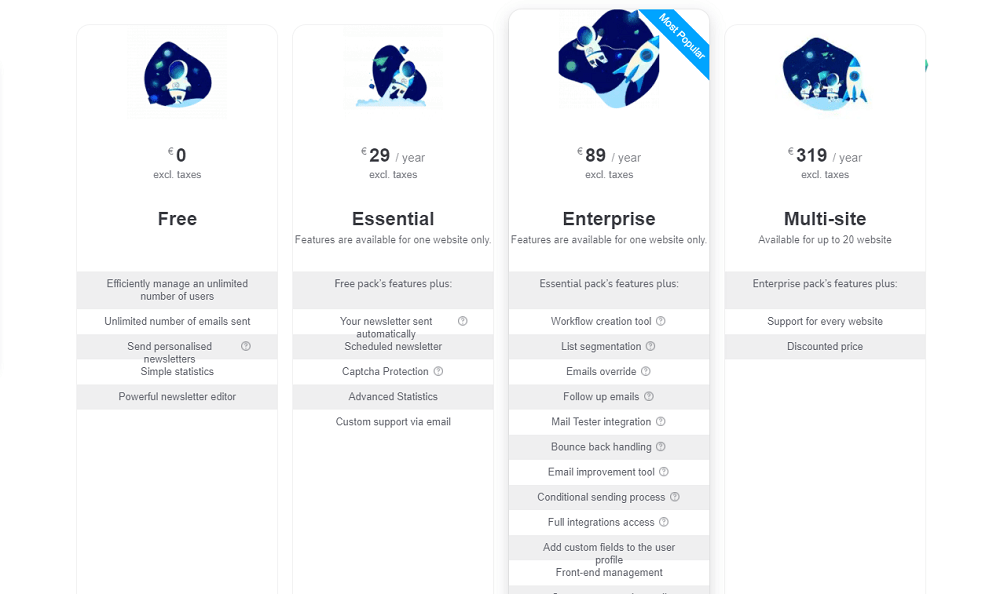
AcyMailing is both a free and premium plugin with multiple paid tiers. Here’s an overview of what you get:
- Free: No-limit newsletter sending, the newsletter editor with personalization features and manual sending, and simple statistics.
- Essential ($29/year): The first tier of premium AcyMailing offers automatic/scheduled sending, Captcha verification, and advanced statistics.
- Enterprise ($89/year): Advanced features become available, including list segmentation, follow-up emails, conditional triggers, spam testing, integrations access, and more.
- Multi-site ($389/year): With all the features of the Enterprise plan, you also can use the plugin on up to 20 sites.
While there is a multi-site license, all features will work on multiple sites except those that rely on cron jobs, automatic updates, and the spam tester.
In addition, while you can keep the premium plugin after your license expires, you’ll need to renew it yearly to continue using automatic email sending and spam testing.
AcyMailing Features
Wondering what exactly AcyMailing has to offer? Here’s a few helpful features to look out for.
Newsletter Automation
While it’s only available on the premium version, AcyMailing offers powerful automation and conditional sending logic. Here’s what you can do:
- Create manual emails or set up recurring scheduled campaigns.
- Send emails in response to certain triggers like subscribing to your newsletter.
- Integrate with plugins like WooCommerce to, for example, send abandoned cart reminders.
- Create manual mass actions (like resending confirmation emails or subscribing users to a list) or set up automated actions.
- Support for double opt-in.
- Automatic user management, subscribing and unsubscribing.
AcyMailing is designed to work with any server, even ones that restrict or throttle email sending, by using a queue system. It also does its best to prevent your mail from being labeled as spam with the spam testing tool and spam score.
Newsletter Designer and Form Builder
AcyMailing works on a simple template system that has a very low barrier to entry. No more struggling with confusing interfaces; just drag and drop content into blocks, very similarly to Gutenberg.
While it’s very minimalistic and easy to use, the newsletter designer does pack a punch once you dig into its settings. It includes tags to personalize your emails with, addressing users by name or other IDs, desktop and mobile preview with responsive templates to match, and even A/B testing.
The form builder is much simpler; it doesn’t use a drag and drop builder, but instead just has a few settings to tweak.
No Limits
Unlike other plugins, AcyMailing doesn’t cut you off at a certain number of users, lists, newsletters, or emails. Even in the free version of the plugin, you can manage as many users and send as many emails as your host or SMTP service allows.
Integrations
AcyMailing supports a decent few mailing services:
- Amazon SES
- Elastic Email
- Mailgun
- Postmark
- Qmail
- SendGrid
- Sendinblue
It also works with the default PHP mail function from your server, as well as generic SMTP mail services.
AcyMailing integrates with several WordPress plugins, most notably WooCommerce, as well as multiple contact form, event calendar, and user membership plugins.
Also – if there is a feature you want, but don’t see listed, you can submit a feature request. The developers are very responsive and even have a live roadmap you can check to see what’s already in the works for upcoming updates.
How to Set Up AcyMailing Newsletter
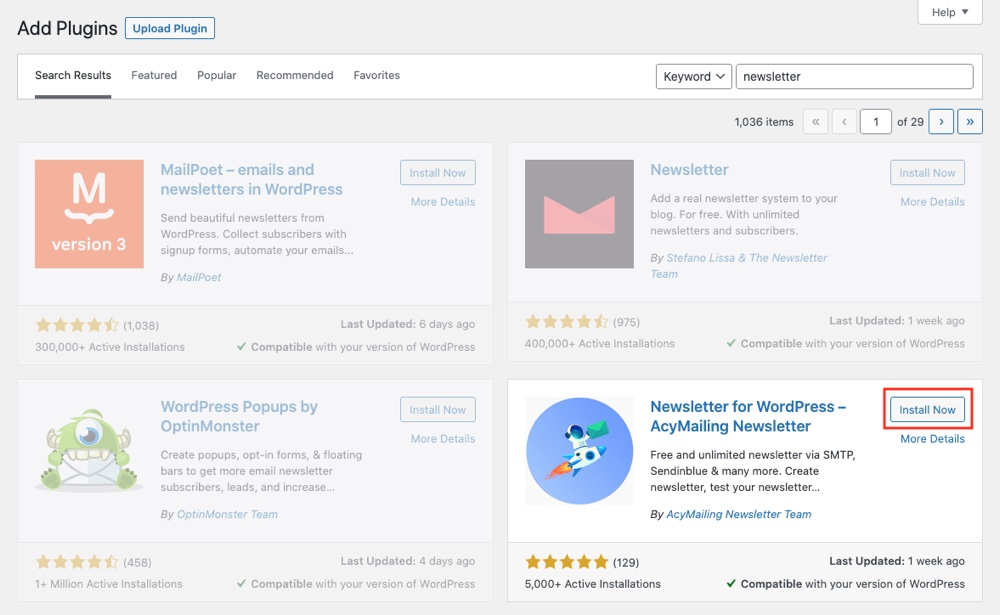
First step: Installing AcyMailing Newsletters for WordPress. If you want to try the free version of the plugin, you can go to Plugins > Add New and search for “newsletter” or “acymailing”. If you’ve purchased the premium version, instead click Upload Plugin and upload the zip provided. Make sure to activate it.
You’ll have a new AcyMailing section now, so navigate to AcyMailing > Dashboard. Here you’ll find a step-by-step guide which will walk you through the basic setup procedure.
At one point you’ll be asked to design your first email and do a test send. You can leave it on default, or click the blue Edit button to try out the drag and drop designer.
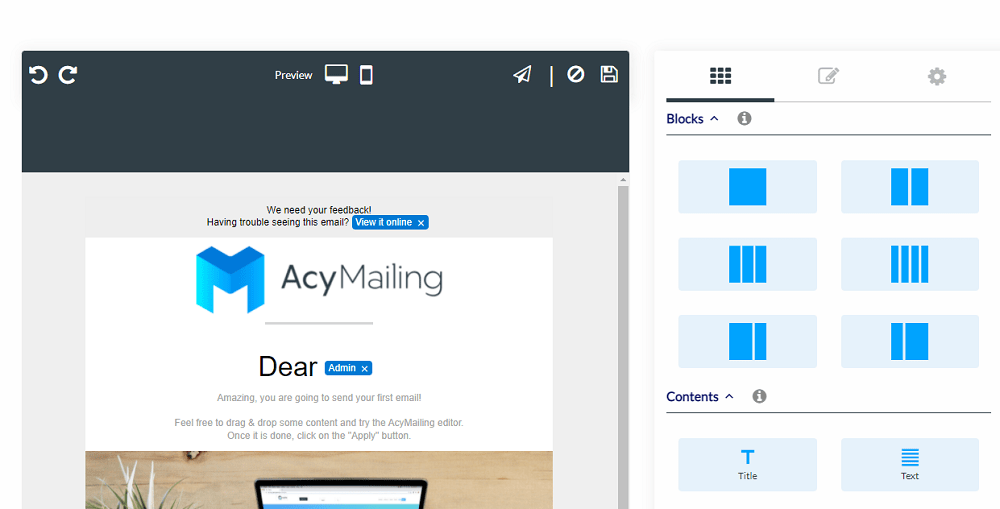
The interface is fairly simple and should be easy to get the hang of. Drag in a block, then drag a content block into it; that’s the gist of it.
Hover over any block to move, duplicate, delete, or edit it. Click on a block to bring up the editing menu, and click directly on a content piece to open its settings menu.
Click the gear on the right side of the screen to edit the template as a whole, tweak color palette and font, or even upload a custom style sheet.
Remember to check out the preview buttons at the top of the designer, and remember you can undo or redo if you make a mistake. Click Apply (floppy disk symbol) or Cancel (crossed-out symbol) when you’re finished experimenting.
Now setup your test email receiver list and then configure your email sending settings. If you use any of the services on the list, pick those. If you use a different external service, pick External Service (SMTP). Otherwise, choose Your server (PHP Mail Function).
You can access these settings later in Configuration > Mail settings.
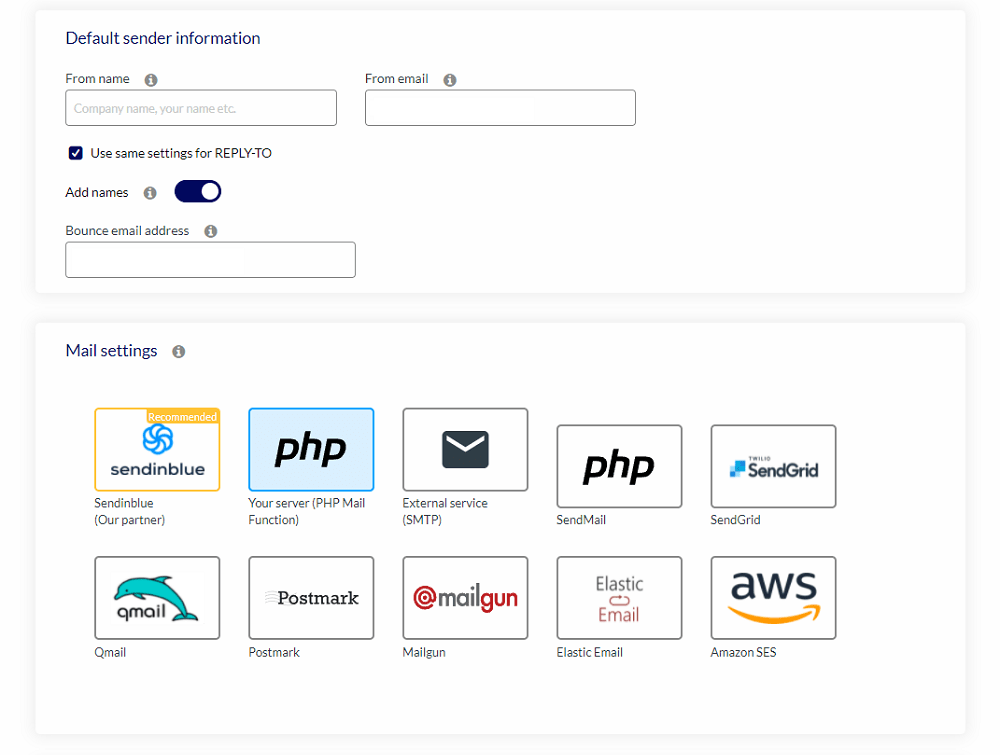
After this, you just need to send your test email and you’re ready to start exploring the plugin. Make sure to take a look at AcyMailing > Configuration and ensure everything is how you want it.
You should also get used to the Dashboard, since it has quick links to emails, audience, and automation settings, and also provides at-a-glance statistics.

Diving Into AcyMailing
Let’s go over the most important functions offered by AcyMailing Enterprise. There’s plenty to explore, but let’s make sure you know how to create a form, manage users, and set up email campaigns.
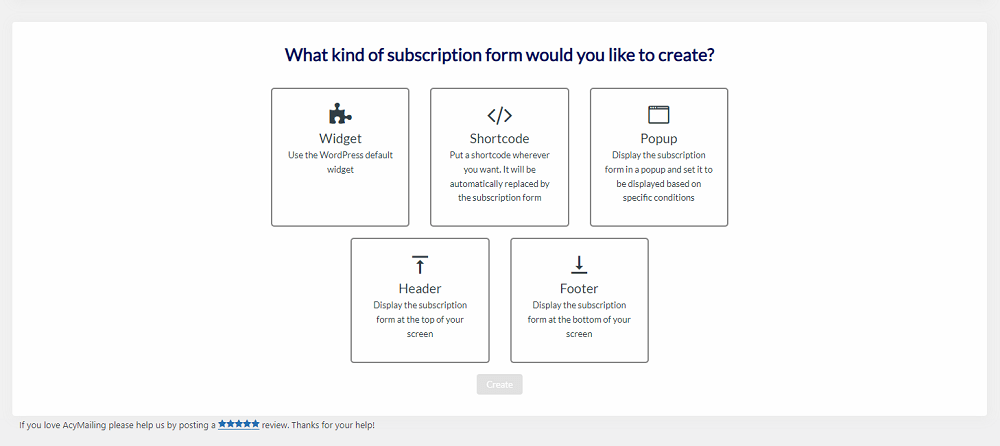
First: Forms can be created in AcyMailing > Subscription Forms.
You can add them to the header, footer, or other widgetized areas, design a form to be used with a shortcode, or even make a popup with custom display rules. You can also simply open any page in Gutenberg and add an AcyMailing block.
In AcyMailing > Custom Fields, you can customize your form block further by requesting additional info, such as age.
Users collected through forms can be managed in AcyMailing > Subscribers. You can also import a list of subscribers here. These can be further segmented in AcyMailing > Segments and AcyMailing > Lists, so you can target and separate specific groups.
Now the fun part: Designing an email campaign. Head over to AcyMailing > Emails to get started. You can pick from a variety of types, from the basic campaign to something totally automated, follow-up emails, welcome emails, and more.
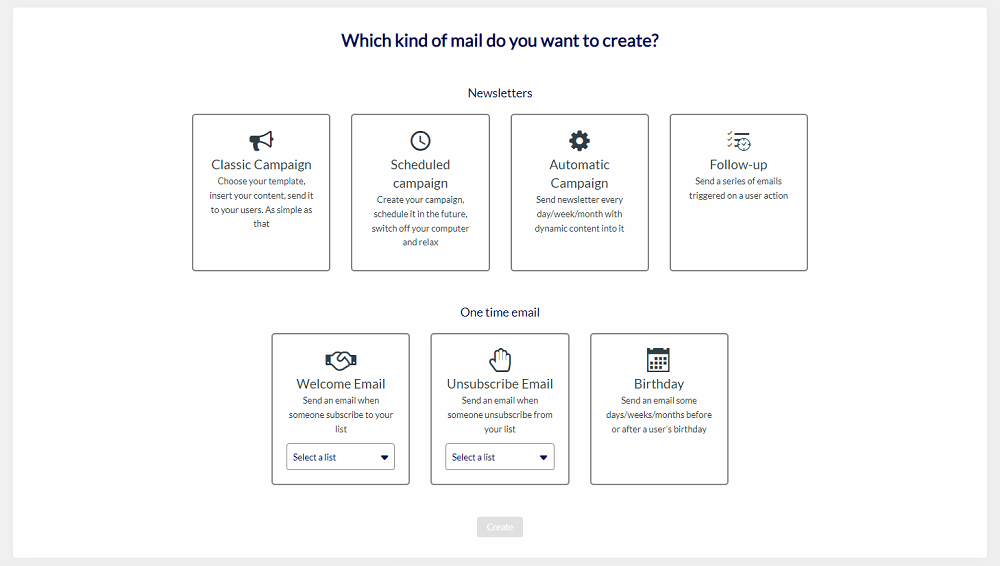
Pick the type you want, choose your template or build your own, change the settings, and send a test email.
Before this, you may want to visit AcyMailing > Templates, where you can create your own custom template for quick use later. When you’ve created some campaigns, visit AcyMailing > Queue to see an overview.
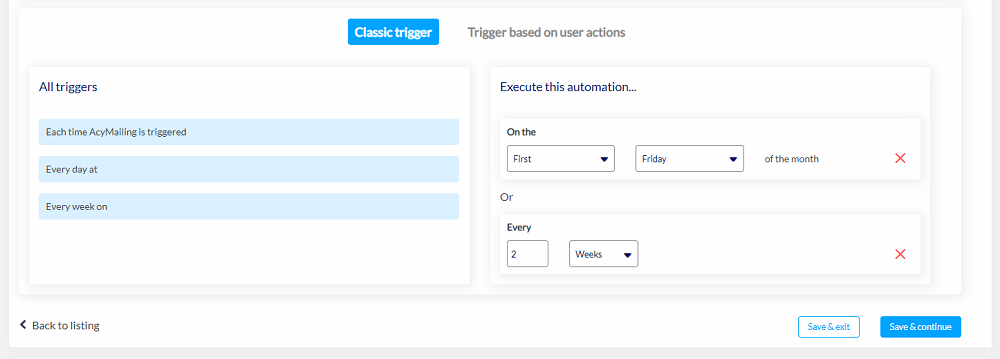
Another important function is found under AcyMailing > Automation. This lets you set up triggers with a drag and drop conditions builder. For instance, you can resend confirmation emails for unconfirmed subscribers once a week or send an email to the admin when a new user subscribes.
Finally, the Statistics menu provides insight into click rate and bounce rate and can be narrowed to certain campaigns.
Final thoughts – if other newsletter plugins are far too expensive or difficult to pick up, AcyMailing may be just what you’re looking for.
It’s robust enough to segment, automate, and personalize emails with advanced functions, while not inundating itself with confusing features or a cluttered UI that can take weeks to get the hang of. An afternoon with AcyMailing and you’ll be ready to set up your campaigns and start attracting subscribers.
The simple and clean nature of this plugin is appealing, especially for beginners. It has a free version, so give it a try and see if you enjoy the easy drag-and-drop template builder and dynamic automation.
Disclaimer: WPExplorer may be an affiliate for one or more products listed in the article. If you click a link and complete a purchase we could make a commission.


