Achira22 / stock.adobe.com
If you’re looking to open an online shop to sell your products or services, a good place to start is with a reputable, well-known e-commerce platform such as WooCommerce*. However, knowing how to go about it can be a bit intimidating, especially if you’re a beginner.

Fortunately, WooCommerce is easy to use. It’s flexible, user-friendly, and makes integrating your online business with your WordPress site a breeze – even if you don’t consider yourself tech-savvy.
In this post, we’ll explain what WooCommerce is, how it works, and the benefits of using it. Then we’ll walk you through a WooCommerce tutorial for beginners, showing you how to start your first online store in four simple steps. Let’s get started!
In This Article 👁
What is WooCommerce? 👩🏻🏫
WooCommerce is an e-commerce platform that lets you create an online store for your WordPress site. You can use it to sell both digital and physical products and goods, as well as services.

Built on WordPress, the WooCommerce plugin* is open-source software that is both free and highly customizable. With over five million active installations and a 4.5-star rating, it’s the most popular e-commerce plugin available and can be used for both small and large businesses.
It is flexible, highly extendable, and customizable, and offers a plethora of options for designing the perfect e-commerce solution for your WordPress site. Whether you’re looking to add shopping cart functionality to an existing site or want to create an online shop from scratch, WooCommerce makes doing so easy.
You can use WooCommerce to:
- Sell products and services, including digital downloads and affiliate goods
- Add shopping cart features and functionality
- Create membership sites
- Manage orders and shipping operations
- Automate sales and tax calculations
- Accept secure online payments from multiple gateways
- Choose from dozens of add-ons to customize your online store
Aside from starting your online store, WooCommerce also comes packed with features that make the process of selling and fulfilling orders easier. From shipping label configuration to order tracking and reporting, WooCommerce simplifies the entire experience of starting and managing an e-commerce site.
The Benefits of Using WooCommerce for Beginners 🏅
If you’ve never started an online store before, you might be concerned about the technical aspects involved in doing so. However, one of the biggest draws of using WooCommerce as an e-commerce solution is that it is beginner-friendly.
Built as a WordPress extension, WooCommerce was developed to make creating, launching, and managing your online store as simple and straightforward as possible. What’s more, you can leverage dozens of features, templates, and add-ons to customize the store to the exact needs and preferences of your business.
Some additional benefits of WooCommerce include:
- Multiple payment options. By default, WooCommerce comes with PayPal and Stripe support built-in. However, there are also dozens of additional gateways you can choose from as add-ons, including Authorize.net, bank transfers, cash, Amazon Payments, and more.
- Designs to fit any theme. The WooCommerce plugin can be customized to fit just about any WordPress theme. You can also choose from thousands of designs and themes, many of which are free.
- Highly extendable and scalable. WooCommerce comes with its own REST API for third-party service integration. There are also a plethora of plugins available, from Google Analytics to PDF Invoices and Packing Slips. Whether you’re looking for booking and subscriptions, sales tax collections, shipping integrations, or something else, there’s probably an add-on for it.
- Unlimited sites. WooCommerce is free, open-source software. This means you can use it to create as many online stores as you wish, with no licensing fees.
As an e-commerce solution, WooCommerce is both powerful and affordable. While some other options on the market require licensing fees and complex installation and configuration processes, WooCommerce lets you add and customize an online store to your WordPress site, and make it as simple or intricate as you want.
[bctt tweet=”💵 WooCommerce makes adding an online store to your WordPress site as simple as possible. #WordPress” username=”thewpbuffs”]
What You Need to Get Started With WooCommerce 🔧
Before we get into creating your online shop with WooCommerce, there are a few things you’ll need to get started. If you’re adding WooCommerce to an existing WordPress site, you won’t need to worry about this part.
However, if you’re creating an e-commerce site from scratch, you first need to register a domain, purchase hosting, and set up your WordPress installation. If you need detailed guidance on this, refer to the first three steps of our How to Start a WordPress Blog post.
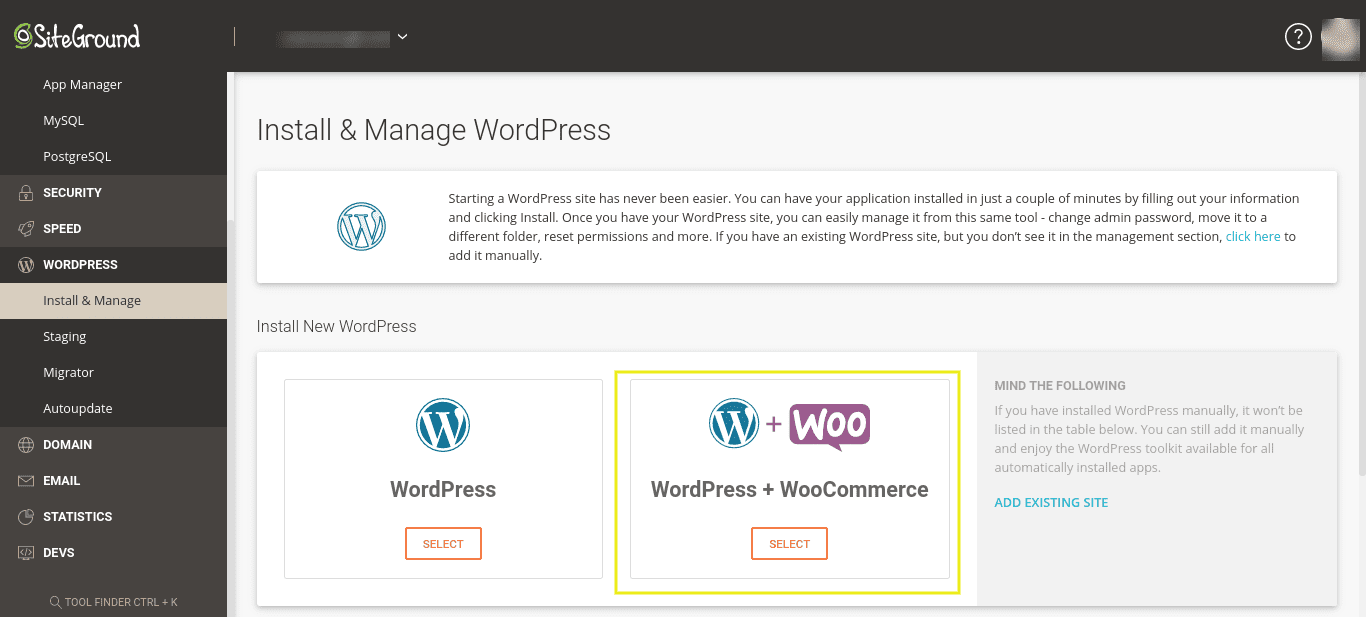
Note: Some hosting providers such as SiteGround offer one-click installations for WordPress and WooCommerce:
Another thing we recommend is an SSL certificate, so you can accept secure online payments. Depending on your hosting provider, this may be included in your plan. If not, you can refer to our guide on getting a free SSL certificate for your WordPress site.
How to Use WooCommerce (In 4 Steps) 💰
Once you have your WordPress site set up, you’ll be ready to get started with WooCommerce. In this WooCommerce tutorial for beginners, we’ll walk you through how to set up your online store in four steps:
- Install the WooCommerce Plugin and Configure Your Settings
- Add a New Product to Your WooCommerce Store
- Choose a Theme for Your WooCommerce Shop
- Select Relevant Extensions to Expand the Functionality of Your WooCommerce Site
1. Install the WooCommerce Plugin and Configure Your Settings
The first step is to install and activate the WooCommerce plugin* the way you would any other WordPress plugin. You can download it from the WordPress Plugin Directory, then upload it in your admin dashboard by going to Plugins > Add New > Upload Plugin.
Another option is to search for it in the Plugins dashboard, then click on the Install Now button, followed by Activate. Once you activate the WooCommerce plugin, it will bring you to the installation wizard:
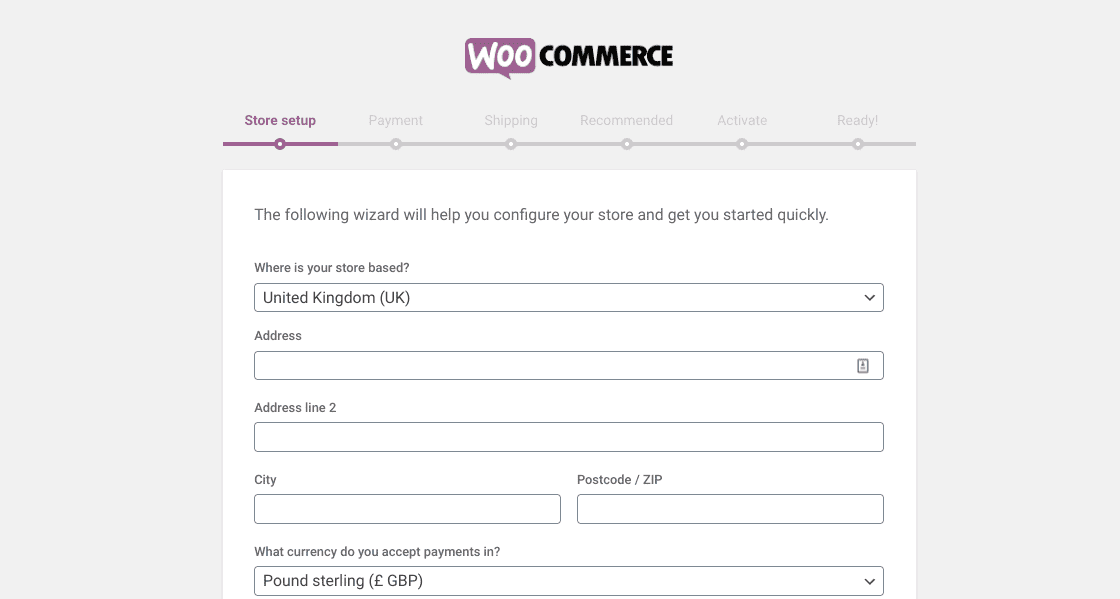
This is where you’ll fill out the details needed to set up your WooCommerce store. This includes the store location and accepted payments.
You can always go back and manually change these settings from your WordPress dashboard (WooCommerce > Settings). However, filling out the basic information now can be helpful in getting the store up and running.
After you enter in the store location information, click on the Continue button at the bottom. Next, it will bring you to the Payment page, followed by Shipping. Fill in the information and configure the settings as you see fit.
The fourth screen on the setup wizard will be for recommended extensions. We suggest de-selecting all of these for now. You can always go back and add only the ones that are relevant to your site later:
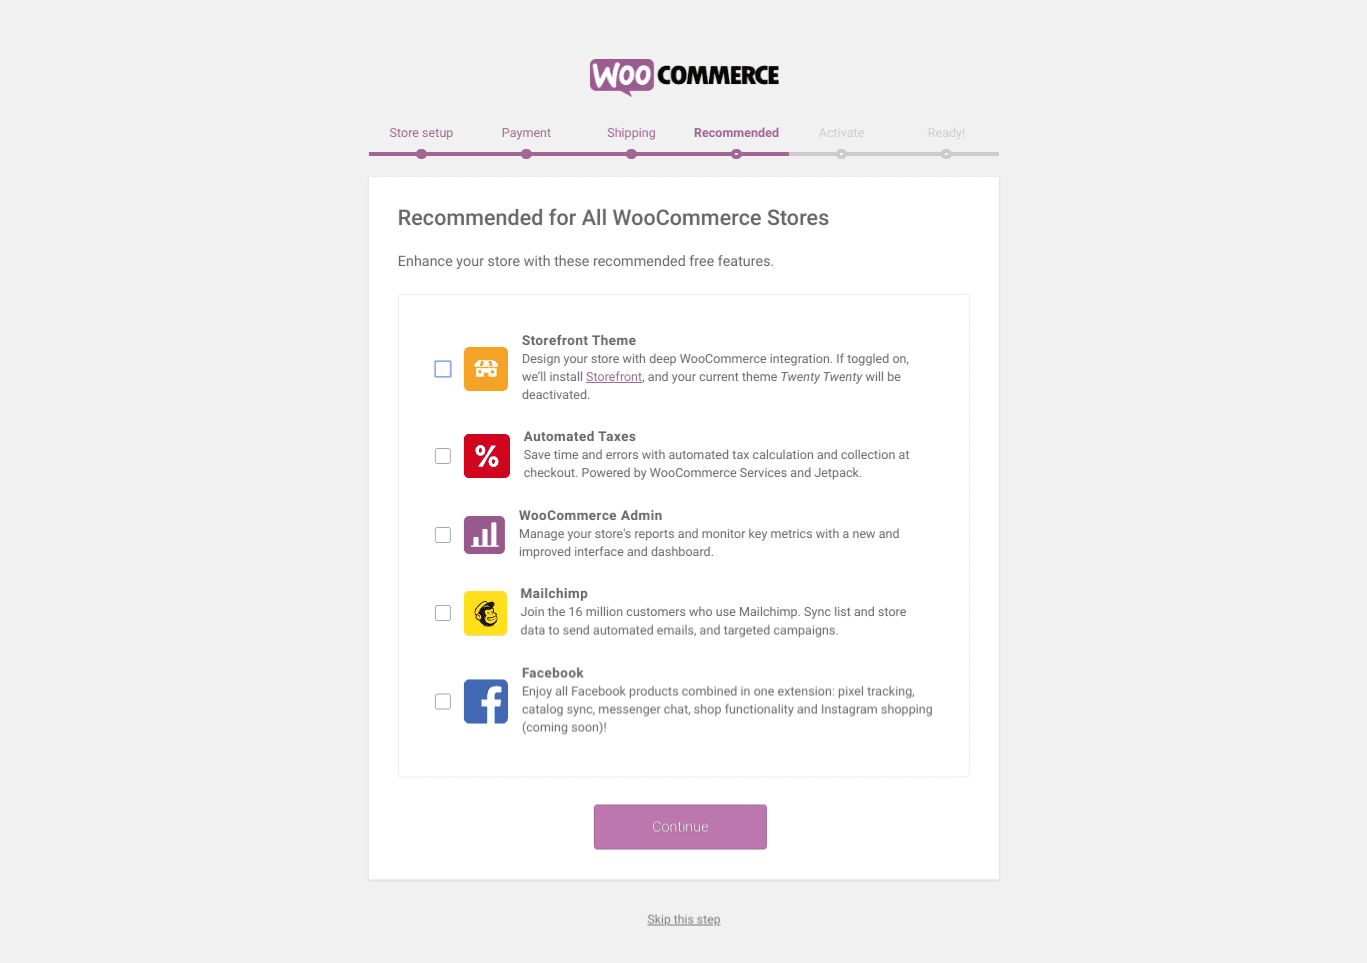
It will also prompt you to download and connect with the Jetpack plugin. Again, you can skip this step for now. On the final page, you have a few options:
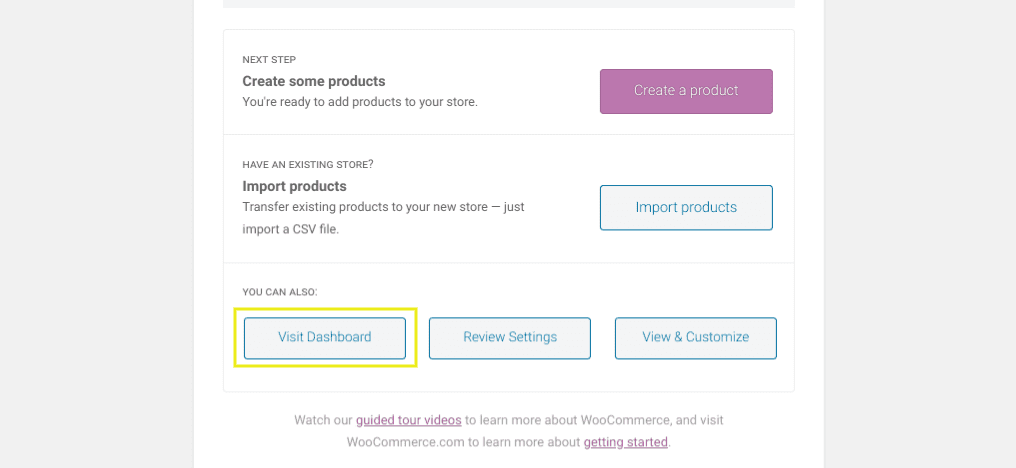
You can choose to create new products, visit your dashboard, or review the settings. If you visit your WordPress dashboard, you’ll notice the WooCommerce item has been added to the admin area:
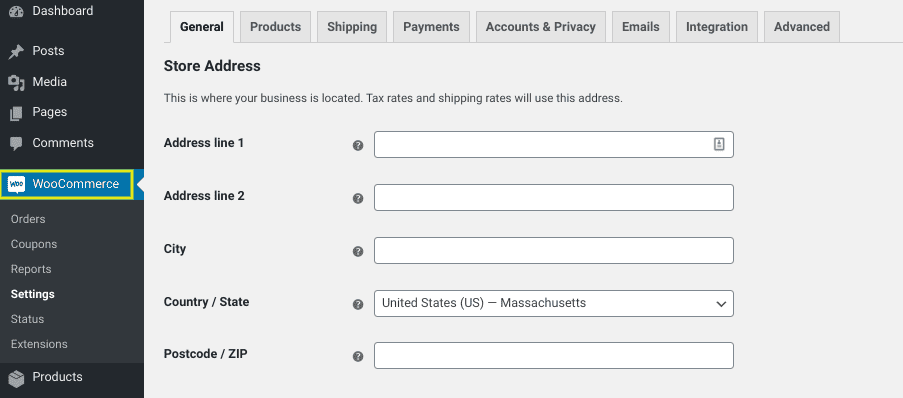
Again, you can always revisit this section to change your settings as needed.
2. Add a New Product to Your WooCommerce Store
Once you finish the installation wizard setup, you can add your first product to your WooCommerce store. You can do this by going to Products > Add New:

If you’re familiar with WordPress, this page will probably look familiar. It looks and functions similarly to regular posts and pages.
For example, on this page, you’ll create a title for your product as well as write a description for it. To the right of the page, you can add product categories and tags. These make it easier for your customers to sort your offerings to find what they are looking for.
Next, scroll down to the Product Data box:
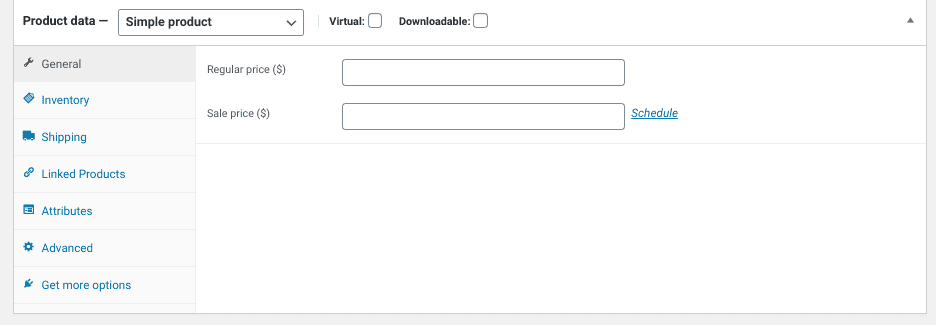
In this section, you can fill out the information for:
- Product type and pricing. You can set the listing price, as well as an option to add a sale price. WooCommerce also lets you use this section to set and show a sale price for offers with specified dates.
- Inventory. This is where you can configure the settings for managing your inventory, including enabling notifications for low or out-of-stock items.
- Shipping. Here you can fill out the information about the product’s weight, dimensions, and class.
If you need more information or guidance navigating the product types and pricing options, check out the WooCommerce documentation.
You can also add a product image, which is similar to the featured image on WordPress posts. To add more images, you can use the Product Gallery option.
Finally, don’t forget to review your product information. Once you’re satisfied, you can click on the Publish button in the top right corner of the page. You can repeat this process every time you want to add a new product to your store.
3. Choose a Theme for Your WooCommerce Store
WooCommerce can work with any WordPress theme. However, that doesn’t necessarily mean that the theme you’re using for your WordPress site is the best one for your storefront. If you’re creating a site from scratch, you’ll need to do this anyway.
We recommend choosing from the many themes and templates designed specifically for e-commerce. To get started, you can browse the WooCommerce Theme Store to find one that fits your needs. You can filter by free, storefront, and responsive themes, as well as by industry:

If you find one you like, you can select the Add To Cart button, and then continue with the checkout process. On the order confirmation page, you’ll see a Download button. You can then upload the file to your WordPress site by going to Appearance > Themes > Add New > Upload Theme.
You can also browse themes in the WordPress Theme Directory, or go to Themes > Add New from your WordPress dashboard. Then, you can filter by the e-commerce feature:
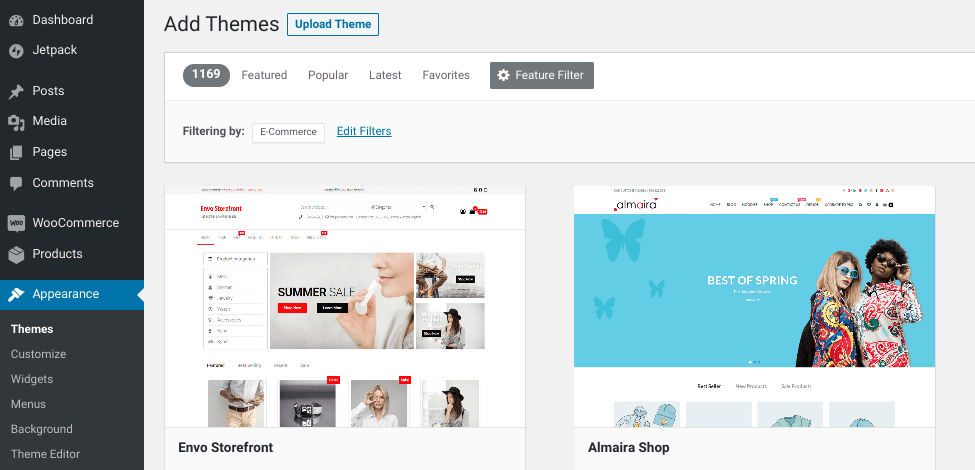
Once you find one you like, click on the Install button, followed by Activate. We also suggest previewing the theme with a product you just created, to get an idea of how your store will look from the front end of your site:

As with any WordPress theme, you can use the Theme Customizer to adjust the appearance and styles of the theme as you see fit. The specific theme and design you choose will depend on your type of business and the products you’re selling.
However, when selecting a theme, it’s a good idea to keep it simple. The goal of your e-commerce pages is to drive conversions. Therefore, you want the attention to be on the products themselves, meaning as little clutter and distraction with the design as possible.
4. Select Relevant Extensions to Expand the Functionality of Your WooCommerce Store
As we mentioned earlier, one advantage of using WooCommerce as a beginner is the variety of extensions available for you to choose from. You can use them to add specific functions and features to your store with just a few clicks.
For example, there are extensions that can help you:
- Handle shopping cart abandonment
- Offer dynamic pricing and discount options
- Add advanced product filtering
- Exercise more control over your shipping rates
- Create landing pages to promote products
There are both free and premium options available, which you can explore through the WooCommerce Extensions Store:
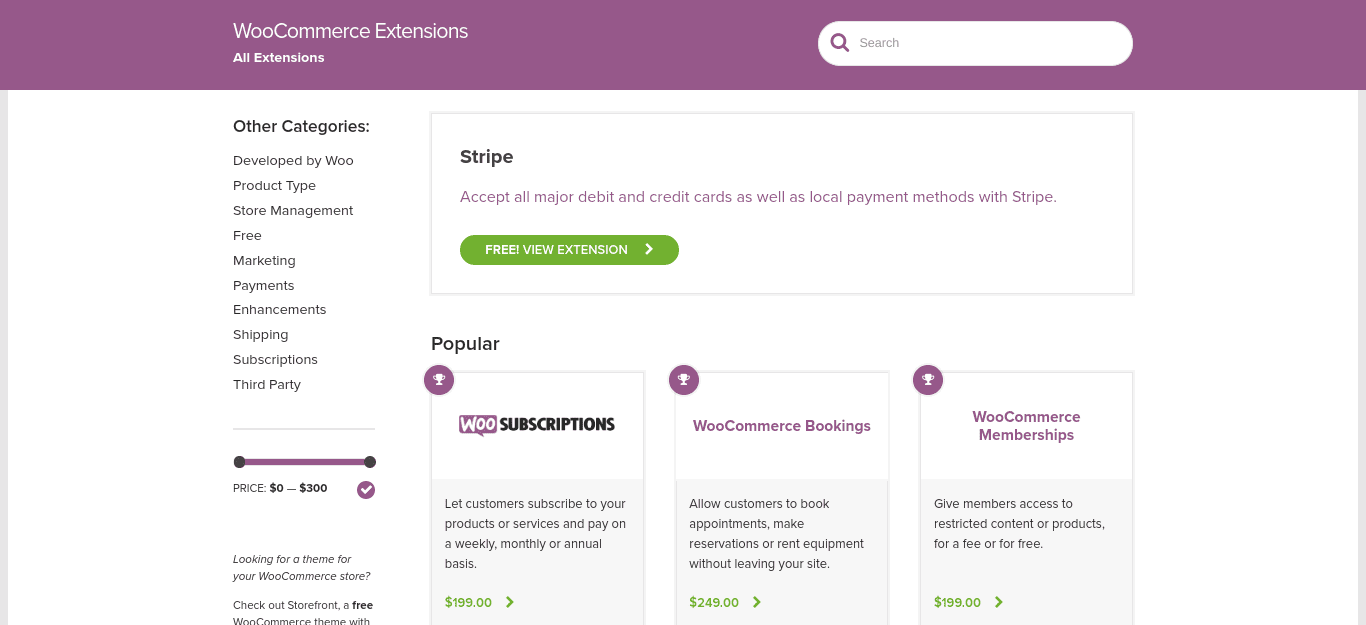
You can also do this directly from your WordPress dashboard by going to WooCommerce > Extensions:
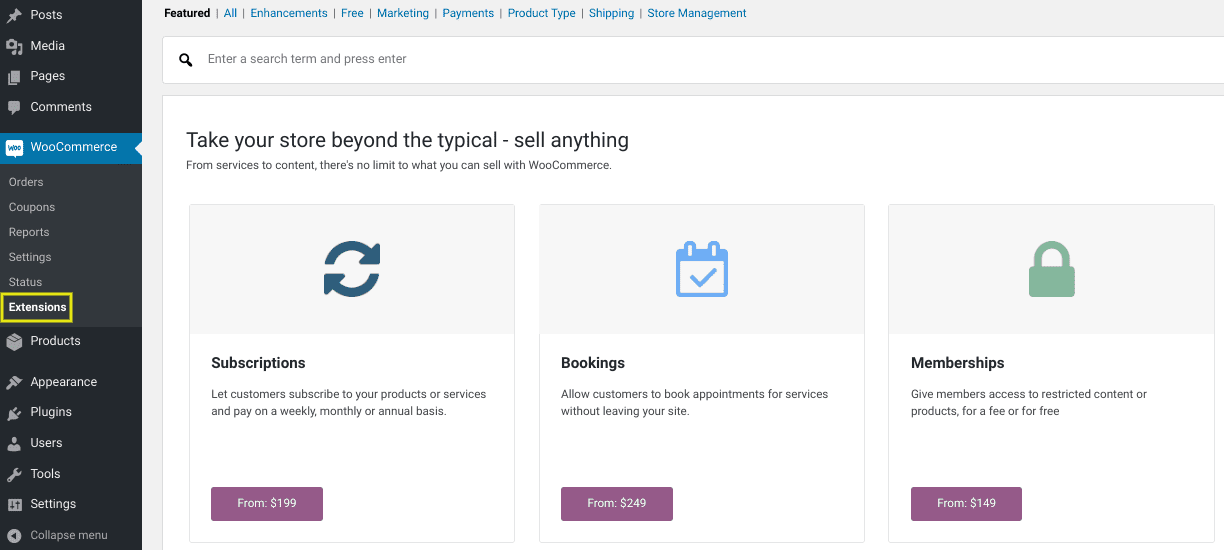
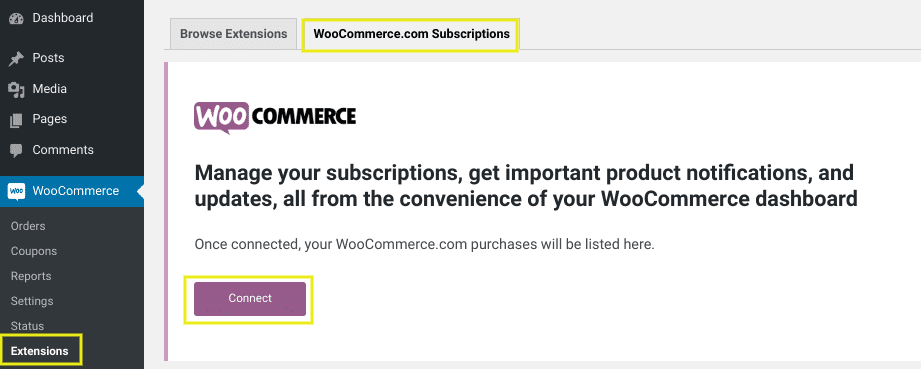
Before searching for and selecting your extensions, we recommend first connecting your WordPress site to your WooCommerce account. You can do this by clicking on the Connect button under the WooCommerce.com Subscriptions tab:
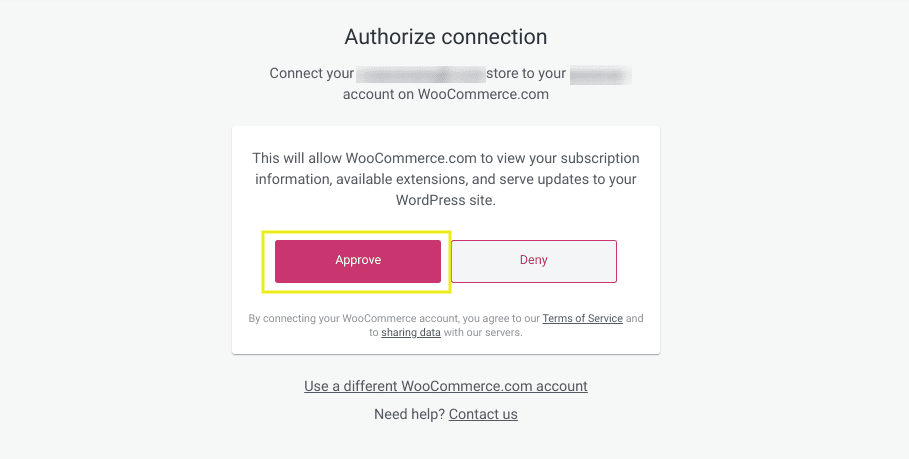
On the next page, it will ask you to authorize the connection. To do so, click on the Approve button:
When you’re ready to browse extensions, you can search by term or use the navigation bar at the top to filter by category. Let’s say you want to add a free one such as the Amazon Pay extension.
Once you click on it, you’ll be redirected to the WooCommerce Marketplace extension information page. Click on the Install Now – Free button.
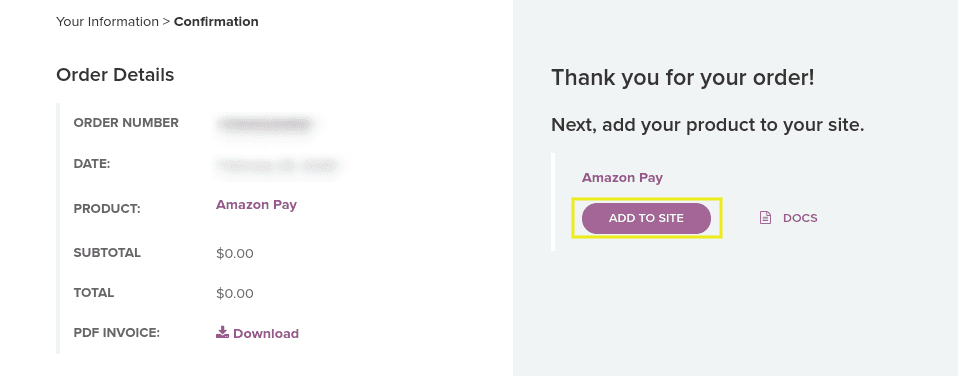
This will bring you to the checkout page. After you click on the Continue button, fill in your information, then select Purchase to complete the order. On the order confirmation screen, click on the Add To Site button:
You can also manually upload the extension the way you would any other WordPress plugin. Simply go to Plugins > Add New > Upload Plugin from your WordPress dashboard.
Tips for Tracking and Managing Your WooCommerce Orders 🧾
Once you get your e-commerce site rolling and customers start placing orders, it’s important for you to have a process for managing and tracking those sales. Fortunately, this is another aspect of online selling that WooCommerce helps simplify and streamline.
The WooCommerce plugin includes a feature that lets you see the status and details of your orders. You can locate this under WooCommerce > Orders:
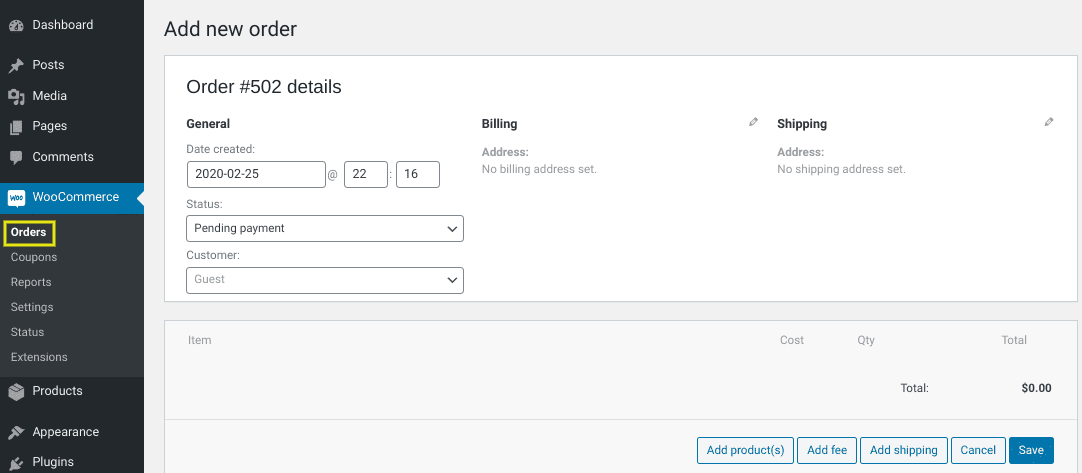
Once orders are placed, you can use this area to view the order status (pending payment, refunded, etc.). This is also where you can go to change billing and shipping information, send order emails, and more.
Another helpful feature we’d be remiss not to mention is the WooCommerce Reports. You can locate this under WooCommerce > Reports:
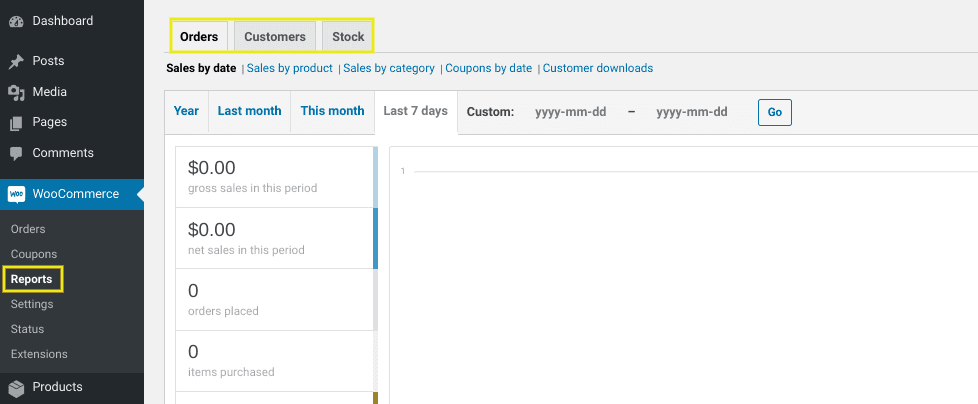
Here, you can find detailed summary reports on your online store. You can view the gross and net sales over the past week or other time periods. You can also find information for:
- Placed orders
- Items purchased
- Refunds issues
- Product stock
- Sales and taxes
You can use this information to help gather meaningful insights into how your online store is performing and use it to improve your selling strategy. Moreover, you can export the reports in CSV format to easily integrate them with your own records.
These are just some of the built-in WooCommerce features that can make tracking and managing your orders easier. You can also take it a step further by using plugins and extensions.
For example, as we mentioned earlier, the WooCoomerce Google Analytics and WooCommerce PDF Invoice and Packing Slips plugins can make tracking customer information and fulfilling orders directly from your dashboard quicker.
WooCommerce Frequently Asked Questions ❔
At this point, you hopefully have a solid understanding of how WooCommerce works and, more importantly, how it can benefit you. However, you still might have some questions and concerns that we can help clarify. Let’s take a look at some of the most frequently asked questions about WooCommerce.
Is WooCommerce Free to Use?
WooCommerce is free to download and use. However, as with any type of website, you’ll need a domain name and hosting. So, at the very minimum, you’ll need to factor in the cost of these items.
Beyond this, you don’t need to make any purchases unless you want to. WooCommerce doesn’t have any recurring or licensing fees. The only money you may end up spending while using it is if you want to purchase premium themes or extensions.
As with any type of website, your investment will influence your return. If you want a generic, basic e-commerce shop, there are plenty of free or inexpensive options to choose from to help accomplish this. On the other hand, if you plan on creating a robust, intricate e-commerce business, you’ll probably want to opt for some premium themes and plugins that provide advanced features and functionalities.
Can I Use WooCommerce If I Don’t Have a WordPress Site?
WooCommerce is a WordPress plugin. You can download it from either the WordPress Plugin Directory or from the WooCommerce website.
However, it does not work as a standalone product. In order to use it, you need to have a WordPress installation and hosting account.
What Type of Products Can I Sell Using WooCommerce?
One of the great things about WooCommerce is the wide range of applications it has. You can use it to sell just about any product, including:
- Physical goods that need to be shipped (clothing, electronics, home goods, etc.)
- Digital items that are downloaded (software, e-books, etc.)
- Recurring services (subscriptions, memberships, etc.)
It’s a powerful and popular e-commerce solution used by businesses across every industry.
Does WooCommerce Come With Support?
WooCommerce is an open-source platform built by hundreds of global contributors. As one of the most popular solutions, there is an active WordPress support community that makes regular updates, contributions, tutorials, etc. about the platform. In addition, the WooCommerce website offers an extensive database of documentation you can access to find answers to specific questions you have.
What Payment Options Are Supported By WooCommerce?
WooCommerce offers support for all the major payment gateways, as well as some you may not find a need for. The supported payment options include:
- PayPal (Built-in)
- Stripe (Built-in)
- Amazon Pay
- Authorize.net
- PayFast
- FirstData
In addition to these payment gateways, WooCommerce also lets you accept in-person payments via Square or PayPal Here. You can visit the WooCommerce website for a full list of WooCommerce payment options.
Wrapping Up ✔️
Setting up an online store may seem like it would be an expensive and time-consuming process. However, with the right e-commerce platform, it can actually be quite the opposite. This is why we recommend using WooCommerce to beginners.
In this post, we explained how you can get started with WooCommerce in four steps:
- Install the WooCommerce plugin* and configure your settings.
- Add a new product to your WooCommerce store.
- Choose a theme for your store.
- Select relevant extensions to expand the functionality of your WooCommerce store.
Once you get your e-commerce site up and running, it’s also important to make sure it’s properly and continuously maintained. At WP Buffs, we’re a leader in WordPress security and care. Our 24/7 Care Plans and Packages can help keep your WordPress site in quality condition so you can work on other critical aspects of business, like fulfilling your online orders!
Want to give your feedback or join the conversation? Add your comments 🐦 on Twitter.
Image credit: Mike Petrucci.
