Best / stock.adobe.com
When adding new code to your website, it’s important to make sure that everything still works correctly afterward. Testing the new functionality helps you make sure that nothing went wrong during the process. However, you’ll also want to ensure that any design-related changes were implemented without a hitch.
That’s where visual regression testing tools come into the picture. They can help you confirm that your web pages still look as they should after you make changes to your site’s code. Using these kinds of tools minimizes the risks associated with WordPress updates, as well as with any custom changes.

In this post, we’ll explain what visual regression testing is and how it works. Then we’ll introduce four visual regression testing tools you can try out. Let’s get started!
In This Article 🔍
What Is Visual Regression Testing? 🧐
When you make changes to your WordPress site, there’s always a risk that the update will cause unwanted changes to the functionality and/or design of your pages. New code can affect the way elements previously looked and functioned.
In a nutshell, visual regression testing is a way of identifying visual defects in your web pages. It can help you make sure that your WordPress updates and modifications don’t wreak havoc on your designs and layouts.
Visual regression testing involves capturing screenshots of your web pages and comparing them against original, baseline versions (the result is often referred to as a ‘diff’). The purpose is to discover any deviations between versions, so you can resolve the unintended discrepancies quickly.
[bctt tweet=”🔦 Visual regression testing helps you notice errors in your web page designs before your visitors do. #WordPress” username=”thewpbuffs”]
This is particularly important when it comes to mobile and responsive design. Let’s say that someone is trying to use a page on your site from their mobile device. However, they’re having a difficult time reading or navigating the page due to overlapping text or images. Of course, this will thwart the User Experience (UX) and can increase your bounce rate by driving the visitor away.
Visual regression testing helps you avoid that kind of problem. Plus, it enables you to improve the front end or User Interface (UI) of your WordPress website.
Visual regression testing, at its core, involves capturing and comparing screenshots. While you could do this manually, that’s not a very efficient method. In contrast, automated testing can save you a lot of time.
Visual regression testing tools present an alternative, automated approach to testing web pages. They run through a site or application, taking screenshots and comparing versions to ensure that each page appears properly across different browsers.
Plus, these tools don’t just examine the page as a whole, but the specific blocks and elements as well. For example, if you add a text block to a web page, visual regression testing doesn’t just make sure the text is visible. It also helps you make sure that text appears exactly how you want it to look.
What’s more, these testing tools can help you spot even the most subtle changes, including fine details and pixel-level differences. For example, let’s say a change causes the font size of a Call to Action (CTA) button to increase by just a few pixels. This isn’t something you’d likely detect on your own.
However, when you use a visual regression testing tool, it will take a screenshot of the new page and compare it to the original or baseline version. If any changes are present, it will highlight exactly what’s different, so you can take action if needed.
Now that you have a better understanding of what visual regression testing is and what it’s used for, it’s time to explore some of the tools that can get the job done for you. The four visual testing tools we’ll introduce are:
- Screenster
- Wraith
- PhantomCSS
- BackstopJS
1. Screenster
If you’re looking for a web-based visual regression testing tool that doesn’t require any coding, Screenster is worth considering:

This tool combines screenshots with DOM and CSS verifications. Its algorithms run comparison tests and automatically detect visual changes in your content. It uses smart selectors to identify any page elements that have been moved or modified. Plus, it doesn’t require an installation or a browser plugin.
Additional features include:
- Coded and codeless tests
- Local and offline testing
- Automatic change comparison and detection
- The option to ignore dynamic content
To get started, you can sign up for a free account. You can also choose from various premium plans and packages, depending on your specific needs. Since this is a web-based tool, you can also try it online using just your email address. From there, you can create a test:
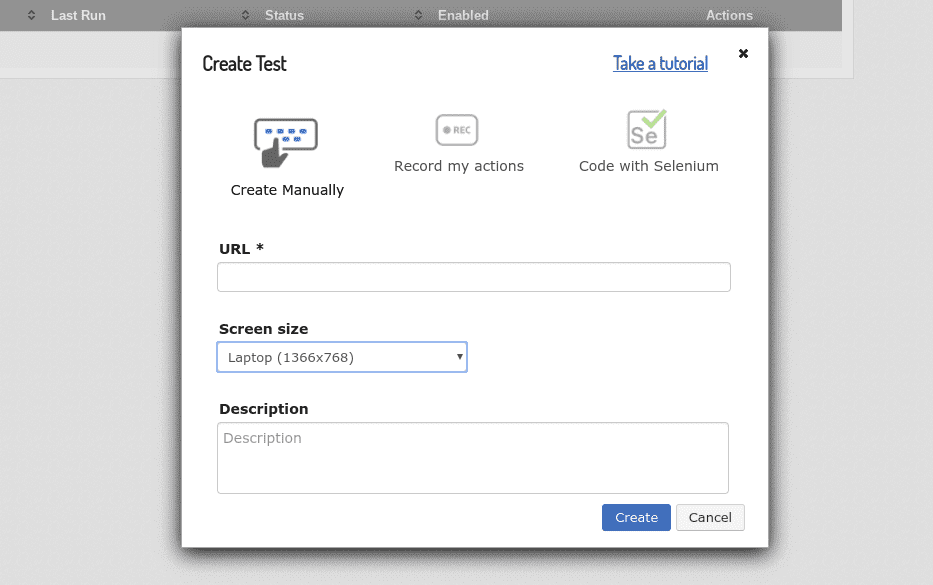
Screenster will record your actions, then use the results as a visual baseline. To learn more about using Screenster, you can visit its documentation and support page.
2. Wraith
Wraith is a screenshot comparison tool developed by the BBC News team:
This visual testing tool uses a headless browser to compare screenshots of web pages in different environments, from live websites to testing and staging platforms. It can be particularly useful for crawling two websites at once, and testing sites with dynamic content via a ‘capture mode’. You can also use it to compare pages on one website over time.
Additional features include:
- Resolution variation
- Breaking point testing
- Page responsiveness testing
Wraith works by taking screenshots of your web pages and then running a comparison between them. You will get a gallery.html package that contains a ‘diff’ PNG file with the image comparisons (the changes are highlighted in blue). It also includes a data.txt file letting you know what percentage of pixels have been changed.
Unlike Screenster, Wraith does require installation and scripting in order to use it. There are a few prerequisites you’ll need as well, including:
Pantheon offers helpful guidance on using Wraith for visual regression testing. You can also refer to Wraith’s setup and installation documentation for more details.
3. PhantomCSS
PhantomCSS is another free visual regression testing tool to consider. You can use PhantomCSS for basic visual tests and responsive layout testing. It’s a great option if you’re well-versed in JavaScript.
PhantomCSS runs on CasperJS, PhantomJS, and Resemble.js. CasperJS captures the screenshots, and then PhantomCSS uses Resemble.js to compare the screenshots to the baseline images. It looks for pixel differences and creates image diffs that you can refer to.
There are various ways to go about installing and using PhantomCSS. However, one of the easiest options is to use the Grunt plugin:

Together, PhantomCSS and Grunt can make the integration and automation of visual regression testing easier. To use PhantomCSS and Grunt, you’ll first need to install Grunt and create a Gruntfile. Once that’s done, you can install the Grunt plugin and load the PhantomCSS task.
At first, this can seem like a tedious and complicated process, particularly if you’ve never used Grunt before. However, one of the benefits of using PhantomCSS is the plethora of guidance, tutorials, and support available for using it. It’s been around for a while, so there is a fountain of resources and information on GitHub to refer to.
4. BackstopJS
Last but not least, you can use BackstopJS to automate visual regression testing for responsive websites and applications:
BackstopJS lets you compare DOM screenshots over time. It creates screenshots of web pages at multiple screen sizes to use as references. You can use those to find any regressions that might be present after changing your site’s CSS.
Like PhantomCSS, BackstopJS also uses Resemble.js, CasperJS, and PhantomJS (or SlimerJS). Additional features include:
- Scenario display filtering
- A visual diff inspector
- CLI reports
- Chrome-headless rendering
One of the main advantages of BackstopJS is how easy it is to use. To get started, you’ll just need to run the global npm installer. From there, you can locate your project directory and run backstop init.
To run a test, you would use backstop test from the root directory. To approve a batch of changes, you can use backstop approve. For further guidance and instruction, check out the BackstopJS page on GitHub.
Wrapping Up 💡
When you make updates to your WordPress website, it’s crucial to verify that the changes didn’t break anything. This means making sure both the site’s functionality and design are still intact.
In this post, we’ve looked at four visual regression testing tools you can use for no-risk WordPress updates:
- Screenster: A web-based visual comparison tool that combines screenshots with DOM and CSS verifications (without requiring any coding).
- Wraith: A useful tool for testing and comparing sites with dynamic content.
- PhantomCSS: A free visual regression testing tool that’s ideal if you’re well-versed in JavaScript.
- BackstopJS: Automates visual regression testing for responsive websites and applications.
Want to give your feedback or join the conversation? Add your comments 🐦 on Twitter.
Image credit: Nonsap Visuals.


