Julien Eichinger / stock.adobe.com
At any moment, your website might be under attack without you knowing it. Bots could be probing your pages, trying to find vulnerabilities to inject malware or gain access to user data. It’s your job to secure your WordPress site so it isn’t low-hanging fruit for them.

Although WordPress is secure in and of itself, that doesn’t mean there aren’t steps you can take to protect your content further. A few changes here and there can turn your website into a fortress and ensure your user data remains safe.
In this guide, we’re going to talk about WordPress security in general. Then we’ll teach you how to secure a WordPress site in seven key steps. Let’s get right to work!
In This Article 🔭
Is WordPress Secure? Understanding WordPress Security and Vulnerabilities 🤷♂️
Yes, WordPress is secure, but it depends on you to keep it that way. The Content Management System (CMS) receives regular updates to patch vulnerabilities, and there is a large community of people dedicated to ensuring its ongoing security.
However, WordPress is massive. The open-source CMS powers over 30 percent of the web and its scale makes it a juicy target for cyber-attackers. With those kinds of numbers, it’s no wonder that WordPress ‘cleanups’ (fixing hacked sites) make up 90 percent of business for services such as Sucuri.
[bctt tweet=”🧹 WordPress cleanups make up 90 percent of security service business. #WordPress” username=”thewpbuffs”]
Think about it this way – if there’s a popular plugin with a vulnerability, it can affect anywhere from thousands to hundreds of thousands of sites. If a hacker discovers the issue and decides to exploit it, one simple flaw could result in damage to a vast number of online properties.
This problem can become exacerbated when users fail to update plugins, themes, or WordPress core. Outdated code is even more vulnerable to malicious attacks, which is why it’s important to pay attention when developers release new versions.
WordPress is secure. However, once you throw human error into the mix, things have a tendency to go haywire. Depending on your choices, you can end up exposing your website to attacks.
How to Secure a WordPress Site in 7 Simple Steps 👮♀️
There’s a lot of generic security advice online such as using strong passwords and backing up your data. These basics are certainly valuable, but we’re not going to waste your time by repeating them in this post. Instead, we’re going to focus on more advanced approaches to secure your WordPress site.
- Pick a secure web hosting service
- Set up a Secure Socket Layer (SSL) certificate and enable HTTPS
- Use plugins and themes that receive regular updates
- Protect your login page
- Integrate an activity log solution
- Manage user permissions
- Whitelist access to your WordPress dashboard
Step 1: Pick a Secure Web Hosting Service
Perhaps one of the most important things you can do to secure your WordPress site is to start with a strong foundation. This means choosing a reputable and reliable hosting provider.
Some web hosts enforce higher security standards and go the extra mile to keep your website safe. Budget options may be attractive, but they generally cut corners in one way or another to keep costs down.
If you want to avoid a lot of headaches for years to come, opt for the best WordPress hosting right away. Here are some of our top recommendations:
All three services offer managed WordPress hosting plans. That means they take care of certain maintenance tasks for you, such as running updates. They also secure your server and employ various threat detection and prevention measures.
[bctt tweet=”👨💻 Using the right #WordPress web host can make all the difference when it comes to security” username=”thewpbuffs”]
If you want to look at more options, check out our list of approved services. Any of them will make for a quality hosting partner.
Step 2: Set Up an SSL Certificate and Enable HTTPS
HyperText Transfer Protocol Secure (HTTPS) is an encrypted version of regular HTTP. This means all the data that moves between a user’s browser and the website they’re visiting is safe from bots that might try to intercept it.
Most browsers let you know if you’re viewing a secure website with a simple padlock icon next to the URL:

To enable HTTPS for your own website, you need a Secure Sockets Layer (SSL) certificate. It validates your website so visitors know their information is protected.
These days, most of the websites you visit probably use HTTPS and have valid SSL certificates set up. Users are becoming smarter when it comes to online safety and are more likely to steer clear of sites that aren’t secure, so it’s to your benefit from a traffic standpoint, too.
Plus, HTTPS is so crucial for keeping the web safe that search engines actively favor sites that use this protocol. You can even get SSL certificates for free, so there’s no excuse not to set one up, even if you don’t deal with sensitive data such as credit card details.
Step 3: Use Plugins and Themes that Receive Regular Updates
Software that receives regular updates from its developers is, generally speaking, more secure. Take WordPress, for example. For each major version release, there are often several security patches and minor upgrades in between:
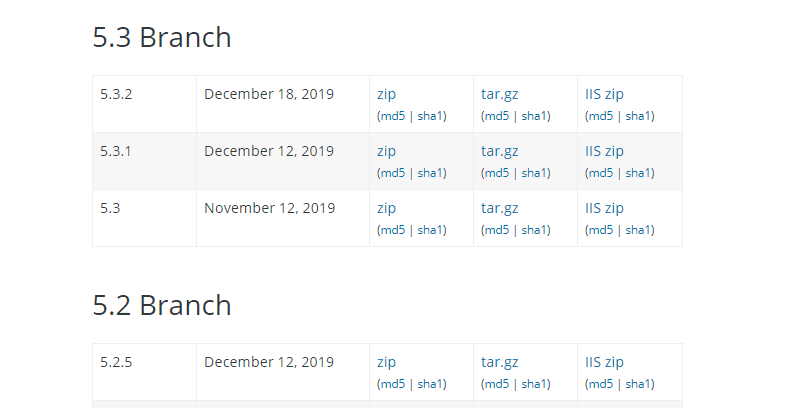
That same logic applies to plugins and themes. The more extensions you run, the more potential attack vectors your site has. That makes it all the more important for you to only use tools that receive regular updates.
The question is, what constitutes ‘regular updates’? As far as we’re concerned, we won’t touch a plugin or theme that hasn’t been upgraded within the last six months. That’s almost an eternity in development cycles and it generally shows there’s a lack of interest in continued maintenance.
Whether you’re downloading plugins and themes from WordPress.org or other sources, you can usually see the most recent update date. If there are reviews, you’ll also want to take a closer look at them:

Additionally, remember to run updates for your plugins and theme periodically. It’s a simple thing, but you’d be surprised at how many people forget about it, even with WordPress dashboard notifications:

If you’re using managed WordPress hosting, your provider may take care of updates for you. Alternatively, you could also invest in a maintenance service such as one of our WP Buffs Care Plans to accomplish the same outcome. That’s one less task for you to worry about.
Step 4: Protect Your Login Page
Your Login page is the gateway that keeps attackers outside of your dashboard. However, the security of this area depends entirely on you. If you choose to reuse passwords or create easy-to-guess credentials, you’re doing your website a disservice.
If you’re ready to step up your Login page’s security, there are a lot of other changes you can implement to make a big difference, such as:
Merely changing the default WordPress Login page address from yourwebsite.com/wp-login.php is enough to stop a lot of the most straightforward attacks on your website. However, in case someone does identify your new URL, limiting the number of login attempts can dissuade attackers as well.
Step 5: Integrate an Activity Log Solution
Activity or audit logs are one of the most useful security tools you can have in your WordPress arsenal. In a nutshell, they record any noteworthy events that occur on your website and enable you to easily browse that data:

Take the example we mentioned before of someone trying to crack your Login page. An activity log plugin will let you know every time someone tries to access your WordPress dashboard and whether they succeed or fail. If you see a large number of failed attempts from the same IP address, then you know a bot was likely trying to hack your site.
The types of events that an activity log enables you to track will depend on which tool you use. Some of our favorite plugins for the job include:
- WP Security Audit Log. An in-depth tool that enables you to track almost everything that happens on your website. That includes login attempts, profile changes, errors, and more.
- Simple History. If you want something that’s easier to use, Simple History doesn’t offer as much in-depth information, but it still enables you to track events such as failed logins.
Activity logs may seem like overkill. However, you’ll be glad you have access to the data they provide in the event something goes wrong with your website. After all, if you can pinpoint the source of security breaches, even after they’ve occurred, you can better prevent them from happening again.
Step 6: Manage User Permissions
Enforcing correct user roles is critical if you’re using complex software such as WordPress. As the administrator, you have full access to every part of the CMS and you can change anything you want. However, no other user should have that same level of permissions.
Out of the box, WordPress includes five default roles you can assign to new users, each with a different set of permissions:
- Administrator: Has full access to all content, plugins, themes, and settings.
- Editor: Can make changes to all content, comments, and related settings, but not plugins, themes, or site-wide options.
- Author: Is able to edit, publish, and delete their own posts.
- Contributor: Can edit and delete their own posts.
- Subscriber: Has permission to view your site and (in some cases) leave comments.
From a security standpoint, permissions are very cut-and-dry. It’s an effective system by default, but if you want to lock your dashboard down even further, there are plugins that enable you to modify user roles, such as the aptly-named User Role Editor:

A smart rule of thumb is that no one should have more permissions than they need to do their job. As few people as possible should have full access.
7. Whitelist Access to Your WordPress Dashboard
If you want to take dashboard security a step further, you can whitelist specific IP addresses so only those users can access the back end of your site. It’s an effective approach, but it also poses some technical difficulties. For example:
- You’ll have to routinely add new IPs to the list for users without static addresses.
- You yourself will need to have a static IP, so you don’t lose access.
Depending on your Internet Service Provider, you might not have a static IP address. However, that’s something you can work around by using a Virtual Private Network (VPN).
You can even set up your own VPN with the right software and a cheap Virtual Private Server (VPS), to save a little money and get full privacy. If you want to implement a whitelist, you’ll need to edit WordPress’ .htaccess file, which is easier than you might imagine.
Wrapping Up 💪
Securing a WordPress website isn’t all that complicated, but it does take some time. Fortunately, a lot of the most popular safety measures don’t require much maintenance after you implement them. A little extra work now can keep your website safe for years to come.
When it comes to securing WordPress, you’ll want to start by choosing a reliable host and setting up an SSL certificate. Then, follow up by reinforcing your Login page defenses and controlling who has access to your dashboard.
If you don’t have time to go through all your WordPress settings and incorporate advanced plugins, you can always try our premium maintenance services. At WP Buffs, we offer multiple levels of Care Plans that can help secure your WordPress site!
Want to give your feedback or join the conversation? Add your comments 🐦 on Twitter!
Image credit: Chris Panas.
